Paperless-ngx AI: Auto-Tag Documents with Claude
Want Paperless-ngx to sort your documents on its own, without an AI creating hundreds of new tags? Paperless-ngx 3 can do that out of the box. By the end you have a cleaned-up taxonomy, a Claude connection, and a workflow that gives every new document a title, tags, a correspondent and a document type, using only the categories you already have.
Quick summary
- Paperless-ngx 3 has built-in AI features. An LLM (large language model, a text AI like Claude) suggests a title, tags, correspondent and document type, and a workflow applies those suggestions automatically.
- This guide is for you if you run Paperless with Docker Compose and want your documents filed automatically, but under your control.
- You need a Paperless instance running on Docker Compose, shell access to the host, an API key from the Anthropic Console, and enough RAM for the AI jobs.
- The embeddings (number vectors used for semantic search and “similar documents”) run locally. Only the classification goes to Claude.
Before this, I used the external add-on paperless-ai with GPT-4o-mini to tag documents in Paperless 2.15.3, and it tagged with everything it could think of. I ended up with 923 tags, 129 document types and 424 correspondents, and searching had become useless. In this guide I show you how to clean up, upgrade, and set up the AI with Claude so it only works with your own tags.
In every command, /opt/paperless is the folder that holds your docker-compose.yml and docker-compose.env. If your Compose stack lives somewhere else, use that path instead. webserver is the name of the Paperless service in the official Compose file.
Step 1: Create an export as a rollback point
Before you delete or merge anything, make a full export. Paperless ships with the document_exporter for this. The export contains the originals, the archived PDFs and all metadata, and you can import it into an empty instance later.
cd /opt/paperless
docker compose exec webserver document_exporter ../export
../export is the path inside the container (/usr/src/paperless/export). In the official Compose file it is mounted to the ./export folder next to your docker-compose.yml, so the files end up in /opt/paperless/export. Check that this volume entry exists in your Compose file, otherwise the export stays inside the container. According to the docs, API tokens are not part of the export and have to be created again after an import.
If something goes wrong during the cleanup, this export gets you back to where you started. Keep one thing in mind: an export can only be imported into the exact Paperless version that created it. It contains an exact copy of the database, and migrations can change the layout.
Step 2: Rebuild the taxonomy
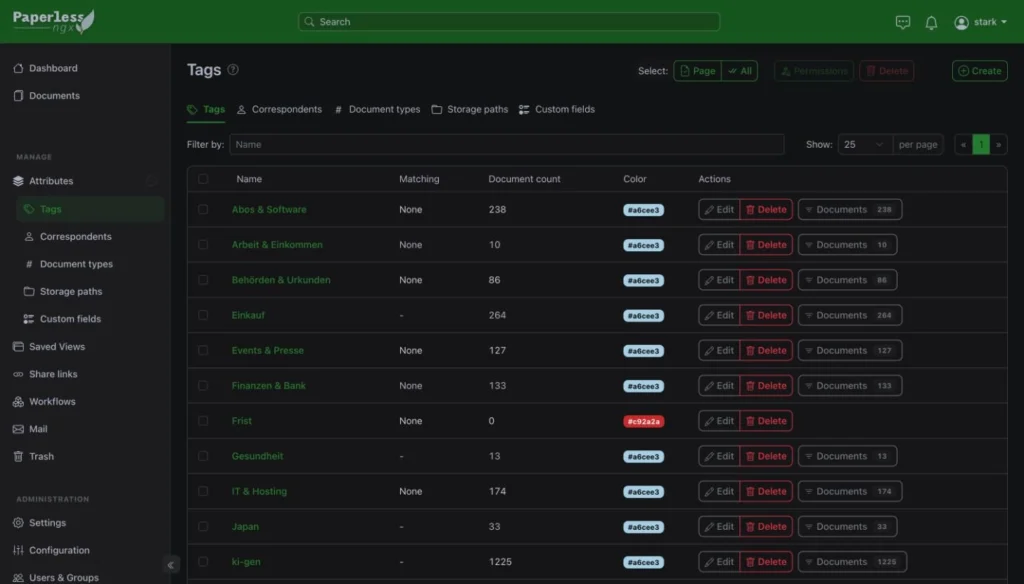
First decide what structure you actually want, then map everything onto it. That’s much faster than going through hundreds of tags one by one. Here’s what I was left with:
| Before | After | |
|---|---|---|
| Tags | 923 | 17 area tags plus “New” and “Deadline” |
| Document types | 129 | 16 |
| Correspondents | 424 | 226 |
The area tags cover broad areas of life. My tip: create an inbox tag like “New”. Everything that comes in gets it, and you remove it once you’ve looked at the document. A tag like “Deadline” marks everything where you still need to do something. For correspondents, merge duplicates and delete everything that no longer has a document assigned.
Step 3: Upgrade to 3.3.0
If you also want to move to a clean Docker Compose install while you’re at it, do the upgrade in stages:
- Export from the old instance (see above)
- Set up a fresh Paperless 2.15.3 instance with Docker Compose and import the export
- Update to 2.20.15
- Update to 3.3.0
The fresh instance has to run exactly the same version as the old one during the import. That’s why you pin the image to 2.15.3 first and only move to newer versions after the import. You run the import with the counterpart of the exporter. Copy the export folder to /opt/paperless/export on the new instance first:
docker compose exec webserver document_importer ../exportFor each update, change the image tag in docker-compose.yml and restart the stack. On the way to 2.20.15, the database migrations run automatically at startup:
cd /opt/paperless
docker compose pull
docker compose up -d
For the jump to 3.3.0, adjust the environment first and only change the image tag after that. You can only reach Paperless 3 from 2.20.15. Read the v3 migration guide before you update. Two changes affect almost everyone. PAPERLESS_SECRET_KEY is now required, and Paperless won’t start without it. And if you use PostgreSQL, you have to set the database engine explicitly with PAPERLESS_DBENGINE=postgresql. Add both to the webserver’s environment, for example in docker-compose.env:
PAPERLESS_SECRET_KEY=<your-long-random-value>
PAPERLESS_DBENGINE=postgresql
You can generate a suitable key like this:
python3 -c "import secrets; print(secrets.token_urlsafe(64))"If you never set your own key before, Paperless ran with a built-in default. The new key invalidates the old sessions, so you get logged out once and sign in again.
Once the environment is updated, set the image tag to 3.3.0 and restart the stack with docker compose pull and docker compose up -d.
For Office documents and emails, add Apache Tika and Gotenberg 8 to the Compose stack. Pin Tika to version 3.3.1.0, because Tika 4 broke Paperless for me. Here’s the relevant part of docker-compose.yml:
services:
  webserver:
    image: ghcr.io/paperless-ngx/paperless-ngx:3.3.0
  gotenberg:
    image: gotenberg/gotenberg:8
  tika:
    image: apache/tika:3.3.1.0
For Paperless to actually use the two services, the webserver needs three variables in its environment block (or in docker-compose.env). The hostnames gotenberg and tika are the service names from the Compose file:
PAPERLESS_TIKA_ENABLED=1
PAPERLESS_TIKA_ENDPOINT=http://tika:9998
PAPERLESS_TIKA_GOTENBERG_ENDPOINT=http://gotenberg:3000
The complete template with database, Redis broker, volumes and the recommended Gotenberg options (JavaScript off, no external content when converting emails) is in the official repo as docker-compose.postgres-tika.yml. Use that file as your base and only change the image tags.
For OCR (text recognition on scans), set the languages of your documents. For me that’s German, French and English. Paperless expects the three-letter Tesseract codes, and you join several with +:
PAPERLESS_OCR_LANGUAGE=deu+fra+engGerman, English, French, Italian and Spanish are already included in the Docker image. For other languages, also set PAPERLESS_OCR_LANGUAGES. Every extra language costs noticeably more CPU time during OCR, so only add the ones you really need.
Step 4: Connect the built-in AI to Claude
Paperless 3.x can talk to an LLM directly, so you no longer need an add-on. Choose openai-like as the backend. That’s the name of the OpenAI-compatible backend both in the environment variable and in the web UI under “LLM Backend”. Point it at Anthropic’s OpenAI-compatible endpoint:
https://api.anthropic.com/v1/Use Claude Haiku as the model. In practice, you add these variables to docker-compose.env (or to the environment block of the webserver):
PAPERLESS_AI_ENABLED=true
PAPERLESS_AI_LLM_BACKEND=openai-like
PAPERLESS_AI_LLM_ENDPOINT=https://api.anthropic.com/v1/
PAPERLESS_AI_LLM_API_KEY=<your-anthropic-api-key>
PAPERLESS_AI_LLM_MODEL=<claude-haiku-model-id>
You’ll find the current model ID for Haiku in Anthropic’s model overview. Copy the ID exactly as it appears in the API column. Then restart the stack with docker compose up -d so the container picks up the new variables.
You can also set all AI options in the web interface under Settings → Application Configuration. Values saved there take priority over the environment variables. So if a change in docker-compose.env seems to do nothing, check there first.
Expect your first test to return an error. Haiku rejects the temperature parameter that Paperless sends along. The fix is one line in the Paperless container’s environment:
PAPERLESS_AI_LLM_EXTRA_PARAMS={"temperature": null}With this, the parameter is no longer set and the requests go through. According to the OpenAI compatibility docs, the endpoint accepts temperature values between 0 and 1. With Claude 4.7 and newer models, any value below 1 returns a 400 error, and so does a request that sets temperature and top_p at the same time. Paperless passes the values from PAPERLESS_AI_LLM_EXTRA_PARAMS to the provider without checking them, and they override its own.
Anthropic itself describes the OpenAI compatibility layer mainly as a tool for testing and comparing models. According to the docs, it isn’t meant as a long-term production solution for most use cases. For a private Paperless instance it works, but expect to adjust the parameters again after Paperless updates or new models.
Keep the embeddings for semantic search and similar documents running locally. If your documents aren’t all in English, use a multilingual model like paraphrase-multilingual-MiniLM-L12-v2. Nothing leaves the server for the embeddings, and only the classification goes to Claude. Add two variables for this:
PAPERLESS_AI_LLM_EMBEDDING_BACKEND=huggingface
PAPERLESS_AI_LLM_EMBEDDING_MODEL=sentence-transformers/paraphrase-multilingual-MiniLM-L12-v2
The first time it runs, Paperless downloads the embedding model from Hugging Face into its data folder. The container needs internet access once for this, plus some disk space. After that, build the AI index once from scratch:
cd /opt/paperless
docker compose exec webserver document_llmindex rebuild
You need the rebuild when you first turn the feature on and every time you switch the embedding backend or model. After that, Paperless adds new and changed documents to the index automatically once a day, controlled by PAPERLESS_LLM_INDEX_TASK_CRON.
Step 5: Create a workflow that doesn’t invent new tags
The workflow is what separates this from the old mess. Attach it to the “Document Added” trigger and let the AI set four things: title, tags, correspondent and document type. These two settings matter most:
- Turn “Create missing” OFF. The AI can then only pick from existing tags, types and correspondents and won’t create anything new. Creating new ones is exactly what paperless-ai did on my instance.
- Turn Overwrite ON so the AI can also set fields that already got a value during import. Tags are the exception: suggested tags are always added and never replace existing ones.
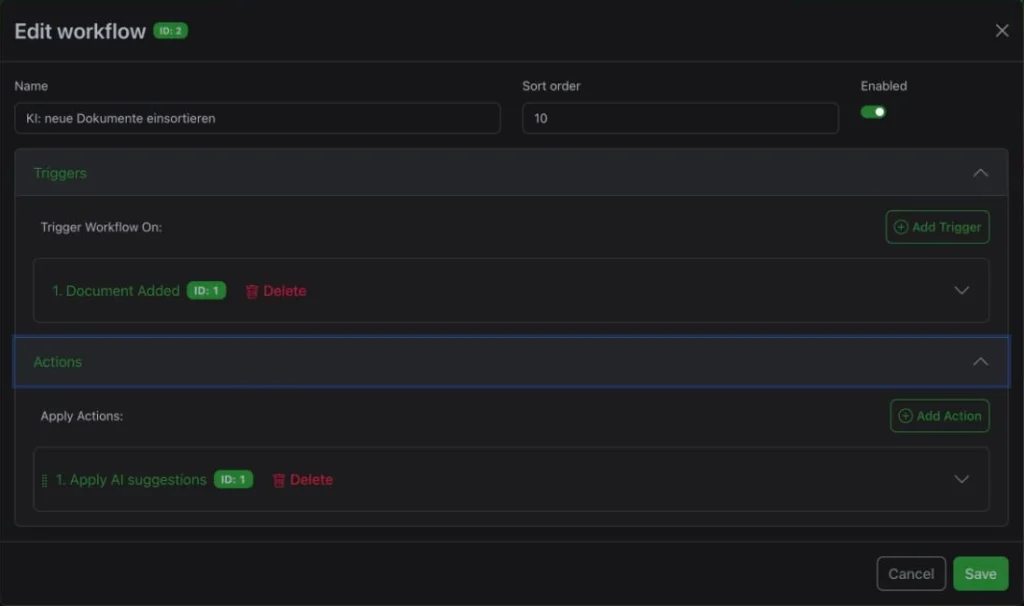
The action runs in the background because the request to Claude takes a few seconds. The document is updated as soon as the answer arrives.
Filing your existing documents
Next, run your existing documents through the AI once so they match the new structure too. For me that was 166 documents. The “Document Added” workflow won’t fire for them because they’re already there. Here’s how you can do it with a second workflow and a helper tag:
- Create a tag like “AI-Backfill”.
- Create a workflow with the “Document Updated” trigger and set the trigger filter to documents with the “AI-Backfill” tag.
- Give it two actions: “Apply AI Suggestions” with the same settings as above, and a “Removal” action that removes the “AI-Backfill” tag again. That way each document only runs through once.
- In the document list, select a group of documents, say 20 to 30, and assign “AI-Backfill” to them with Bulk Edit through the tag menu. That counts as an update and starts the workflow.
- Wait until the tasks are done, check a few results, then move on to the next group.
The Paperless docs recommend small batches too. Every matching document is one API request, costs money, and blocks the task queue while it runs. New documents get processed more slowly during that time. When you’re done, you can disable the backfill workflow.
Common problem: not enough RAM during the backfill
Don’t run the AI index rebuild and the backfill at the same time. My container had 6 GB of RAM and died with an out-of-memory error while doing both. Since then it has 12 GB, and the two jobs never run in parallel. My tip: let the index finish first, then start the backfill.
Check that it works
- Open any document and click “Suggest” on its detail page. If you get suggestions for title, tags and correspondent, the connection to Claude works.
- If you get an error instead, check the logs:
docker compose logs -f webserver. A 400 error abouttemperaturemeans thePAPERLESS_AI_LLM_EXTRA_PARAMSline is missing or wasn’t picked up. - Once the index is built, the chat in the top bar answers questions about your documents and links to the sources.
- Upload a test document. After a few seconds it should have a title, tags, correspondent and document type, and no new entry shows up under Tags.
Limit costs and automate backups
Create a separate API key just for Paperless and set a spending limit in the Anthropic Console. Mine is 5 dollars. If a workflow ever gets stuck in a loop, the damage stays small.
Run the export from step 1 every week with cron. One entry in the host’s crontab is enough, for example Sundays at 3 a.m.:
0 3 * * 0 cd /opt/paperless && docker compose exec -T webserver document_exporter ../exportThe -T matters because cron has no terminal, and docker compose exec fails without it. Remember that you can only restore this export into the same Paperless version too. Write down which version is running every time you update.
This cron job writes to the same folder every week and only updates files that changed. It doesn’t keep older versions: if you accidentally delete something on Monday, it’s gone from the export after the next Sunday too. If you want to be able to go back several weeks, add --zip to the command. Paperless then creates a separate ZIP file with the date in its name on every run, and you clean up old ZIPs yourself so the disk doesn’t fill up. Or back up the export folder with your regular backup tool that keeps versions.
Make Paperless family-friendly
If other family members should use Paperless without calling you, give each of them their own user without admin rights. That way nobody deletes tags or changes workflows by accident. Set the interface to their language. With the “New” inbox, everyone sees right away what just came in. In my setup, exactly this kind of account is meant for my mom.
It gets even easier with a document scanner that supports scan-to-folder over SMB (Windows file sharing). The scanner then drops the PDFs straight into Paperless’s consume folder, and the workflow does the rest. That’s my next step.
If you still need to set up Paperless and don’t have a server yet, a mini PC* is enough, as long as you give it enough RAM for the AI jobs.
Wrapping up
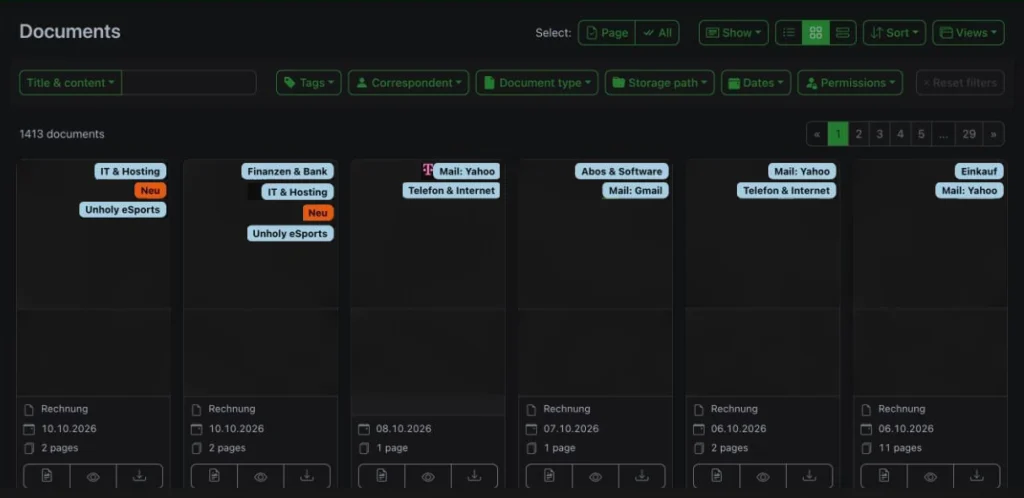
As long as “Create missing” is off, your taxonomy stays the way you built it. For me that means 17 area tags plus “New” and “Deadline”. New documents land in the inbox with a title, type and correspondent, and all you do is remove “New” once you’ve looked at them.
Do you already use the AI in Paperless, and with which model? Let me know in the comments.
* Affiliate link: As an Amazon Associate I earn from qualifying purchases. It costs you nothing extra. More info
Did this guide help you? You can buy me a coffee on Ko-fi. It keeps MappleBox ad-free.