Home Assistant on Proxmox: Install HAOS as a VM Step by Step
If you already have a Proxmox server or a mini PC running Proxmox, it’s the most convenient place for Home Assistant. You get the full Home Assistant OS with its app store, automatic updates and backups, and the machine can keep running other services on the side. In this guide I’ll show you how to install Home Assistant as a virtual machine, pass through a Zigbee stick and reach your smart home safely when you’re away.
Quick summary
- Home Assistant is an open source hub for your smart home. It connects lights, sensors, smart plugs and devices from different brands and controls them with automations.
- Home Assistant OS (HAOS for short) is the ready-made operating system for it. It includes the Supervisor, which manages updates, backups and apps (formerly called add-ons).
- This guide is for anyone who already runs Proxmox and doesn’t want a separate Raspberry Pi just for Home Assistant.
- You need about 2 CPU cores, 4 GB of RAM and 32 GB of storage for the VM, plus an optional Zigbee or Thread stick.
Why a VM and not LXC or Docker?
Home Assistant comes in several flavors. The container version (Docker) also runs inside an LXC, but it has no Supervisor. Without the Supervisor you can’t install apps like Mosquitto, Zigbee2MQTT, Matter Server or Tailscale with one click, and you have to handle backups and updates yourself. Home Assistant OS as a VM is the officially supported option with every feature included. With 2 cores and 4 GB of RAM, the extra overhead of a VM compared to a container is small.
By the way, since Home Assistant 2026.2, add-ons are called apps. Older guides still say add-ons, and they mean the same thing. You’ll find them under Settings > Apps.
What you need
- A Proxmox VE host with access to the web interface and the shell. I run two Home Assistant VMs on two Minisforum mini PCs.
- Free resources: 2 cores, 4 GB of RAM and 32 GB on a storage such as
local-lvm. Officially 2 GB of RAM is enough, but that gets tight quickly once you add a few apps. - A fixed IP address for the VM, ideally through a DHCP reservation in your router, for example
192.168.1.50. - Optionally, a USB radio stick for Zigbee or Thread.
Step 1: Create the VM with the helper script
The fastest way is the community’s Proxmox VE Helper-Scripts. The haos-vm script downloads the official HAOS image straight from GitHub, unpacks it and builds a matching VM from it. The image is a .qcow2 file, which is a ready-made disk image for KVM. In the Proxmox interface, open the host’s shell (click the node, then Shell) and run:
bash -c "$(curl -fsSL https://raw.githubusercontent.com/community-scripts/ProxmoxVE/main/vm/haos-vm.sh)"This runs someone else’s script as root. If you want to know exactly what it does, take a look at the code on GitHub first. The script asks whether you want to use the default settings. They’re sensible choices:
| Setting | Script default |
|---|---|
| CPU cores | 2 |
| RAM | 4096 MB |
| Disk | 32 GB as scsi0 with SSD emulation and discard |
| BIOS | OVMF (UEFI) with EFI disk |
| Machine type | q35 |
| Network | Bridge vmbr0 |
| Version | Stable (Beta and Dev are available) |
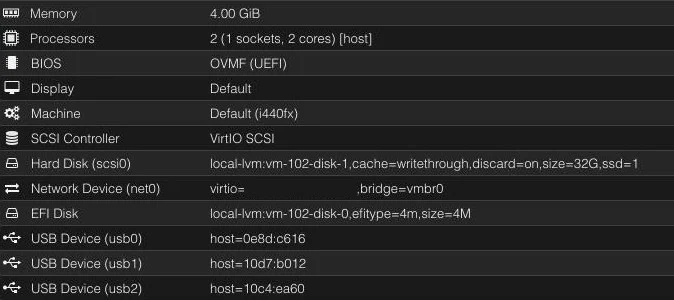
The advanced settings let you choose the VM ID, name, storage and CPU type yourself. I set the CPU type to host so the VM sees the real features of the processor. The only downside is if you want to live-migrate the VM to a host with a different CPU. Both of my VMs run exactly like this: 2 cores, 4 GB of RAM, a 32 GB disk, UEFI and CPU type host. The older one still uses the i440fx machine type, and that works just as well.
If you’d rather do everything by hand: the official Home Assistant installation page has the KVM/Proxmox image under “Alternative” as haos_ova-<version>.qcow2.xz. You then create a VM with OVMF BIOS and Secure Boot turned off, import the unpacked file as a disk and set it as the boot drive. The script does exactly these steps for you.
Afterwards, check the VM’s Options to make sure Start at boot and the QEMU Guest Agent are both turned on. The script already sets both, but a quick look doesn’t hurt. HAOS ships with the agent, so Proxmox can show the VM’s IP address in the summary and shut it down cleanly.
Step 2: First-time onboarding
The first start takes a few minutes because Home Assistant finishes setting itself up on first boot. At some point the VM console shows the IP address. Then open this in your browser:
http://homeassistant.local:8123
# or directly by IP
http://192.168.1.50:8123
If you only see a loading page, give it a little longer. After that, onboarding walks you through the basic settings:
- Create a new smart home or restore from an existing backup.
- Create a user account. This account is the admin, so pick a strong password.
- Set your location, time zone and units. The location is used for sunrise, weather and presence detection.
- Decide which anonymous usage data you want to share. All of it is optional.
- Add the devices it found. Home Assistant detects many devices on your network automatically, such as printers, TVs or smart plugs.
The first thing to do afterwards is install updates. Available updates for Core, Supervisor and the operating system show up at the top of Settings.
Step 3: Pass through a Zigbee or Thread stick over USB
Zigbee and Thread are wireless standards for low-power smart home devices. For Home Assistant to use them, the VM needs direct access to the USB stick. This is called USB passthrough. Plug the stick into the Proxmox host and list the connected devices in the host shell:
lsusbEach line contains an ID in the format vendor:product, for example 10c4:ea60 on many sticks with a Silicon Labs chip. In the Proxmox interface, go to the VM, then Hardware > Add > USB Device and choose Use USB Vendor/Device ID. In the dropdown below, pick your stick by the ID from lsusb. You can also do it in the shell, here for the VM with ID 100:
qm set 100 -usb0 host=10c4:ea60Mapping by device ID has one advantage: the stick is still recognized if you plug it into a different USB port. Then restart the VM completely, meaning shut it down in Proxmox and start it again. Home Assistant usually picks up the stick on its own as a new device, for example for the ZHA integration (Zigbee Home Automation). My Berlin instance has three USB devices attached to the VM this way, including the Zigbee stick.
A tip from experience: put Zigbee sticks on a short USB extension cable. Plugged directly into a mini PC’s case, USB 3 ports and the power supply noticeably interfere with the radio signal.
Matter and Thread
Matter is the newer cross-brand standard for smart home devices. Many Matter devices communicate over Thread. In Home Assistant you add the Matter integration, which installs the Matter Server as an app. For Thread devices you also need a Thread border router, which is either a stick with Thread firmware or a device you already own, like a compatible smart speaker. Matter uses IPv6 and multicast on your local network, so your network needs to support that. If you use UniFi, UniFi Network 11: the most important changes covers the new Matter and Thread support in the controller.
Step 4: Set up backups
Home Assistant has a built-in backup system under Settings > System > Backups. Set up automatic backups there: a schedule (daily is recommended), how many backups to keep and where to store them. Besides local storage, you can add a network drive (NAS) as a target. You do that under Settings > System > Storage with the usage set to “Backup”.
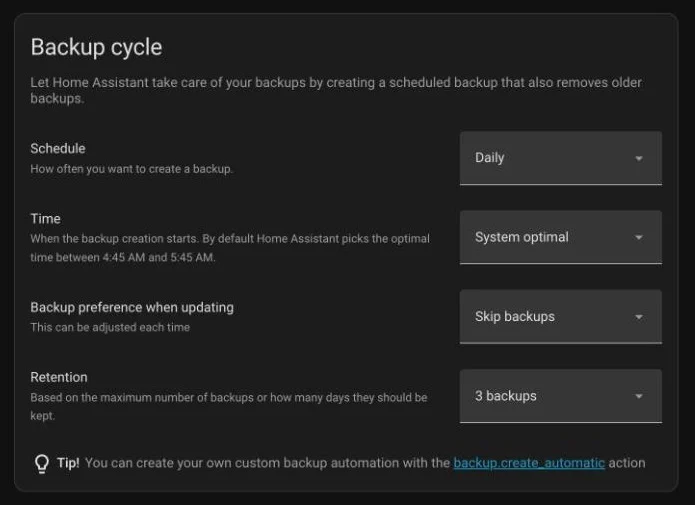
The backups are encrypted. During setup you download an Emergency Kit that contains the key. Keep it somewhere outside Home Assistant, for example in your password manager. Without this key you can’t restore a backup.
It’s also worth backing up the whole VM in Proxmox: Datacenter > Backup > Add, with a schedule and a target like a NAS or Proxmox Backup Server. That gives you two ways back: a quick full restore of the VM, and the Home Assistant backup, which you can also restore on new hardware.
Step 5: Remote access without open ports
Don’t just expose port 8123 to the internet with port forwarding. There are two convenient and safe options:
- Tailscale app: Under Settings > Apps, install the Tailscale app from the Home Assistant Community Apps, start it and sign in to your Tailscale account through the app’s web interface. After that you can reach Home Assistant from any device in your tailnet, which is your private Tailscale network. With the
advertise_routesoption the app can even share your whole home network. You then need to approve the route in the Tailscale admin console. - Home Assistant Cloud: The paid subscription from Nabu Casa, the company behind Home Assistant. You get remote access without any setup of your own, integration with Alexa and Google Assistant, and a cloud backup. The subscription also funds Home Assistant’s development.
If you want to run Home Assistant behind your own reverse proxy with HTTPS, I show how in Caddy as a reverse proxy in the homelab. A reverse proxy is a server that sits in front of your services and forwards requests to them. Home Assistant rejects requests coming through a proxy until you mark it as trusted in configuration.yaml:
http:
  use_x_forwarded_for: true
  trusted_proxies:
    - 192.168.1.20   # IP of your reverse proxy
The change only takes effect after a restart: go to Settings > System, click the power icon at the top right and choose Restart Home Assistant.
Check that it works
- In Proxmox, the VM’s summary shows an IP address. That means the guest agent is running.
- Settings > System > Repairs shows no open issues, and Settings > About lists the versions of Core, Supervisor and the operating system.
- Restart the Proxmox host as a test. Home Assistant should come back up on its own.
- Create one manual backup and check that it lands in the right place.
- If you have uptime monitoring, add
http://192.168.1.50:8123to it. I explain how I do that with Uptime Kuma in Uptime Kuma and ntfy in the homelab.
Common problems
The VM doesn’t boot and ends up in the UEFI shell. This usually happens with a manual install when Secure Boot is on or the wrong disk is set as the boot drive. Check under Options > Boot Order that the imported disk is at the top. When you create the EFI disk, leave Pre-Enroll keys unchecked, otherwise Secure Boot is turned on.
homeassistant.local doesn’t work. Some networks and devices can’t resolve .local names. Use the IP address from the VM console or from your router instead.
The Zigbee stick isn’t detected. After adding the USB device, shut the VM down completely and start it again. A restart from inside Home Assistant isn’t always enough. On the host, use lsusb to check that the ID is really correct.
The disk is full. Enlarge the disk in Proxmox under Hardware: select the disk, then Disk Action > Resize. HAOS expands its data partition on its own at the next start. Often the cause is old backups or a large database, though, and lowering the number of backups you keep helps.
“400: Bad Request” behind the reverse proxy. The trusted_proxies entry is missing or the proxy’s IP is wrong. The logs under Settings > System > Logs show which address the request came from.
Wrapping up
With the helper script, Home Assistant OS is up and running on Proxmox in a few minutes. The VM gives you everything the container version lacks: apps, the Supervisor, and one-click updates and backups. I run two instances this way at two locations, each with 2 cores and 4 GB of RAM, and that’s plenty for Zigbee, automations and a few apps. You can read how my locations fit together in My homelab across two locations. Next, set up backups and plan your remote access before you start adding devices.
Did this guide help you? You can buy me a coffee on Ko-fi. It keeps MappleBox ad-free.