How to Stream GTA 6 from Your PS5 with OBS and the AVerMedia Live Gamer ULTRA 2.1
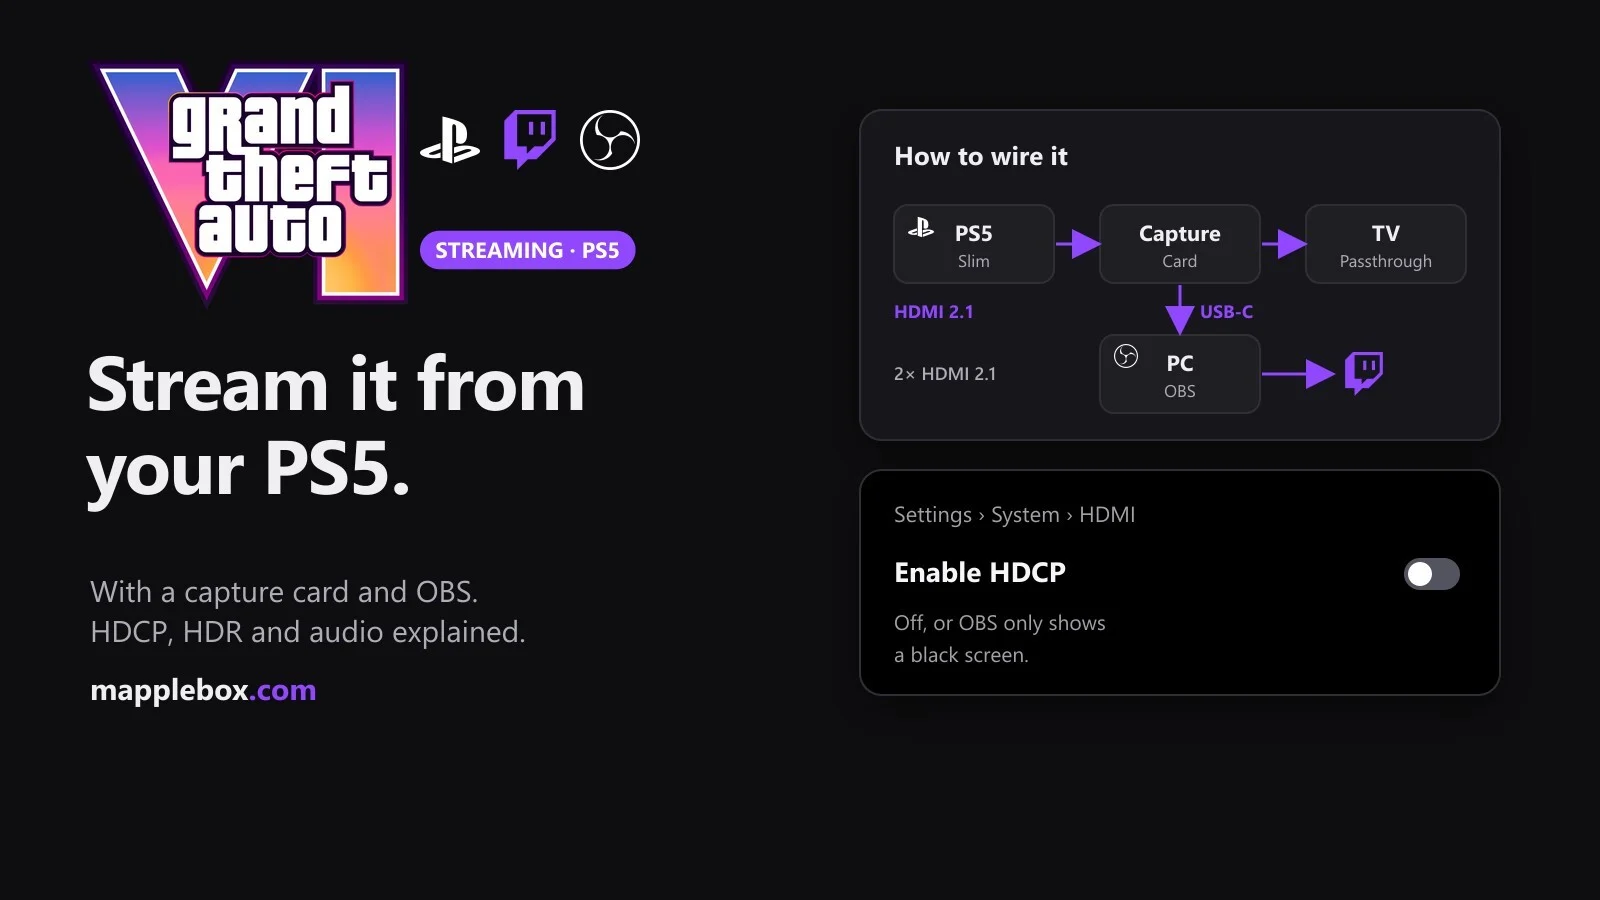
GTA 6 launches on November 19, 2026 for PS5 and Xbox Series X|S, and Rockstar hasn’t announced a PC version. So if you want to stream it with your own OBS scenes, a webcam and alerts, you need a capture card between your PS5 and your PC. This guide walks you through the whole setup with the AVerMedia Live Gamer ULTRA 2.1 (GC553G2): cables, firmware, PS5 settings and the finished source in OBS. You keep playing on your TV with zero added lag, and OBS gets a clean copy of the picture.
The PS5 can also stream straight to Twitch or YouTube without any extra hardware (Create button, then Broadcast). That’s the fastest option, but you get no OBS scenes, overlays or alerts, which is what this setup adds.
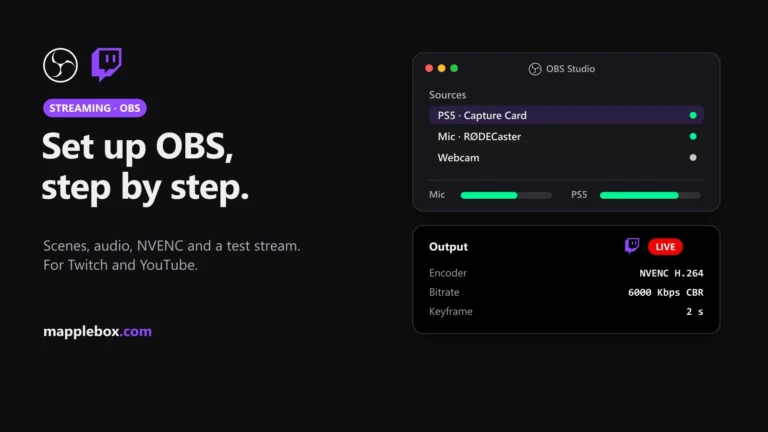
This guide covers the PS5 and the capture card. For setting up OBS itself, meaning profile, encoder, bitrate, mic and desktop audio, see my full guide on how to set up OBS Studio.
Quick overview
- Capture card: a small box that sends your PS5’s HDMI picture to your PC over USB. OBS treats it like a webcam.
- Two HDMI cables: you need 2x Ultra High Speed HDMI (HDMI 2.1). One goes from the PS5 to the card, the second from the card to your TV.
- Passthrough: the card also forwards the untouched signal to your TV or monitor. You play on the TV with no delay while the stream runs on the side.
- HDCP: copy protection built into the HDMI signal. As long as it’s on, OBS only gets an HDCP warning instead of your game. You turn it off for streaming.
- HDR: the wider contrast and color range of modern TVs. Twitch shows streams in regular SDR. If the PS5 sends HDR and OBS treats the picture as SDR, it looks pale and washed out. Step 3 shows you how to fix that.
- Who this is for: you have a PS5 and a Windows PC with a recent NVIDIA, AMD or Intel graphics card, and you want to stream with OBS.
What you need
- PS5 (standard, Slim, Digital or Pro) on current system software
- Capture card: AVerMedia Live Gamer ULTRA 2.1 (GC553G2)*. In the box: an HDMI 2.1 cable, a USB-C to USB-C cable (10Gbps) and a 4-pole 3.5mm audio cable.
- 2x Ultra High Speed HDMI cables (HDMI 2.1, 48Gbps): cable 1 from the PS5 to the card’s HDMI IN, cable 2 from the card’s HDMI OUT to your TV. One of them is the HDMI 2.1 cable from the card’s box. For the second one, get a certified Ultra High Speed HDMI cable*. Certified cables carry a label with a QR code on the package.
- A USB-C port with USB 3.2 Gen 2 (10Gbps) on your PC. On a slower port (USB 3.2 Gen 1, 5Gbps) the card only captures at lower resolutions. If your PC only has 10Gbps USB-A ports, AVerMedia says a USB-C to USB-A cable works too.
- A Windows PC on Windows 10 or 11 (64-bit). AVerMedia lists an Intel Core i5 6th gen or AMD Ryzen 3 plus a GeForce GTX 1060 or Radeon RX 5700 as the minimum. For streaming, use your graphics card’s hardware encoder: NVENC on NVIDIA, AMF on AMD, Quick Sync on Intel. That’s a dedicated chip on the GPU that compresses the video without loading your CPU.
- OBS Studio, free. Twitch Enhanced Broadcasting needs version 30.2 or newer, HDR streaming to YouTube needs 30.1 or newer. The screenshots show OBS 32.2.2 in English.
- Assist Central Pro, AVerMedia’s free software, for the card’s firmware update (step 1).
- A mic on your PC for commentary. Optionally a webcam.
My test setup: a PS5 Slim* on the Live Gamer ULTRA 2.1, a Windows 11 PC with OBS 32.2.2, and a Shure MV7+* mic connected over XLR* to a RØDECaster Pro II*.
*Affiliate link: if you buy through it, I earn a small commission at no extra cost to you. As an Amazon Associate I earn from qualifying purchases. More in the affiliate disclosure.
According to AVerMedia, the card passes through up to 4K at 144Hz, which covers the PS5’s 4K at 120Hz, including HDR and VRR. VRR stands for variable refresh rate: your TV follows the game’s changing frame rate, which prevents stutter and tearing. In OBS you capture up to 4K at 60fps in standard dynamic range (SDR). The exact limits per format are in step 4.
How the setup works
- HDMI cable 1: PS5 HDMI out → HDMI IN on the card
- HDMI cable 2: HDMI OUT on the card → your TV or monitor (passthrough, this is what you play on)
- USB-C cable: USB-C on the card → a USB-C port on your PC (10Gbps)
The ports are labeled on the card: HDMI IN, HDMI OUT and USB-C, plus two 3.5mm jacks for a headset and a controller. Your TV no longer connects straight to the PS5. It sits behind the card. The TV picture never goes through your PC, so there’s no input lag while you play. OBS gets a copy over USB.
Step 1: Connect the card and update the firmware
- Turn your PS5 completely off.
- Wire up PS5, card and TV with the two HDMI cables as shown above. AVerMedia recommends using the included cables where you can.
- Plug the USB-C cable into a 10Gbps port directly on the motherboard, not a USB hub or a front-panel port of unknown speed. Your motherboard manual tells you which port that is. It’s often labeled “10Gbps” or “SS10”.
- Turn on your PS5 and TV. Your TV shows the PS5 menu as usual through passthrough.
- Check the LED on the card. A rainbow wave means ready. Flashing orange means it’s on a USB 2.0 port. Solid red means no device detected, so check the HDMI cable from the PS5.
Firmware update with Assist Central Pro
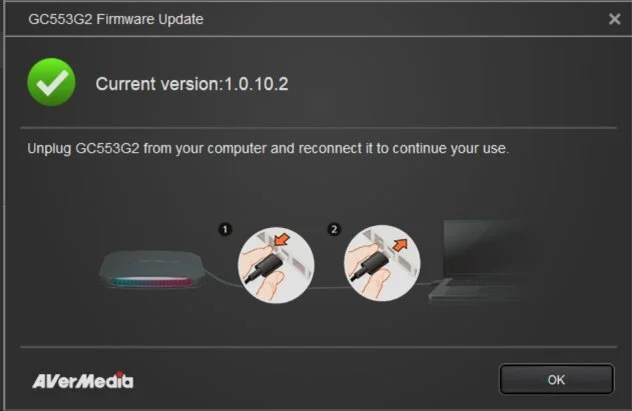
Do the update right at the start. In my test, the TV went black once after I turned HDCP off, and the passthrough picture only came back after the new firmware and one replug. The card shipped with firmware 1.0.8.1 and was on 1.0.10.2 after the update.
- Download Assist Central Pro from the AVerMedia product page and install it.
- Open the tool with the card connected over USB. Find the firmware update for the GC553G2 and start it. The tool shows you whether a new version is available.
- After the update, unplug the card from your PC and plug it back in. The update window asks you to do that too.
You don’t need any AVerMedia software for OBS itself. Windows and OBS see the card as Live Gamer Ultra 2.1-Video (picture) and HDMI/Line In (Live Gamer Ultra 2.1-Audio) (audio). There’s a second audio device called “Not To Use (Live Gamer Ultra 2.1-Audio)”, which you can ignore.
Step 2: Set up your PS5
The PS5 in the screenshots is set to UK English, so a few labels read “Colour”.
Turn off HDCP
HDCP is on by default on the PS5. With it on, the card only sends its own HDCP warning to OBS instead of your game. Your TV keeps showing the PS5 menu as usual through passthrough (it did in my test), so you can flip the setting right on your TV.
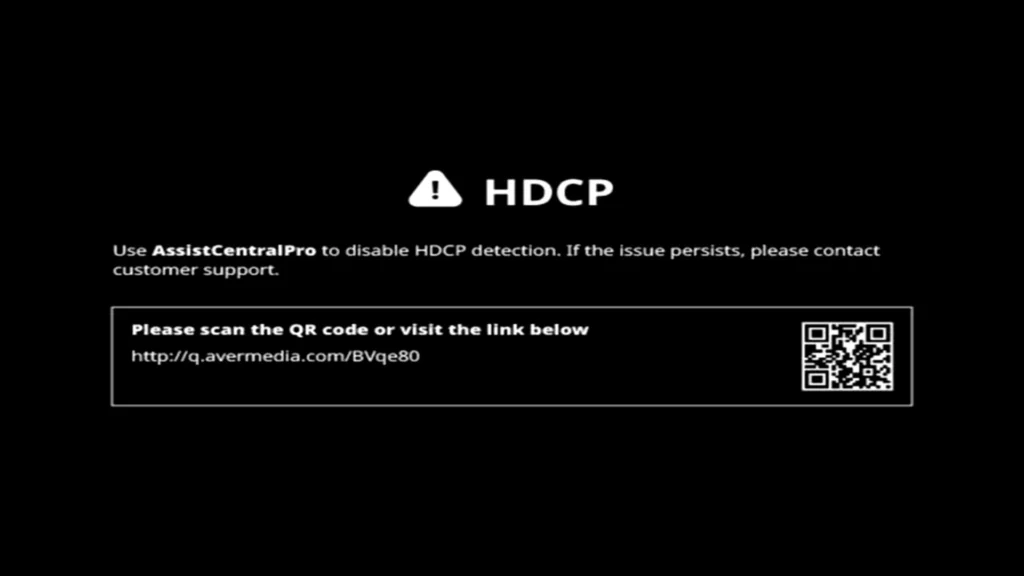
The warning mentions Assist Central Pro, but on the PS5 the fix is the console setting:
- Go to Settings > System > HDMI.
- Turn off Enable HDCP.
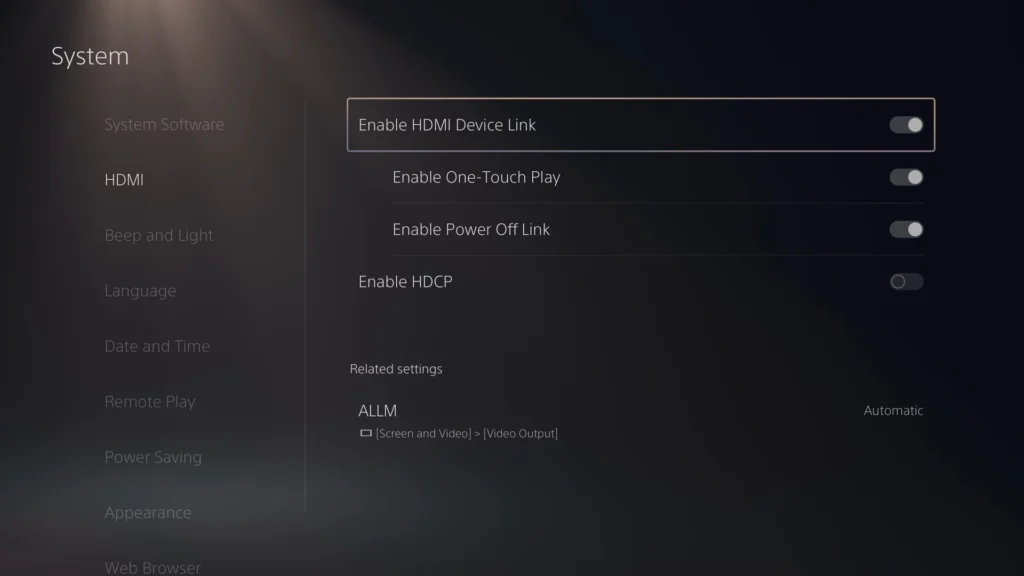
The PS5 warns you itself: with HDCP off, some games and apps can’t be used. That mostly affects streaming apps like Netflix or Disney+, and according to Sony also Blu-ray and DVD playback. AVerMedia notes that protected apps can’t be captured anyway. To watch a movie, turn HDCP back on, then off again when you’re done.
If your TV stays black after switching, do the firmware update from step 1 and unplug the card once. That’s what brought the passthrough picture back for me.
Video output settings
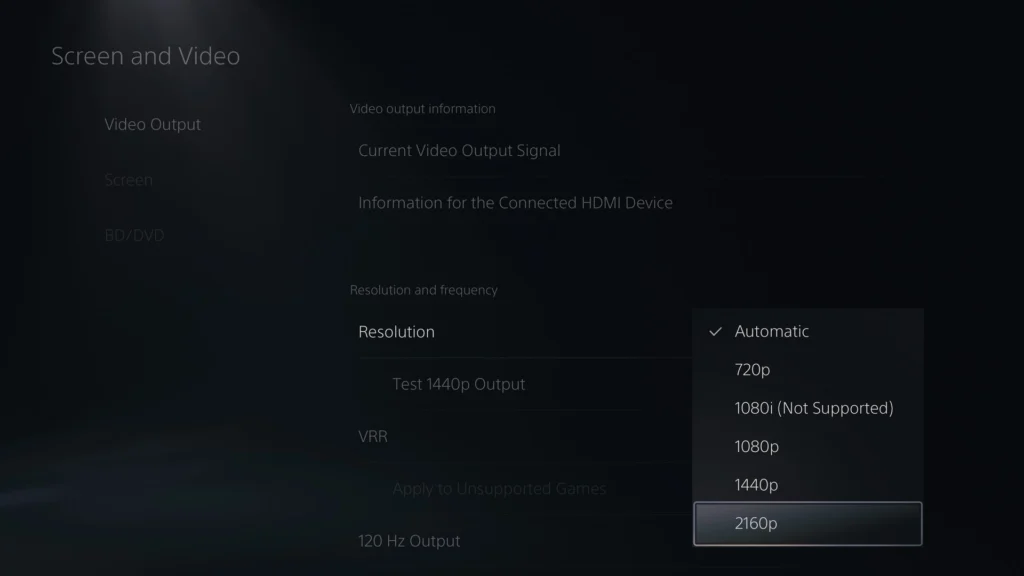
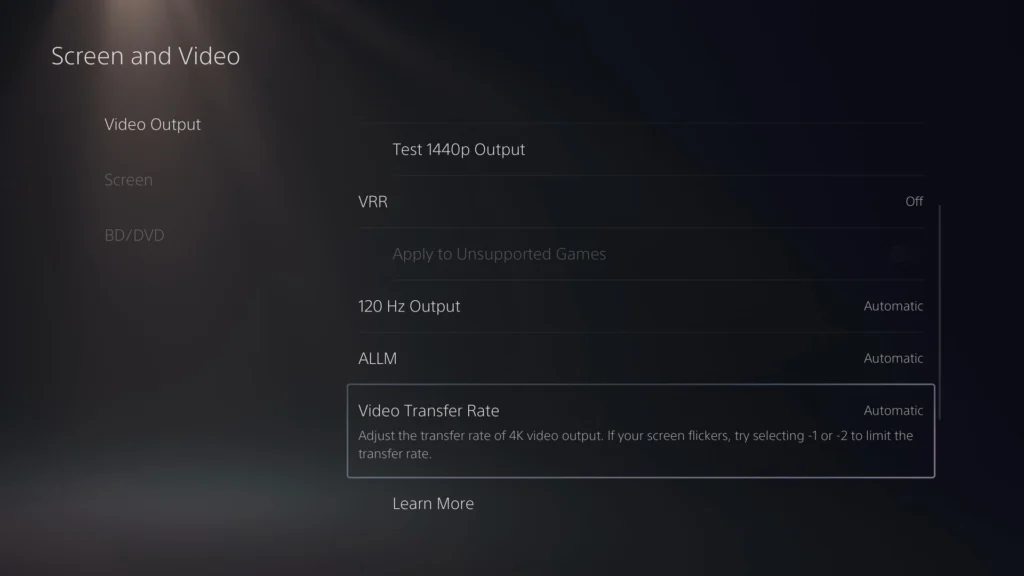
All picture settings live under Settings > Screen and Video > Video Output. The PS5 always sends the same signal to the card and the TV, so whatever you set here is also what your TV gets.
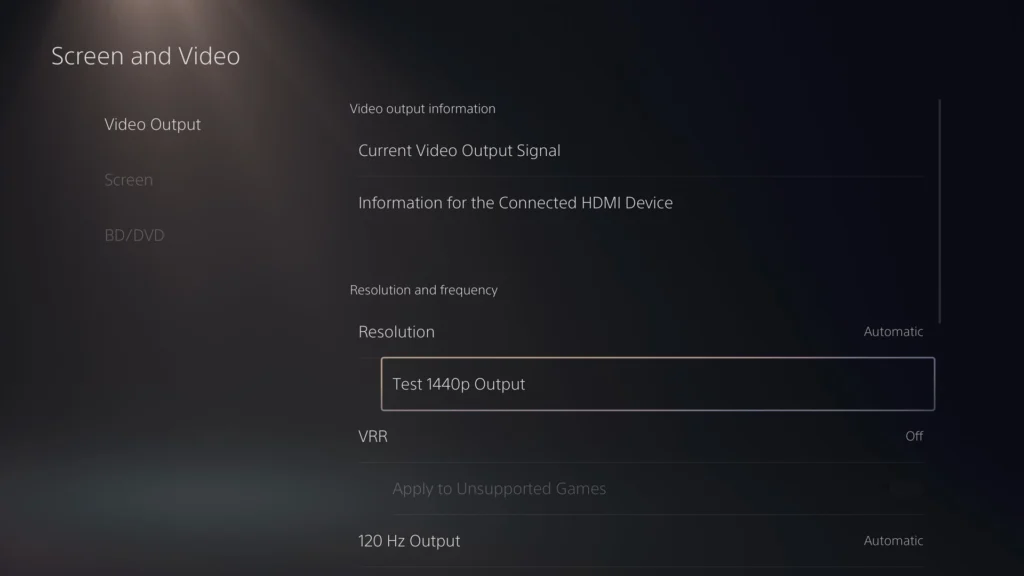
| Setting | For streaming | Why |
|---|---|---|
| Resolution | Automatic | That’s what my test ran, and OBS got a clean 1920×1080 picture (step 4). The other options are 720p, 1080i, 1080p, 1440p and 2160p. For 60fps HDR capture, switch to 1440p, see step 3. |
| HDR | Depends on your route, see step 3 | Off for the simplest Twitch stream. |
| 120 Hz Output | Off | Twitch and YouTube top out at 60fps. 120Hz only helps you on the TV, and only in games that support it. It’s set to Automatic out of the box. |
| VRR | Off | My test ran with VRR off. AVerMedia says the card passes VRR through, but I haven’t tested how it affects the OBS capture, so keep it off for streaming. |
| Video Transfer Rate | Automatic | If the picture flickers, pick -1 or -2. The PS5 suggests that itself. |
We’ll only know which graphics modes GTA 6 offers on PS5 after launch, and we’ll add them here then. Either way, 60fps is all your stream needs.
Step 3: Pick your HDR route
If the PS5 outputs HDR but the card captures in SDR, your stream looks gray and washed out. AVerMedia names this mismatch as the cause.
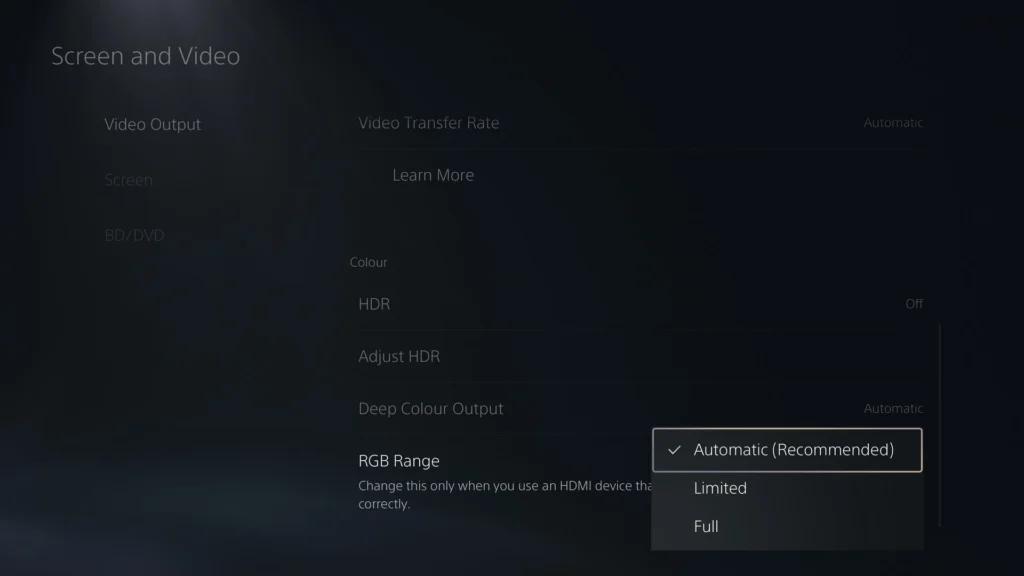
You’ll find HDR under Settings > Screen and Video > Video Output > HDR, in the color section (the UK screenshot says “Colour”). It has three options: Off, Always On and On When Supported.
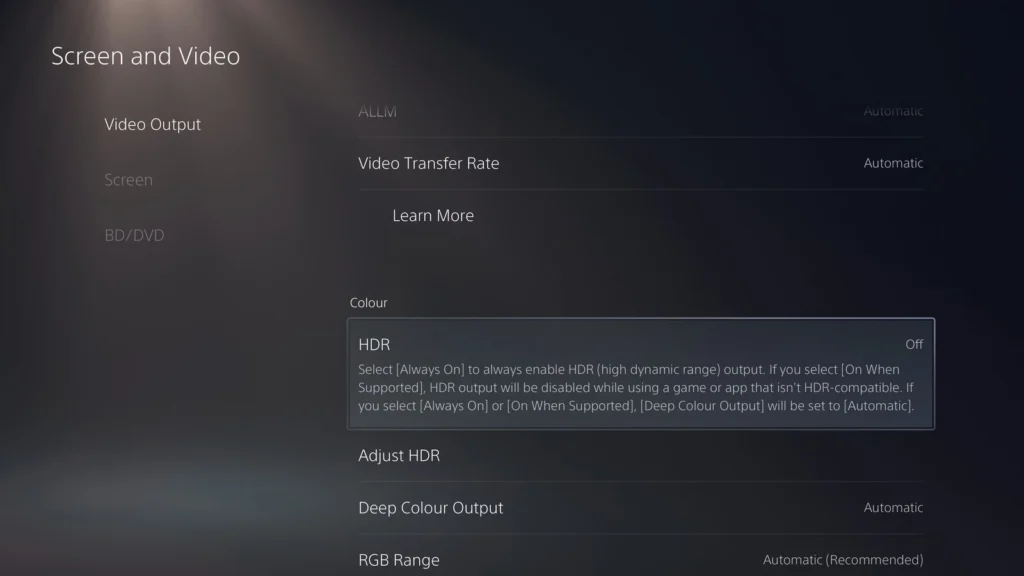
When you switch HDR, the card briefly shows “No Signal” and OBS goes black for a moment. That’s normal, and the picture comes back after a few seconds.
There are three clean ways to handle it:
| Route | PS5 HDR | In OBS | Best for |
|---|---|---|---|
| A: SDR all the way | Off | Video Format NV12, Color Space Default | Twitch, simplest and most reliable |
| B: HDR on your TV, SDR stream | Always On or On When Supported | Video Format P010, Color Space Rec. 2100 (PQ), canvas stays SDR | Twitch, if you don’t want to give up HDR yourself |
| C: HDR stream | Always On or On When Supported | Video Format P010, Color Space Rec. 2100 (PQ), canvas P010 and Rec. 2100 | YouTube, which accepts HDR live streams |
My tip: start with route A. That’s what my test ran: HDR off, 1080p, 60fps. Once your stream runs, you can try route B.
On route B, OBS converts the HDR picture to SDR automatically. That’s called tone mapping, and it works because you tell OBS in the source that HDR is coming in (Rec. 2100 color space). The result depends on the game and on your SDR White Level in OBS (300 nits by default), so always check it with a short test recording. For HDR capture, AVerMedia also recommends turning on Settings > System > Display > Use HDR in Windows. I haven’t tested whether route B really needs that.
Important for routes B and C: the card only captures HDR (P010) at 4K up to 30fps. At 60fps, HDR works up to 1440p, and at 1080p even up to 120fps. For 60fps HDR, set your PS5 resolution to 1440p. Your TV then also gets 1440p and upscales it. I haven’t tested whether the card can downscale a 4K HDR signal to 1440p while capturing, so 1440p on the PS5 is the safe route.
Step 4: Add the card in OBS
Set up OBS itself first: profile, video at 1080p60, encoder and the global audio devices. My OBS setup guide walks you through that. Then add the card:
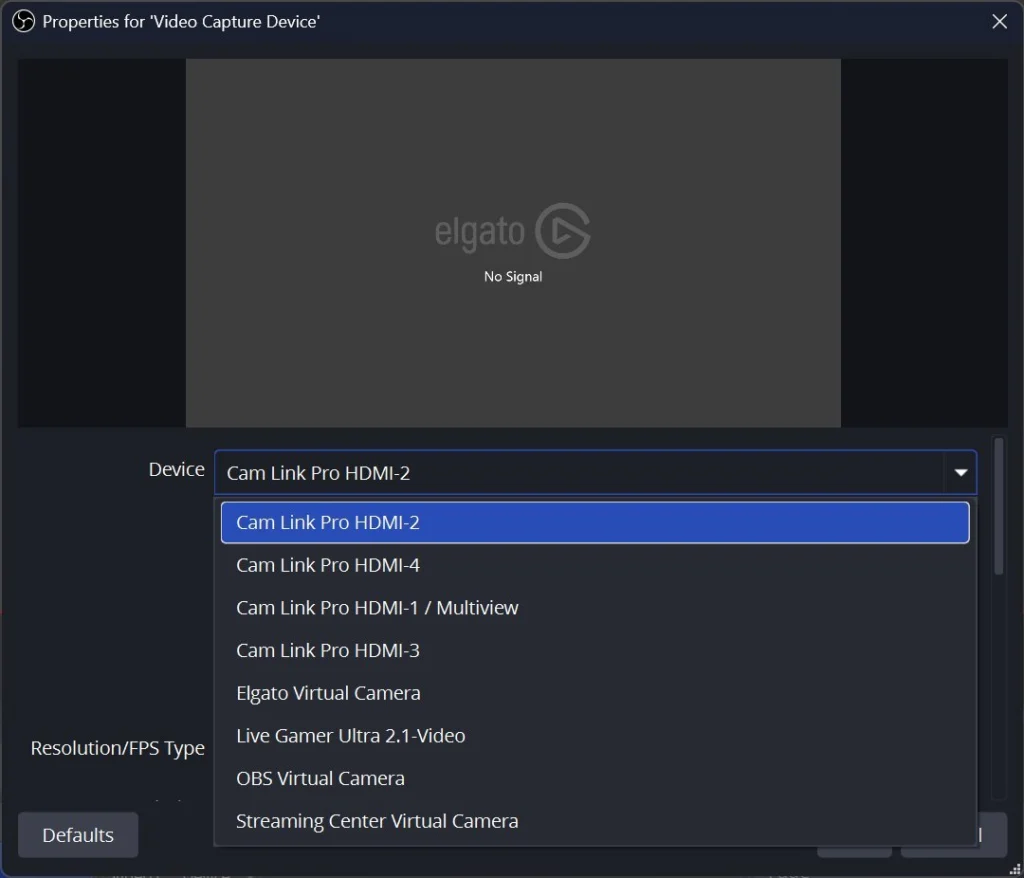
- Click the plus under Sources and pick Video Capture Device. Name it something like “PS5 (Capture Card)”.
- Under Device, select Live Gamer Ultra 2.1-Video.
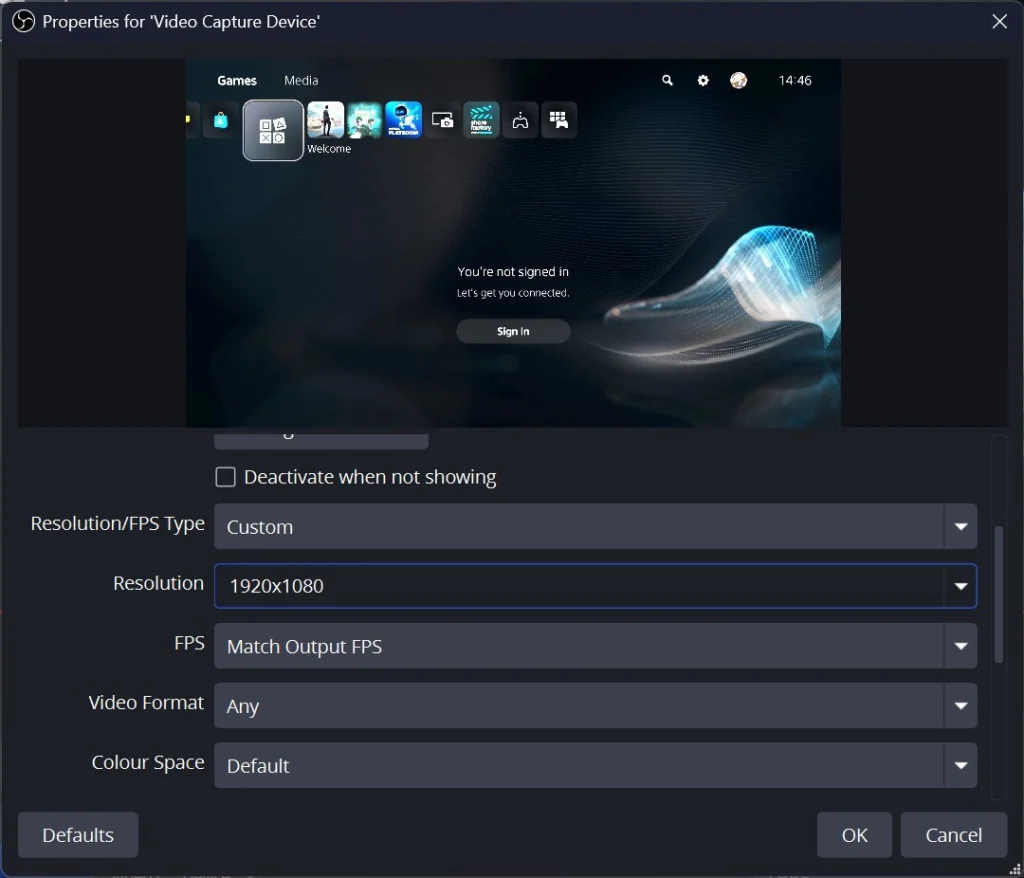
- Set Resolution/FPS Type to Custom. That’s the only way to pick resolution, FPS and video format yourself.
- Enter the values for your route from the table below. For FPS you can also pick “Match Output FPS”, which takes the 60 FPS from your OBS settings.
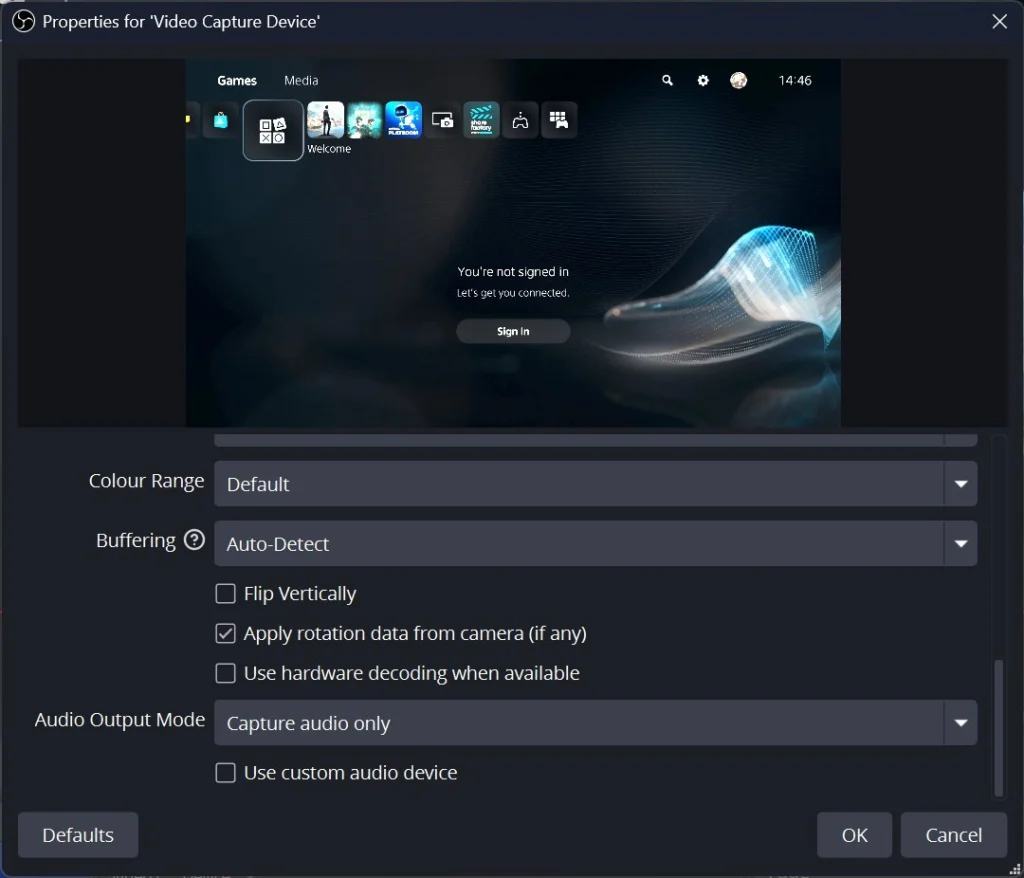
- Leave Audio Output Mode on Capture audio only. Step 5 explains why.
- Click OK and stretch the source to fill the canvas (right-click > Transform > Fit to screen).
| Route | Resolution | FPS | Video Format | Color Space |
|---|---|---|---|---|
| A (SDR) | 1920×1080 | 60 | NV12 or Any | Default |
| B (HDR on TV, SDR stream) | 2560×1440 | 60 | P010 | Rec. 2100 (PQ) |
| C (HDR stream on YouTube) | 2560×1440 | 60 | P010 | Rec. 2100 (PQ) |
For route A, set the source to 1920×1080 at 60fps, even with the PS5 on Automatic sending more than that to a 4K TV. That’s how my test ran: PS5 on Automatic, source at 1920×1080 and 60fps, and the picture came through cleanly. A higher source resolution gets you nothing, since OBS scales down to your output resolution anyway and your Twitch stream is 1080p. Video Format “Any” also worked fine for me.
If the source stays black, the card doesn’t support that combination. Stick to what’s in this table:
| Resolution | NV12 (SDR) | P010 (HDR) | MJPEG |
|---|---|---|---|
| 3840×2160 | up to 60fps | up to 30fps | up to 144fps |
| 2560×1440 | up to 144fps | up to 60fps | up to 144fps |
| 1920×1080 | up to 240fps | up to 120fps | up to 240fps |
These numbers come from AVerMedia’s manual and apply to a 10Gbps port. MJPEG is a compressed format for very high frame rates. For 4K at 144fps, AVerMedia lists at least a 12th gen Core i5, an RTX 3060 and 16GB of RAM. You don’t need MJPEG for a 60fps stream.
If blacks look gray or the picture is way too dark, switch the source’s Color Range from Default to Limited or Full until black is actually black.
Step 5: Get the audio right
The standard audio route goes over HDMI. The main rule from the OBS guide applies here too: every sound reaches OBS exactly once.
Game audio over HDMI
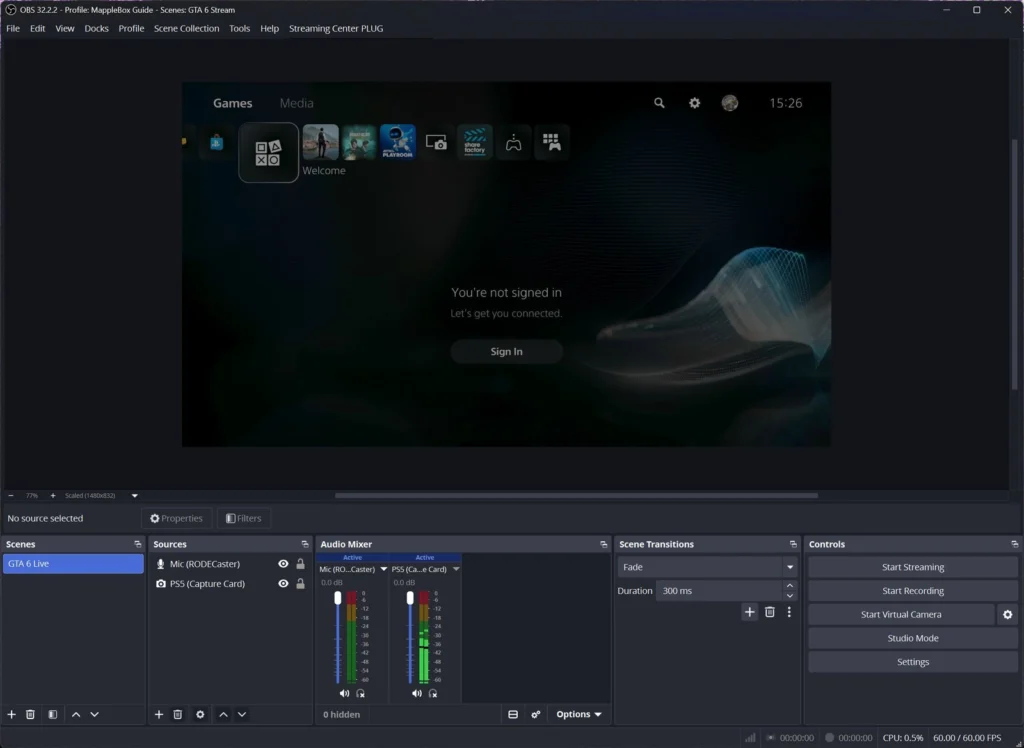
The PS5 sends audio along with the picture over HDMI, and the card passes it to OBS and your TV. In my test, the PS5 audio showed up in OBS right away with these settings:
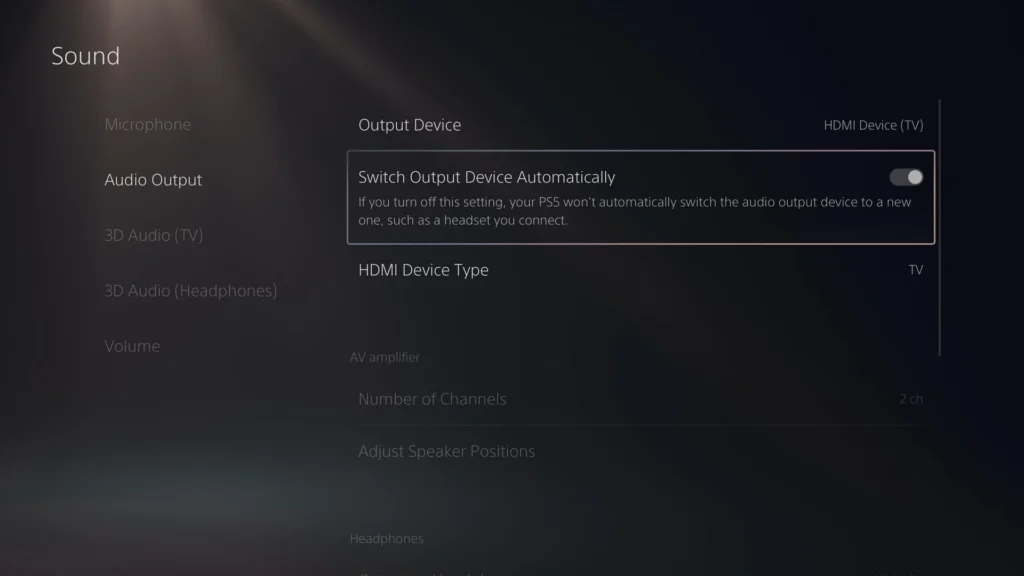
- Under Settings > Sound > Audio Output, keep Output Device on HDMI Device (TV). Don’t plug a headset into the controller: the PS5 then sends audio to the controller and nothing reaches HDMI anymore.
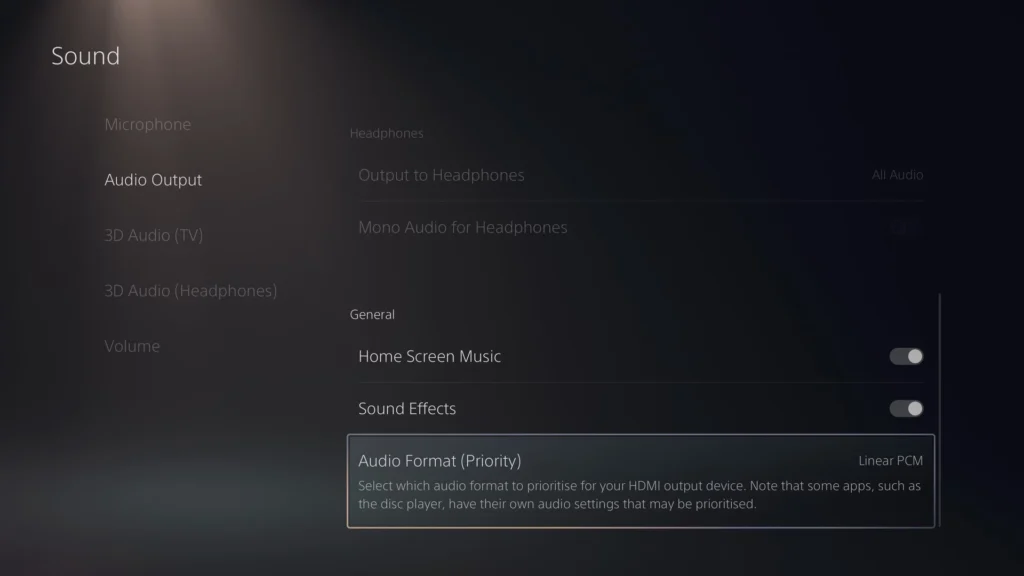
- Further down, set Audio Format (Priority) to Linear PCM. Linear PCM, or LPCM, is uncompressed audio. According to AVerMedia, the card captures LPCM in stereo.
- Use a separate mic on your PC for commentary and add it in OBS as an Audio Input Capture.
OBS: no echo, no doubled audio
- In OBS, the Global Audio Devices under Settings > Audio are set to Disabled, or your mic comes in twice. That’s step 7 in the OBS guide.
- In the “PS5” source, keep Audio Output Mode on Capture audio only. “Output desktop audio (DirectSound)” would also play the sound through your Windows speakers. If OBS then captures your PC audio too, the game audio ends up in your stream twice.
- Leave Audio Monitoring off for the source (gear icon in the audio mixer > Advanced Audio Properties > Monitor Off). You already hear the game on your TV, without OBS’s delay.
- The game audio comes in with the video source. You don’t need an extra Audio Input Capture on “HDMI/Line In (Live Gamer Ultra 2.1-Audio)”, or you’ll have it twice.
- Levels to start with: voice peaking around -10 dB, game around -20 dB, then adjust by ear.
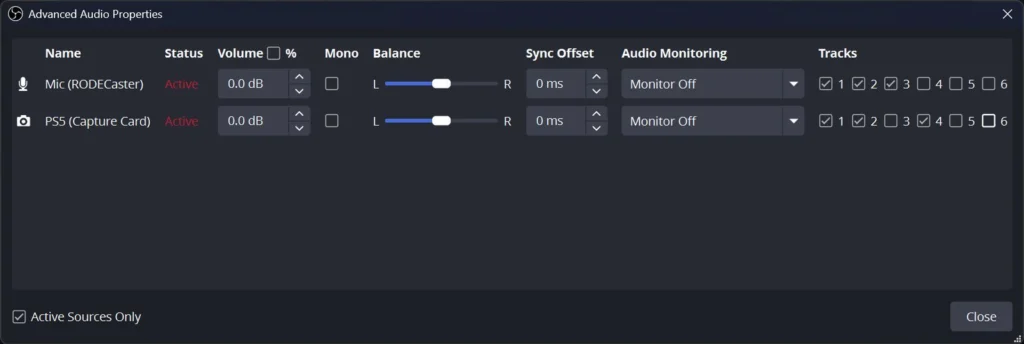
My OBS guide covers in detail how to add your mic, Discord and PC audio cleanly, including a section on the RØDECaster Pro II. My Shure MV7+ is plugged into a RØDECaster over XLR, and OBS only has two sources: the RØDECaster “Main” device as the mic, and the PS5. If Windows also outputs to “Main”, your PC audio is already in the console mix. An extra desktop audio source would double it, so there isn’t one. Your PS5 audio isn’t affected, since it comes in through the capture card.
Untested: party chat through the card’s jacks
I haven’t tested this option myself. The steps come from AVerMedia’s own guide. The card has two 4-pole 3.5mm jacks, one for the controller and one for your headset. That puts game audio, party chat and your voice in the stream without a separate mic on your PC.
- Connect the DualSense headphone jack to the card’s controller jack with the included 4-pole cable.
- Plug your headset into the card’s headset jack, not into the controller.
- On the PS5, go to Settings > Sound > Audio Output, set the output device to the headset connected to the controller, and set Output to Headphones to All Audio.
- According to AVerMedia, the sound reaches OBS through the card’s audio. AVerMedia uses an Audio Input Capture on the card for this, which on my PC would be “HDMI/Line In (Live Gamer Ultra 2.1-Audio)”. Only capture the card audio once, though: if you add that source, mute the PS5 source in the mixer.
- Don’t charge the controller by cable in this setup. AVerMedia says that can mute the signal. A buzzing sound usually comes from a ground loop, so start with a fully charged controller.
In this setup, all audio goes through the controller, so your TV stays silent and you hear everything in your headset. AVerMedia also recommends using only one audio input on the card at a time, so not HDMI audio and controller audio together.
Step 6: Build your scene
To start, one scene with three layers is enough, from bottom to top:
- PS5 (Video Capture Device), full size
- Webcam (optional, also a Video Capture Device), small in a corner. Step 9 of the OBS guide covers the webcam settings. We’ll add where GTA 6 puts the minimap and HUD after launch. Until then, check your picture in-game once and move the webcam where nothing important sits.
- Alerts come later as a Browser source, for example from StreamElements or Streamlabs.
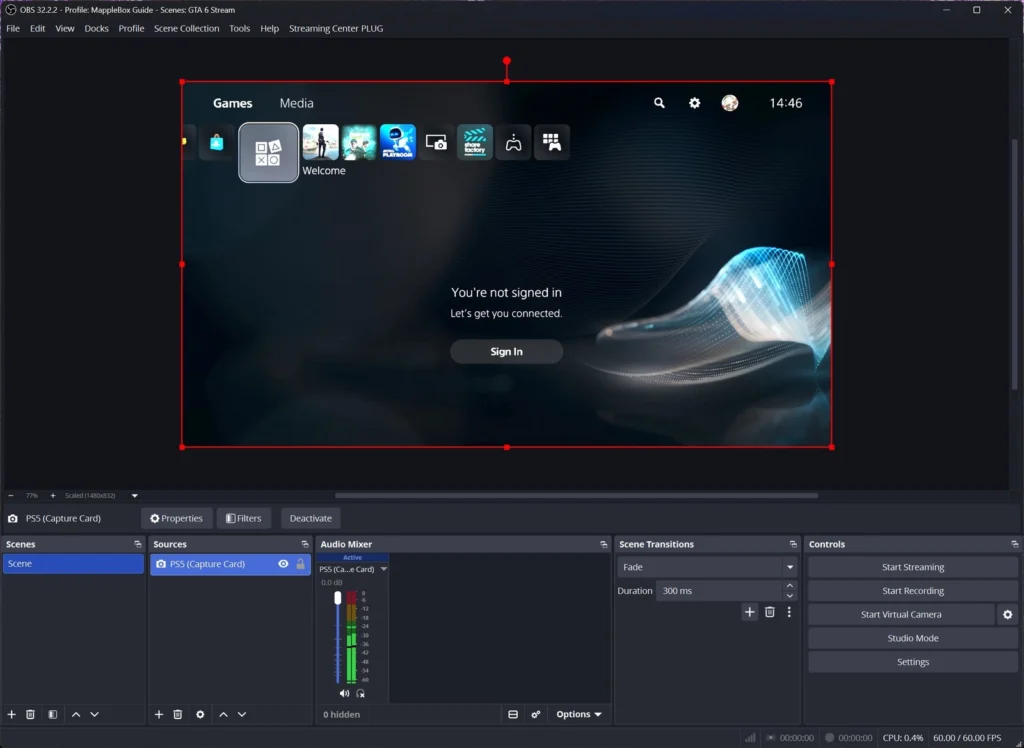
Also set up a “Be right back” scene with a still image. You’ll want it whenever you open menus, messages or anything private.
Step 7: OBS settings for Twitch
The OBS settings are the same for a console and a PC game, and my OBS guide explains each one in detail. The short version for Twitch at 1080p60:
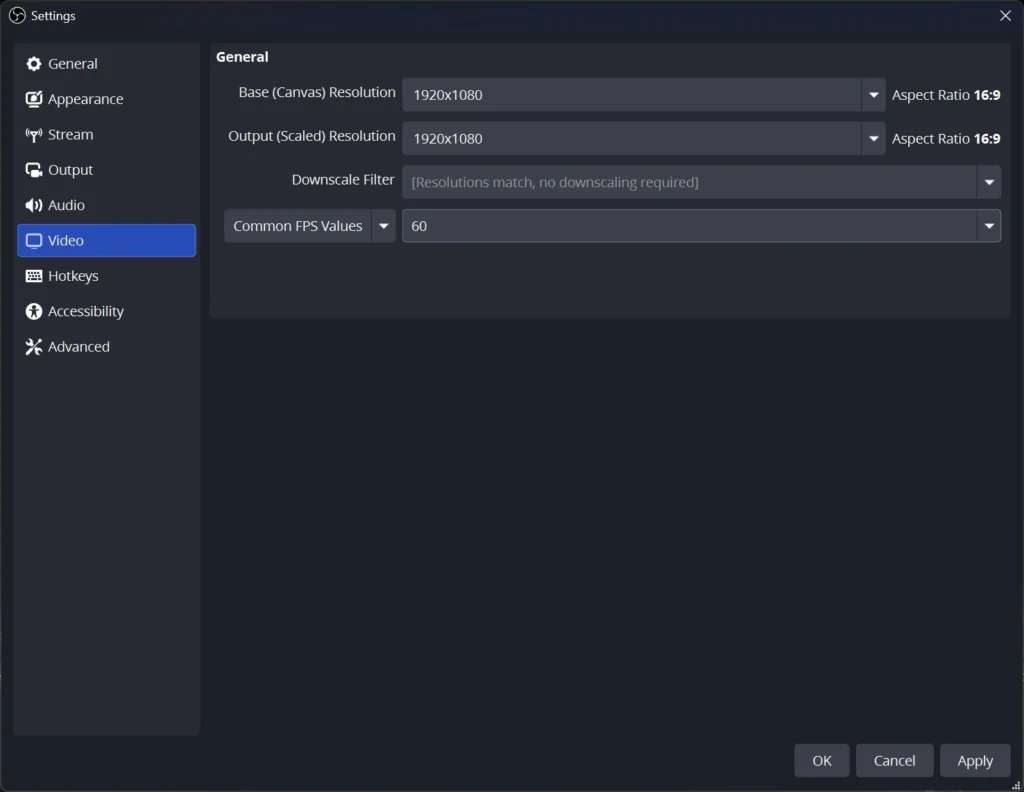
- Settings > Video: base and output resolution 1920×1080, 60 FPS. A new profile sits at 1280×720 and 30 FPS, so change that.
- Settings > Stream: Twitch, “Connect Account (recommended)”. Optionally “Enable Enhanced Broadcasting”, which lets OBS get its settings from Twitch. That works with a stream key too. Since June 2026, Twitch says that allows up to 7.5 Mbps (7500 Kbps) at 1080p, plus 1440p for Affiliates and Partners. Affiliate and Partner are the two Twitch tiers that let you earn money.
- Settings > Output, Advanced mode, Streaming tab: NVIDIA NVENC H.264, Constant Bitrate (CBR), 6000 Kbps, keyframe interval 2 s, preset P5: Slow (Good Quality), tuning High Quality, Multipass Two Passes (Quarter Resolution), profile high, Look-ahead and Adaptive Quantization on, B-frames 2. Audio AAC at 160 Kbps.
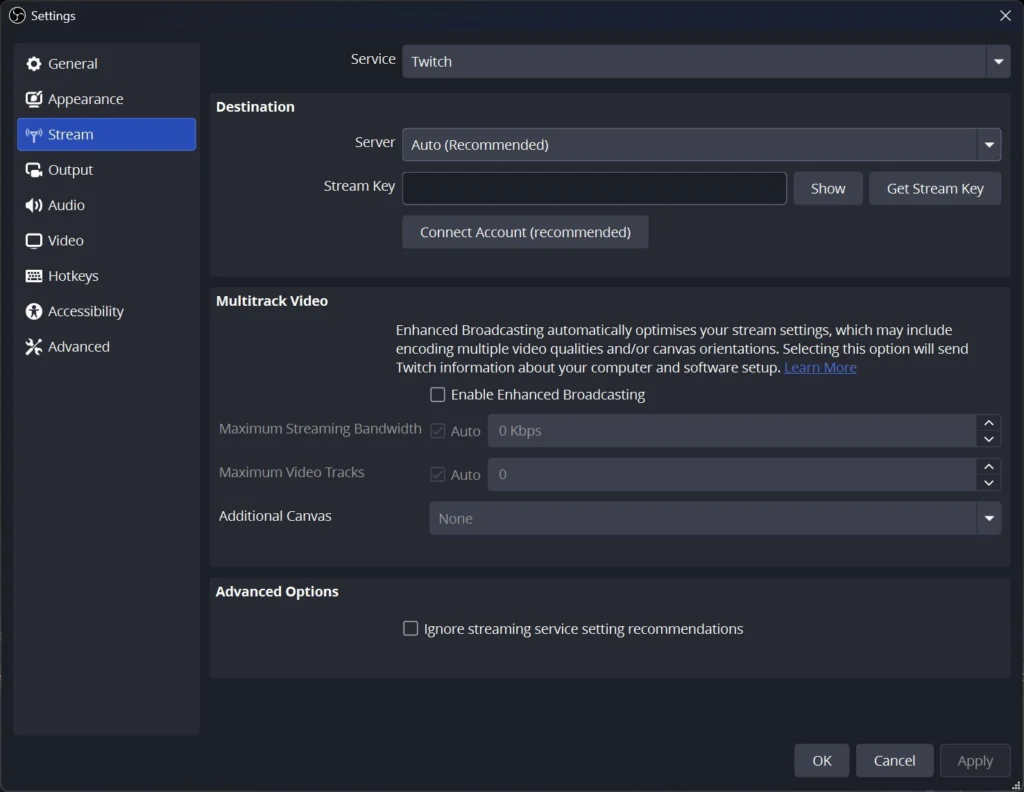
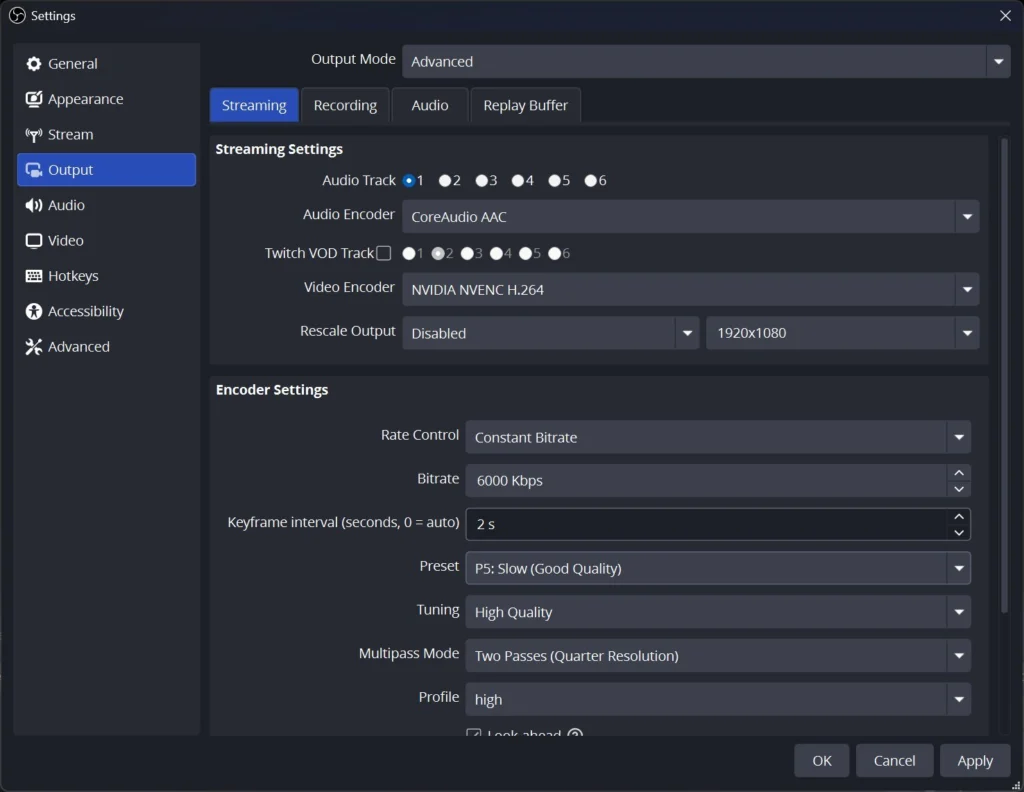
6000 Kbps, constant bitrate, a 2-second keyframe interval and 2 B-frames are Twitch’s own recommendation for 1080p60 with NVENC. The keyframe interval sets how often a complete picture is sent, and B-frames are in-between frames that save bitrate. Without Enhanced Broadcasting, OBS also caps Twitch at 6000 Kbps. On an AMD or Intel GPU, use their H.264 encoder with the same basics, the starting values are in step 5 of the OBS guide. If the stream stutters or drops frames, go down to 720p60 at 4500 Kbps.
Step 8: OBS settings for YouTube
YouTube in SDR (route A or B)
YouTube accepts higher bitrates and resolutions than Twitch. On a recent NVIDIA card, NVIDIA NVENC HEVC is the better pick, since it needs less bitrate than H.264 for the same quality. These are YouTube’s recommendations for HEVC and AV1:
| Resolution | Recommended bitrate HEVC/AV1 | Minimum |
|---|---|---|
| 2160p60 | 35 Mbps | 10 Mbps |
| 1440p60 | 24 Mbps | 6 Mbps |
| 1080p60 | 12 Mbps | 4 Mbps |
OBS takes the bitrate in Kbps, so 12 Mbps means 12000 Kbps. Use constant bitrate and a 2-second keyframe interval, same as Twitch. Make sure your upload speed is well above your bitrate, and set your OBS canvas to the resolution you want to stream. A separate OBS profile for YouTube keeps things tidy.
YouTube in HDR (route C)
YouTube accepts HDR live streams. Set up OBS like this:
- PS5: HDR on Always On, resolution 1440p (see step 3).
- “PS5” source: Video Format P010, Color Space Rec. 2100 (PQ), 2560×1440, 60 FPS.
- Settings > Advanced > Video: Color Format P010 (10-bit, 4:2:0, 2 planes), Color Space Rec. 2100 (HLG). YouTube recommends HLG, Rec. 2100 (PQ) works too. For SDR streams, keep the defaults NV12, Rec. 709 and Limited here.
- Settings > Video: canvas and output at 2560×1440, 60 FPS.
- Settings > Stream: service YouTube, an RTMPS server.
- Settings > Output > Streaming: Video Encoder NVIDIA NVENC HEVC, Profile main10, Constant Bitrate (CBR), 24 Mbps (24000 Kbps), keyframe interval 2.
H.264 can’t carry HDR, and YouTube only accepts HDR over HEVC, not AV1. The preview in YouTube’s Live Control Room doesn’t show HDR colors, so check your stream on an HDR TV or phone. Viewers without an HDR display automatically get an SDR version from YouTube. I haven’t tested the HDR route myself yet. The values come from YouTube’s and OBS’s own guides.
Step 9: Record while you stream
A local recording is worth it for clips, Shorts and as a backup. Under Settings > Output > Recording, set Recording Format to Hybrid MP4. It’s been around since OBS 30.2, and according to OBS the file stays recoverable even after a crash or power cut. For the video encoder, “(Use stream encoder)” is fine to start with, so recording barely costs extra performance. You can’t pause the recording with it, though.
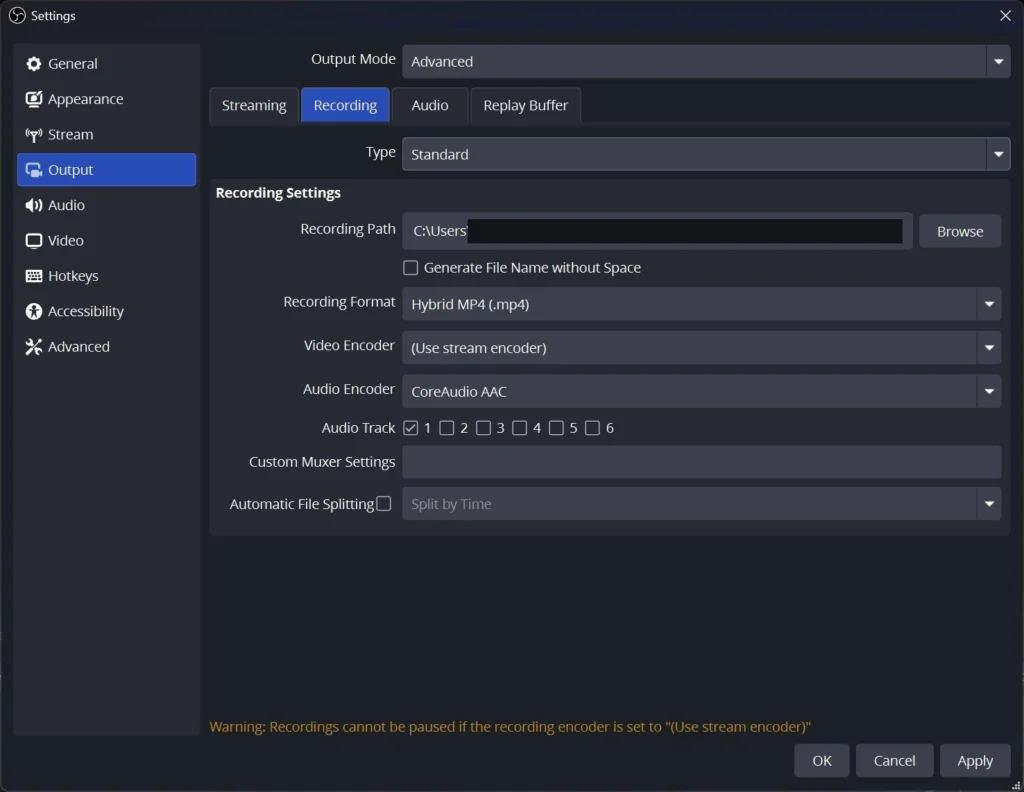
If you want mic and game audio separate for editing, use the track layout from the OBS guide: track 1 is the full mix, track 2 the Twitch VOD track, track 3 your mic, track 4 the PS5, track 5 PC audio or Discord. The recording records tracks 1, 3, 4 and 5.
If you want recordings that look better than the stream, pick a separate encoder, for example NVIDIA NVENC HEVC with Constant QP and a CQ level between 16 and 23. For HDR recordings, set the profile to main10, since H.264 can’t do HDR. Your recording uses your canvas resolution, which is 1080p in the Twitch setup.
How to check it works
- Start a game and make a one-minute test recording in OBS. Watch it back: are the colors, the audio and the lip sync right?
- Open View > Stats in OBS. Dropped frames (network) point to upload problems, skipped frames due to encoding lag mean your encoder is overloaded. My OBS guide covers what to do about each.
- Run a test stream with Start Streaming. Step 12 of the OBS guide shows how to check it, even without anyone watching. On Twitch, you can monitor it with Twitch Inspector.
- Watch your stream on your phone, the way your viewers will. Then click Stop Streaming.
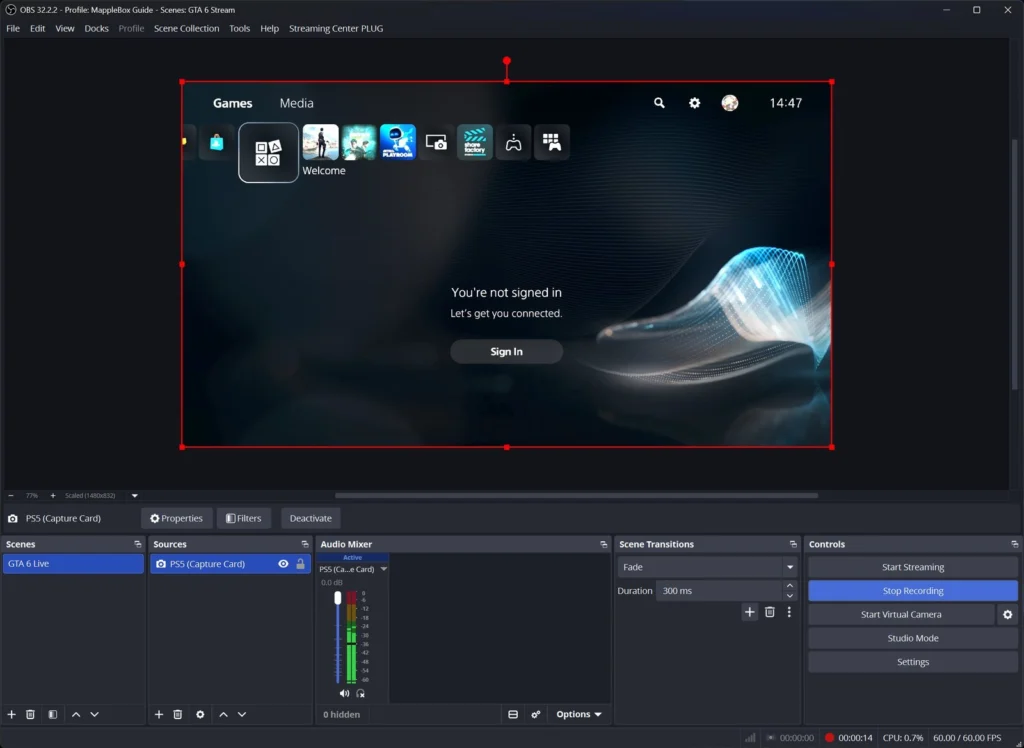
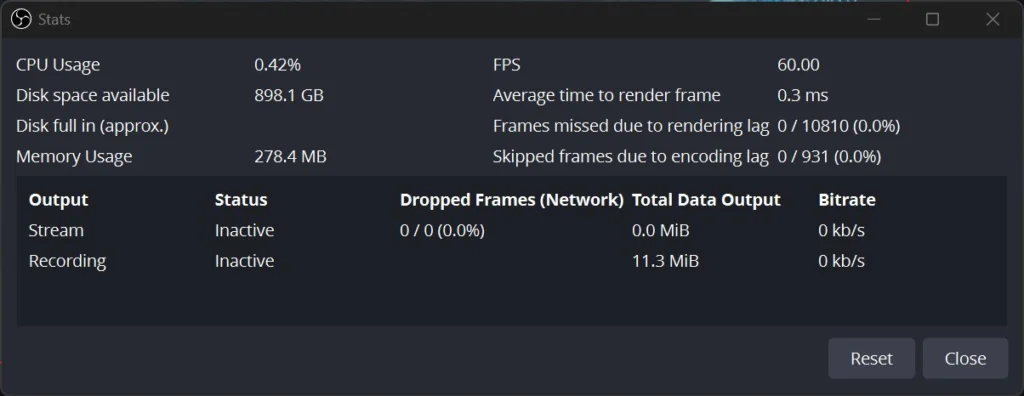
In my test, a 15-second recording at 1920×1080 and 60fps, with H.264 video and 48 kHz stereo AAC audio, ran with PS5 audio and without a single lost frame.
Pre-stream checklist
- Two Ultra High Speed HDMI cables: PS5 to the card, card to the TV.
- HDCP off on the PS5, OBS shows your game instead of the HDCP warning.
- Clear HDR route: PS5 HDR and the OBS source match.
- Right OBS profile active, video at 1080p60.
- One-minute test recording: picture, game audio, voice, no echo.
- Global audio devices disabled, audio monitoring off, every sound only once.
- Stats open, PC on Ethernet.
- Notifications off on PS5 and PC, “Be right back” scene ready, stream key off screen.
Troubleshooting
- OBS shows an HDCP warning: HDCP is still on. Turn off Enable HDCP under Settings > System > HDMI. AVerMedia also suggests closing Netflix or Disney+ and restarting the PS5.
- TV stays black after turning HDCP off: do the firmware update with Assist Central Pro, then unplug the card once and plug it back in. That brought the passthrough picture back for me.
- Brief “No Signal” when switching HDR: that’s normal. The PS5 renegotiates the signal, and the picture comes back after a few seconds.
- OBS source stays black: check that resolution, FPS and video format in the source are a combination from the table in step 4. Is the device set to “Live Gamer Ultra 2.1-Video”?
- Washed-out, gray or oversaturated picture in OBS: the HDR signal and your OBS settings don’t match. Either turn HDR off on the PS5 (route A) or set the source to P010 with Rec. 2100 (PQ) (route B).
- Blacks look gray: set the OBS source’s Color Range to Limited or Full. On the PS5, leave RGB Range on Automatic (Recommended), as the PS5 itself suggests.
- No audio in OBS: is a headset plugged into the controller? Then no audio goes over HDMI. Also check that the PS5 outputs Linear PCM and that the card is enabled in Windows sound settings, where AVerMedia recommends turning off “Audio enhancements”. And make sure the PS5 source isn’t muted in the OBS mixer.
- Doubled audio or echo: set the source’s Audio Output Mode to “Capture audio only”, turn off Audio Monitoring for it, and disable the global audio devices in OBS. Don’t add a second audio source on the card’s audio device. If you capture PC audio, the same sound must not arrive there a second time.
- OBS picture lags behind: that’s normal. OBS always shows the picture with a small delay, which is why you play on the TV through passthrough. If the preview delay bothers you, set Buffering in the source to Disable. If audio and video drift apart in the stream, fix it with Sync Offset in Advanced Audio Properties.
- LED flashing orange, or only low resolutions available: the card is on a USB port that’s too slow. Use a 10Gbps USB-C port directly on the motherboard and the included cable.
- TV flickers: check the cable from the card to the TV, it needs to be an Ultra High Speed HDMI cable. Sony says some TVs can still have issues with 4K at 120Hz. Try turning 120 Hz Output off or setting Video Transfer Rate to -1 or -2.
- Buzzing in party chat: fully charge the controller and don’t charge it by cable while streaming. If that doesn’t help, AVerMedia recommends a ground loop isolator between the controller and the card.
GTA 6: your pre-launch checklist
- Pre-load: Rockstar says pre-loading has been live since November 10. Download the game ahead of time so you can go live right away on the 19th.
- Test stream before November 19: run the whole setup with another game. On launch day you don’t want to be hunting for the HDCP toggle or running a firmware update.
- Twitch Content Classification Labels: the content descriptors on Rockstar’s GTA 6 page include intense violence, drug use and strong sexual content. If you pick a category with an ESRB Mature rating, Twitch adds the “Mature-Rated Game” label automatically. We’ll confirm whether that happens for the GTA 6 category after launch. Depending on your stream, you may need more labels, for example for violence. Set them in Stream Manager under “Edit Stream Info”.
- Notifications: turn off pop-ups on your PS5 or use your “Be right back” scene so private messages don’t show up on stream.
FAQ
Does this work with Xbox Series X|S?
Yes, AVerMedia lists the Xbox Series X|S as supported. There’s no HDCP toggle to flip there: according to AVerMedia, closing media apps is enough, otherwise restart the console.
Do I need AVerMedia’s software?
Not for OBS. OBS picks up the card as the Video Capture Device “Live Gamer Ultra 2.1-Video”. You need Assist Central Pro for firmware updates, and the update is worth it: it fixed my black passthrough picture.
Does it work on a Mac?
Yes, with limits. According to AVerMedia, the card captures up to 4K at 60fps on a Mac, and HDR capture doesn’t work on macOS at all. Route A works, routes B and C don’t.
Can I stream in 4K on Twitch?
No. Twitch recommends 1080p60, and Affiliates and Partners can stream in 2K (1440p) with Enhanced Broadcasting. For 4K, go to YouTube.
Wrapping up
Once it’s set up, you start your stream with one click in OBS and play on your TV like always. The parts to get right are two proper HDMI cables, current firmware, HDCP off, one clear HDR route, and audio from a single source. Do your test stream before November 19.
* Affiliate link: As an Amazon Associate I earn from qualifying purchases. It costs you nothing extra. More info
Did this guide help you? You can buy me a coffee on Ko-fi. It keeps MappleBox ad-free.