How to Set Up OBS Studio: The Complete Guide to Your First Stream
OBS Studio is the free go-to tool for streaming and recording. It can do a lot, which is what makes getting started hard: there are hundreds of settings, and the defaults rarely fit a Full HD Twitch stream. Here’s how you set up OBS step by step, from first launch to your first test stream. You’ll end up with your own profile, clean encoder settings for 1080p at 60fps, a first scene, and audio from your mic and PC without anything showing up twice in your stream.
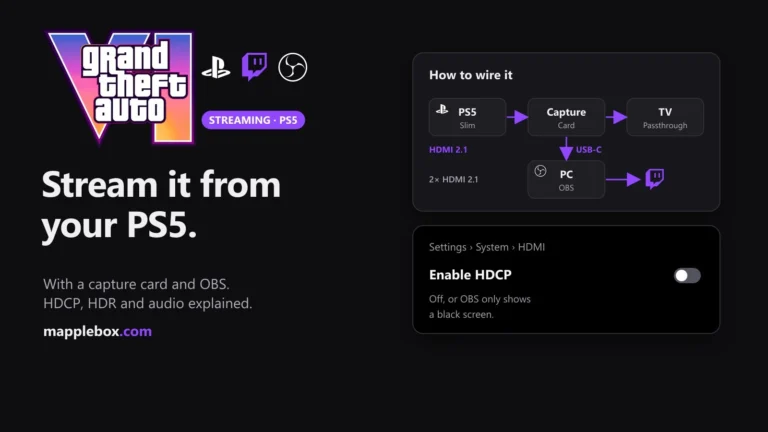
It works for PC games, webcam streams and consoles with a capture card. If you want to hook up a PS5 with a capture card specifically, check out my guide to streaming GTA 6 on PS5.
Quick overview
- What OBS does: it combines sources like your game, webcam, mic and overlays into one picture, compresses it, and sends it to Twitch or YouTube or saves it as a video file.
- Scenes and sources: a source is a single element, like your webcam. A scene is a layout made of several sources, and you switch between scenes live.
- Encoder: the part that compresses the video. Use your graphics card’s hardware encoder so your CPU stays free for the game.
- Bitrate: how much data you upload per second. For Twitch at 1080p and 60fps, 6000 Kbps is the standard value. Kbps means kilobits per second, so 6000 Kbps is 6 Mbps.
- Who this is for: you have a Windows PC and want to stream for the first time, or finally set up OBS properly. This guide is written for Windows. On a Mac, sources and encoders differ, for example there’s no Game Capture and no NVENC.
What you need
- A PC on Windows 10 or 11 with a graphics card that supports DirectX 10.1. That’s the minimum according to OBS. For 1080p60 streaming, a recent NVIDIA, AMD or Intel graphics card with a built-in hardware encoder helps a lot.
- OBS Studio, free. The screenshots show version 32.2.2. Twitch Enhanced Broadcasting needs version 30.2 or newer.
- A Twitch or YouTube account for streaming. You don’t need one just to record.
- A mic, for example a USB mic, a headset or an audio interface. Optionally a webcam, and a capture card for consoles.
- A stable upload connection. Run a speed test first. OBS suggests using at most 75% of your upload speed as your bitrate to start with, so for 6000 Kbps (6 Mbps) you want roughly 8 Mbps of upload or more.
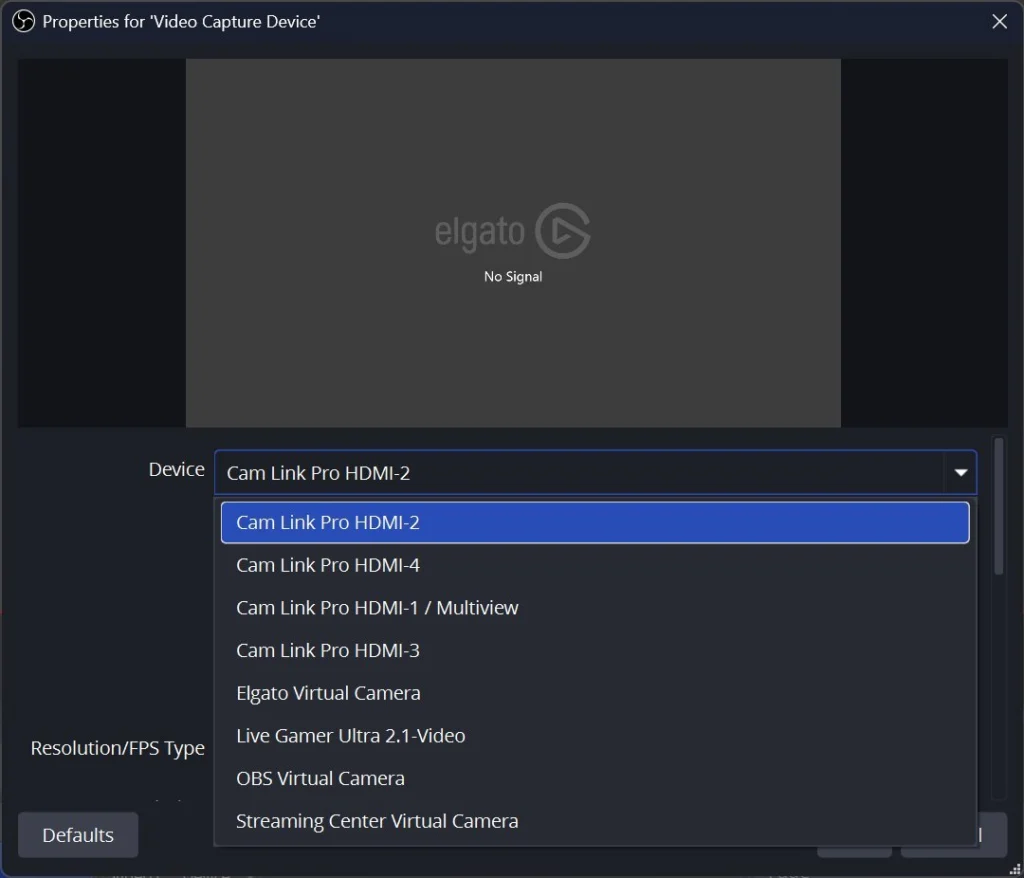
Good to know: the screenshots show OBS set to English (UK), so a few labels read “Colour” or “Optimise”. A few things in the screenshots come from my own setup and won’t show up for you, which is fine: the “Streaming Center PLUG” menu (an AVerMedia plugin), the “Elgato Stream Deck” entry in the Tools menu, and the Cam Link entries in the device list.
My setup for the screenshots: Windows 11 with OBS 32.2.2, a Shure MV7+* mic connected over XLR* to a RØDECaster Pro II*, and a PS5 Slim through an AVerMedia Live Gamer ULTRA 2.1 capture card.
*Affiliate link: if you buy through it, I earn a small commission at no extra cost to you. As an Amazon Associate I earn from qualifying purchases. More in the affiliate disclosure.
Step 1: Install OBS and launch it for the first time
- Download OBS Studio from obsproject.com. Always use the official site, since there are fake downloads with malware out there.
- Install OBS with the default options and launch it.
- On first launch, the Auto-Configuration Wizard opens. You can click through it right away or cancel and run it later, see step 3.
- Open Settings > General. This is where you set the language. Under Updates, keep the channel on Stable and leave the automatic update check on.
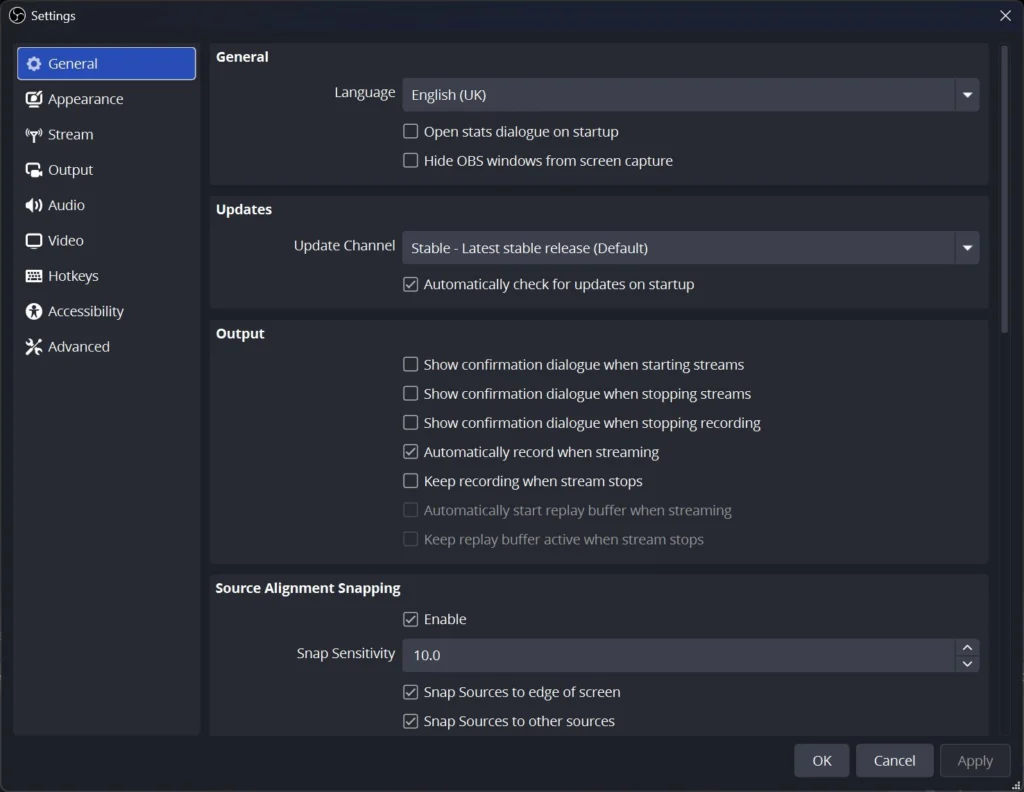
My tip: check Automatically record when streaming here. You’ll get a local copy of every stream for clips and Shorts, even if Twitch deletes your VOD. VOD stands for video on demand, the saved recording of your stream on Twitch.
Step 2: Create your own profile and scene collection
OBS keeps settings and layouts apart. A profile stores your stream, video and output settings, so your encoder, bitrate, resolution and connected account. A scene collection stores your scenes and sources. Set both up cleanly once, and later you can add a second profile for YouTube or recording-only without breaking your Twitch setup.
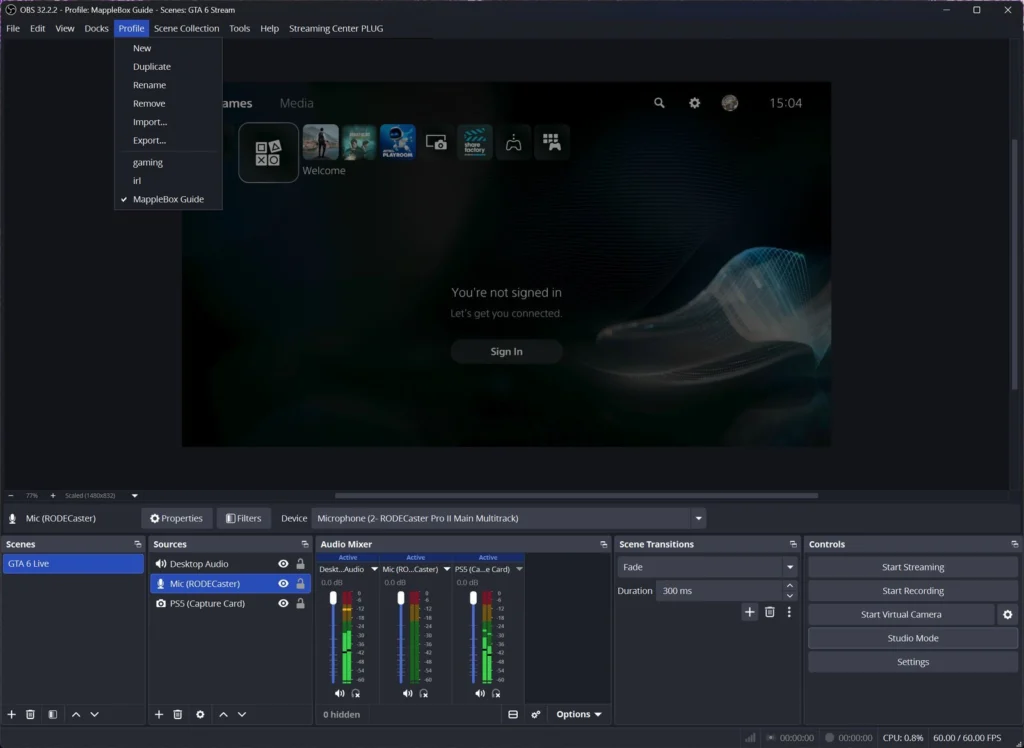
- In the top menu, click Profile > New and give it a name, like “Twitch 1080p60”. In the “Add Profile” window, leave “Show auto-configuration wizard” unchecked, since you’ll do the wizard in step 3.
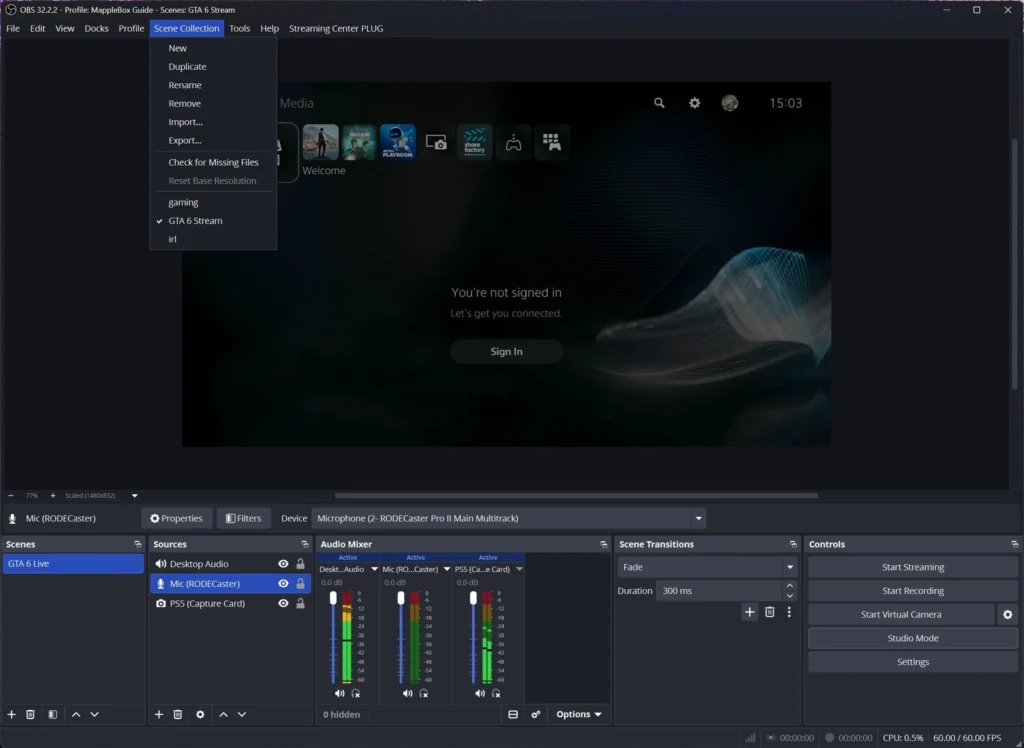
- Click Scene Collection > New and call it something like “Gaming”.
- The active names always show in the OBS title bar.
A new profile starts with OBS defaults, so you know exactly which settings you changed yourself.
Backup: once everything runs, save both with Profile > Export and Scene Collection > Export. That lets you move your setup to a new PC or restore it after something breaks. “Import” in the same menu brings it back.
Step 3: Auto-Configuration Wizard or manual settings
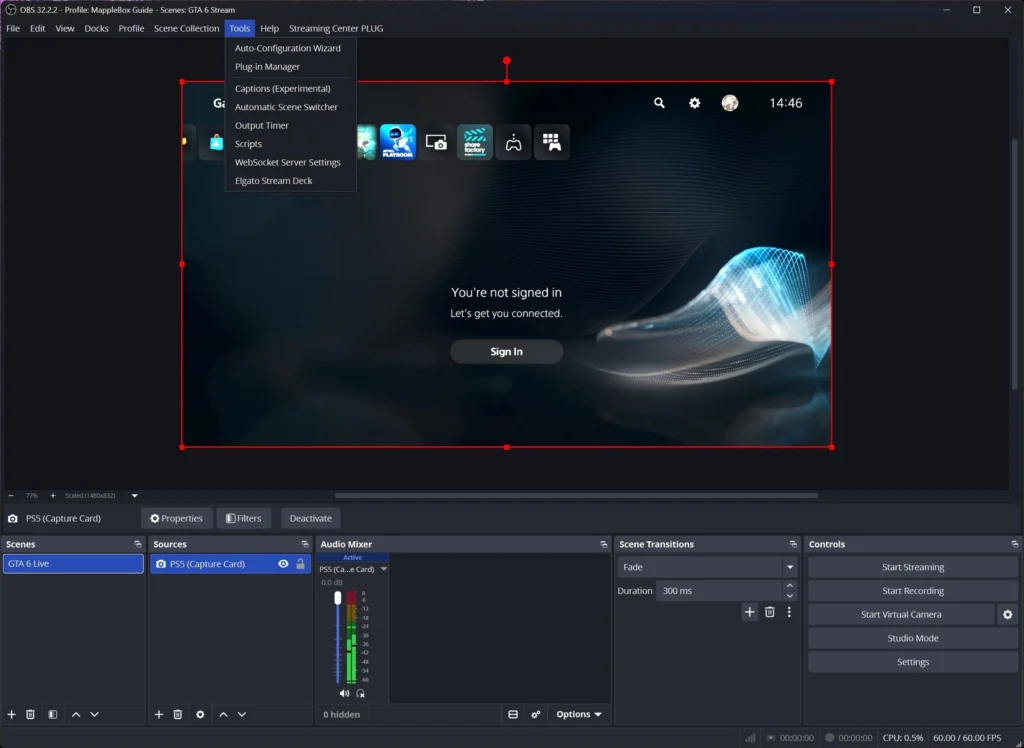
The Auto-Configuration Wizard tests your PC and your connection and suggests settings. You can run it any time from Tools > Auto-Configuration Wizard.
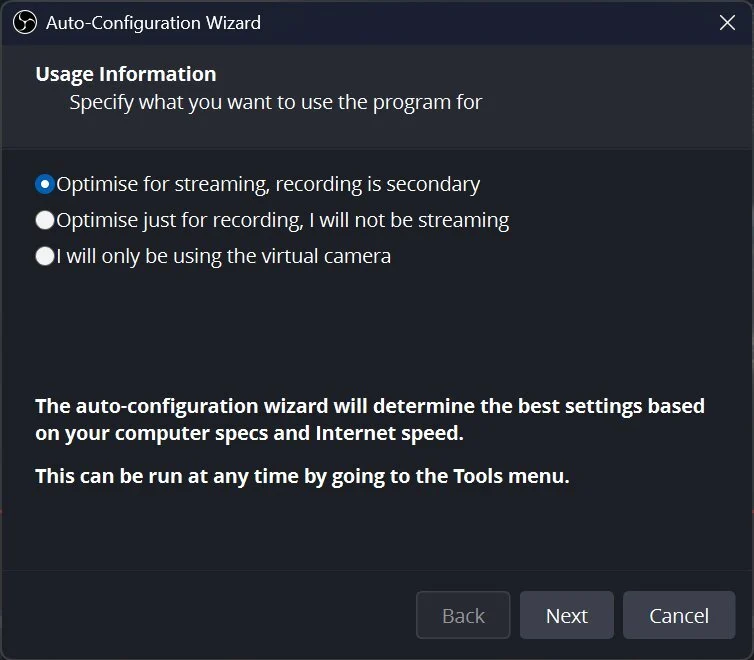
- Usage Information: pick “Optimize for streaming, recording is secondary”.
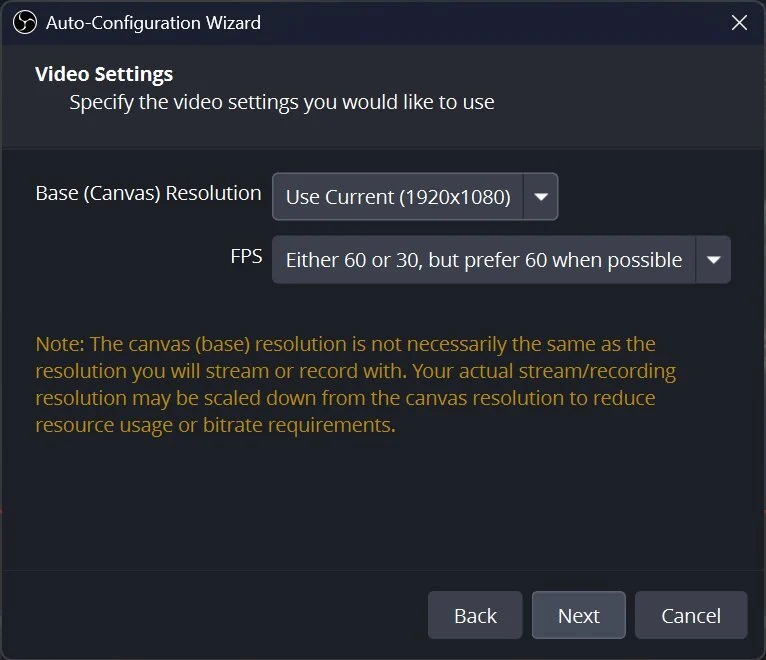
- Video Settings: for Base (Canvas) Resolution, pick 1920×1080 from the list on purpose. The preselected “Use Current (…)” isn’t 1920×1080 on a 1440p or 4K monitor. For FPS, pick “Either 60 or 30, but prefer 60 when possible”.
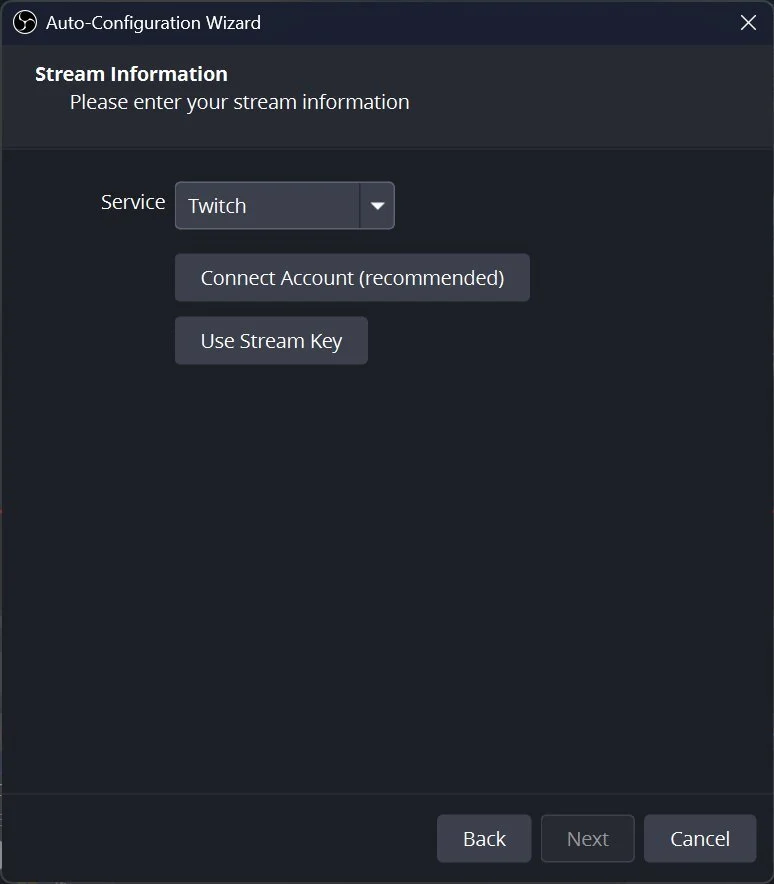
- Stream Information: service Twitch, then “Connect Account (recommended)”. OBS then tests your bandwidth and shows the final results.
Why setting things up manually is fine too: the wizard is a good starting point, but it knows nothing about your capture card or your mic, and on slower connections it likes to suggest 720p. Steps 4 to 8 get you to the same settings, chosen on purpose, so you can also skip the wizard entirely.
Step 4: Stream settings for Twitch
Open Settings > Stream and pick Twitch as the Service. You now have two options:
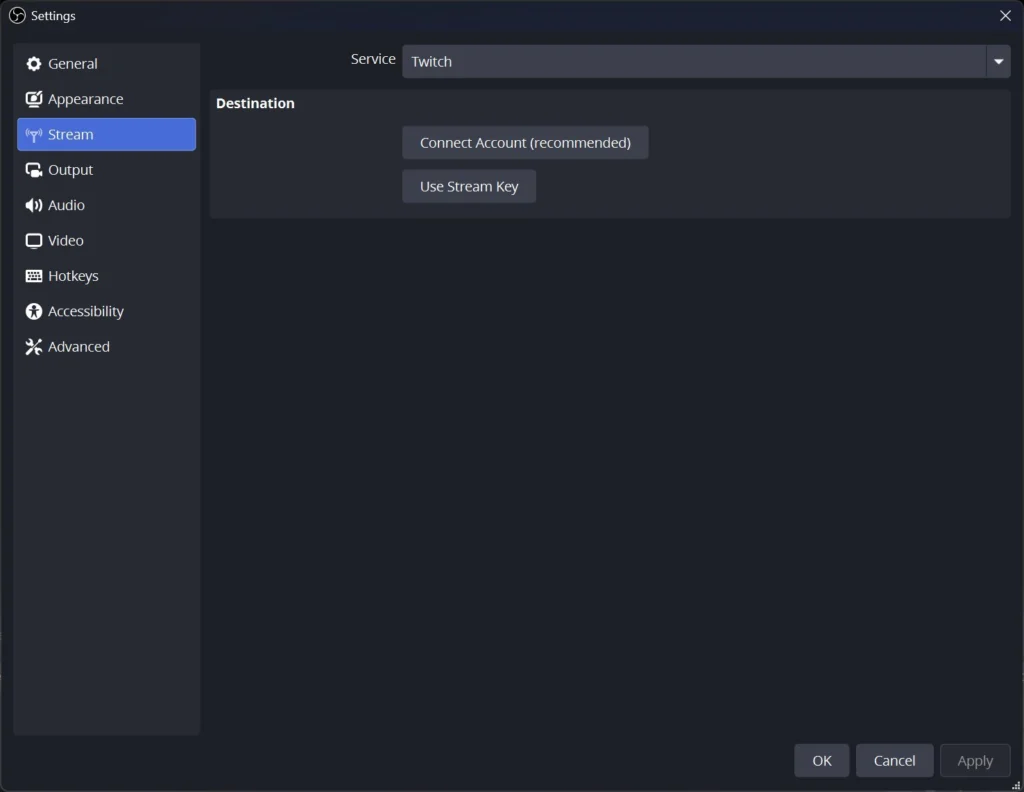
- Connect Account (recommended): you sign in to Twitch in a pop-up window. OBS then grabs the key itself, and you can change your title and category right from OBS. It’s the easiest route, and you need it for the Twitch VOD Track (step 10).
- Use Stream Key: click the button. Only then do the key field and the Get Stream Key button show up. That button opens Settings > Stream in your Twitch Creator Dashboard, where you copy the key and paste it into OBS. Leave Server on “Auto (Recommended)”.
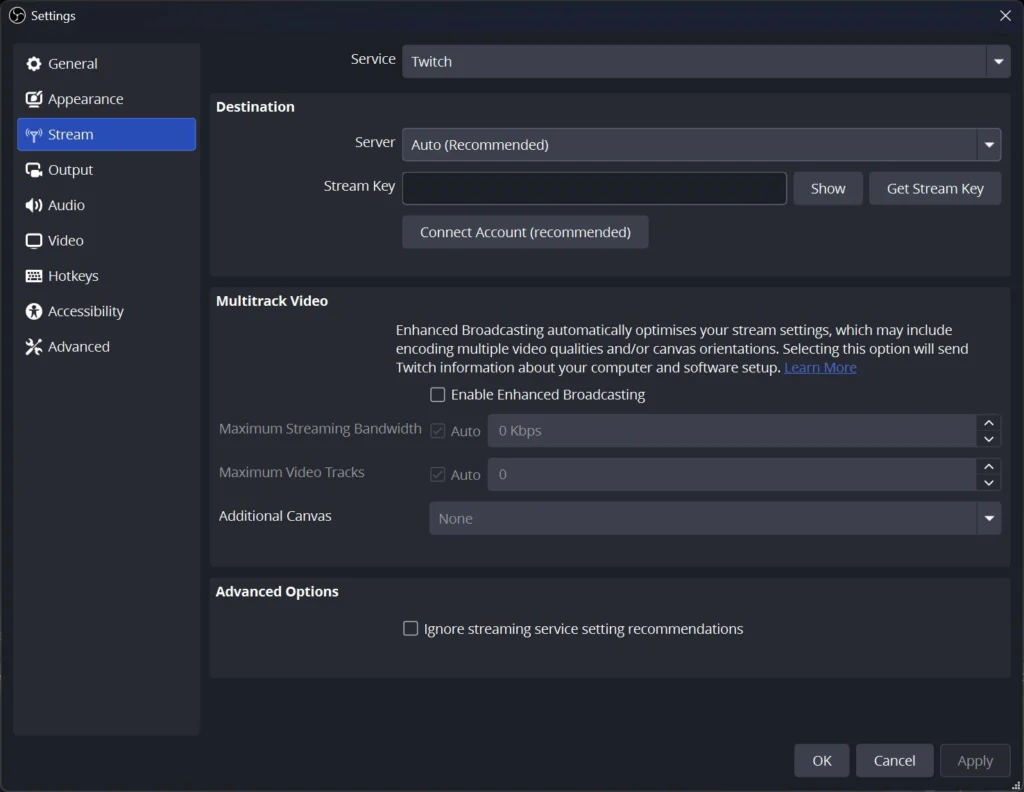
Warning: your stream key works like a password. Anyone who has it can stream to your channel. Never show it on stream, in screenshots or in tutorials, and don’t click “Show” while OBS is on screen. If it ever leaks, reset it in your Creator Dashboard.
Enhanced Broadcasting
With Enable Enhanced Broadcasting, OBS encodes several quality levels on your PC and gets matching settings from Twitch automatically. It works with both routes above, since OBS uses your stream key to request those settings from Twitch. Since June 2026 it also powers Dual Format (horizontal and vertical at the same time) for all streamers, and 2K (1440p) for Affiliates and Partners. Affiliate and Partner are the two Twitch tiers that let you earn money on the platform. Twitch lists up to 7.5 Mbps for 1080p and up to 9 Mbps for 1440p with Enhanced Broadcasting. Leave Maximum Streaming Bandwidth and Maximum Video Tracks on Auto.
Dual Format also needs a second, vertical canvas, which you pick in the Additional Canvas field. That’s outside the scope of this guide, so leave the field empty for a normal stream.
Enhanced Broadcasting puts a bit more load on your GPU because it encodes several versions at once. To get started, the classic single-encoder route from step 5 is fine. Both work, so try them out.
Step 5: Output, encoder and bitrate
Under Settings > Output you decide how OBS compresses your video. At the top, pick the Output Mode.
Simple or Advanced
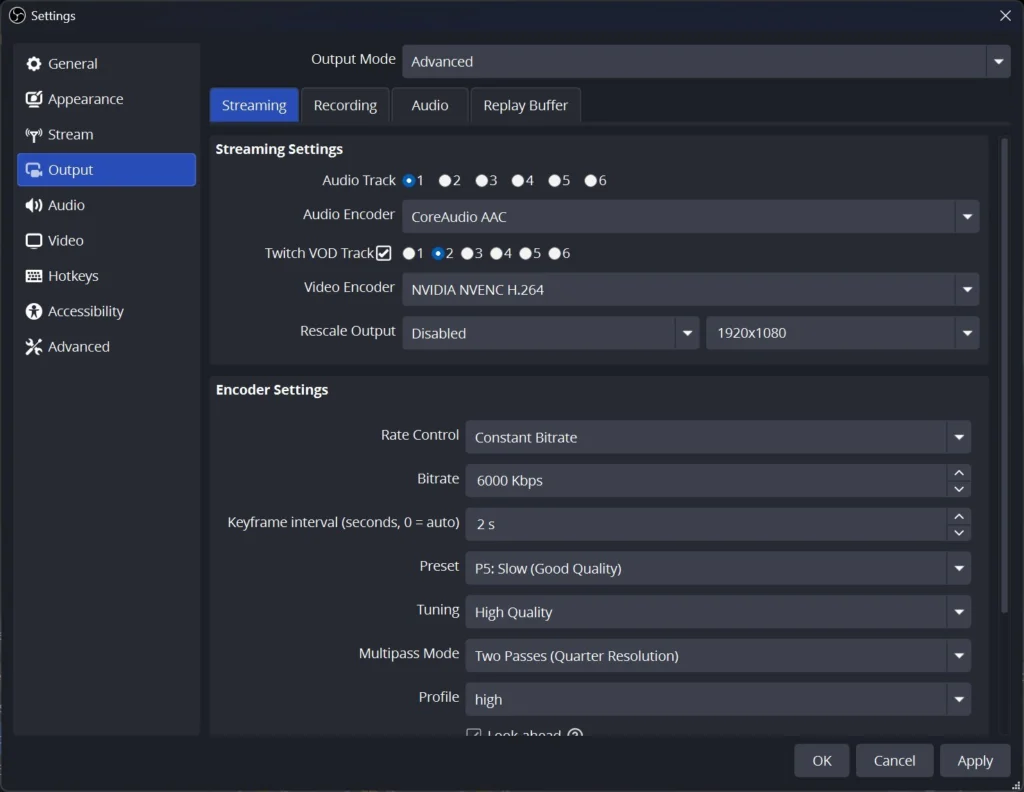
Simple is enough for a lot of streams. In a new profile, OBS 32.2.2 already fills in usable values: 6000 Kbps video bitrate, 160 Kbps audio, the NVENC H.264 hardware encoder on an NVIDIA card, and preset P5. The recording format is set to Hybrid MP4.
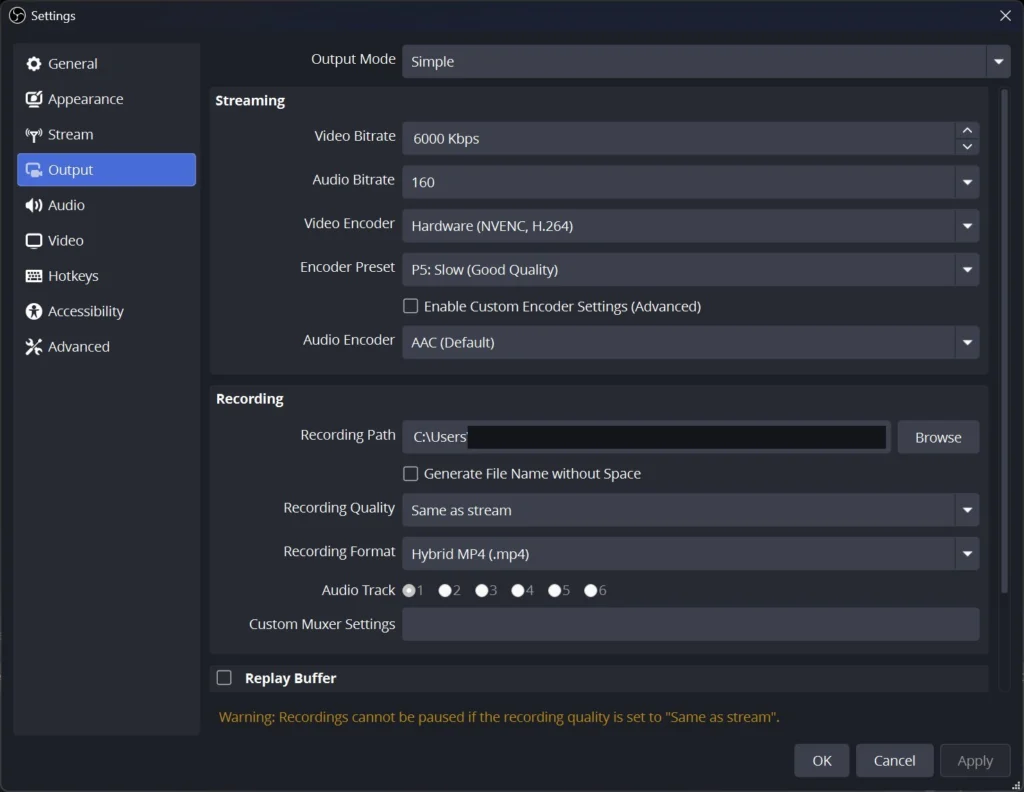
You need Advanced if you want to set the keyframe interval, tuning or separate audio tracks yourself. The keyframe interval sets how often the encoder sends a complete picture. In between, it only sends what changed. I’d switch to Advanced as soon as you’re past your first test stream. The values below are for Advanced mode.
Which encoder
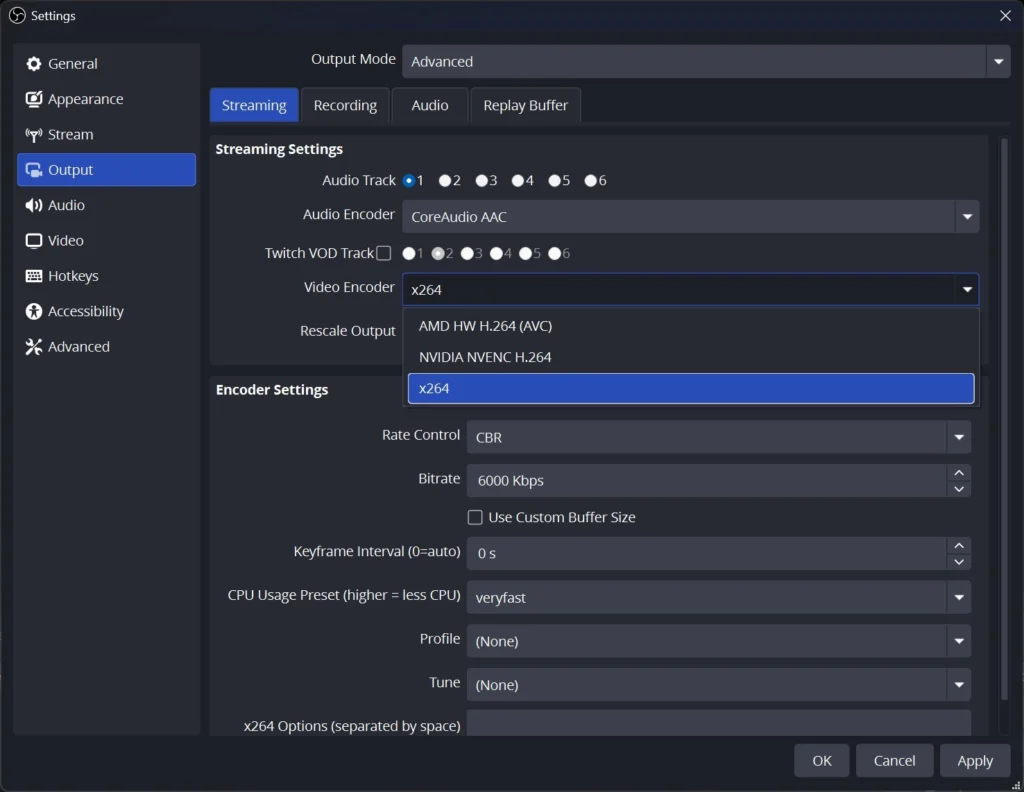
In the Streaming tab, the Video Encoder decides which chip compresses your video. What you see in the list depends on your hardware.
| Your hardware | Encoder in OBS | Note |
|---|---|---|
| NVIDIA GeForce | NVIDIA NVENC H.264 | First choice. A dedicated chip on the GPU, barely any load on your game. |
| AMD Radeon | AMD HW H.264 (AVC) | AMD’s hardware encoder. Starting values below. |
| Intel Arc or Intel graphics | QuickSync H.264 | Intel’s hardware encoder. Starting values below. |
| CPU only | x264 | Heavy on your CPU. Twitch recommends starting with the veryfast preset. |
For Twitch, use H.264, since without Enhanced Broadcasting OBS only offers H.264 for Twitch. HEVC and AV1 are interesting for YouTube or for recordings.
Twitch values for 1080p60
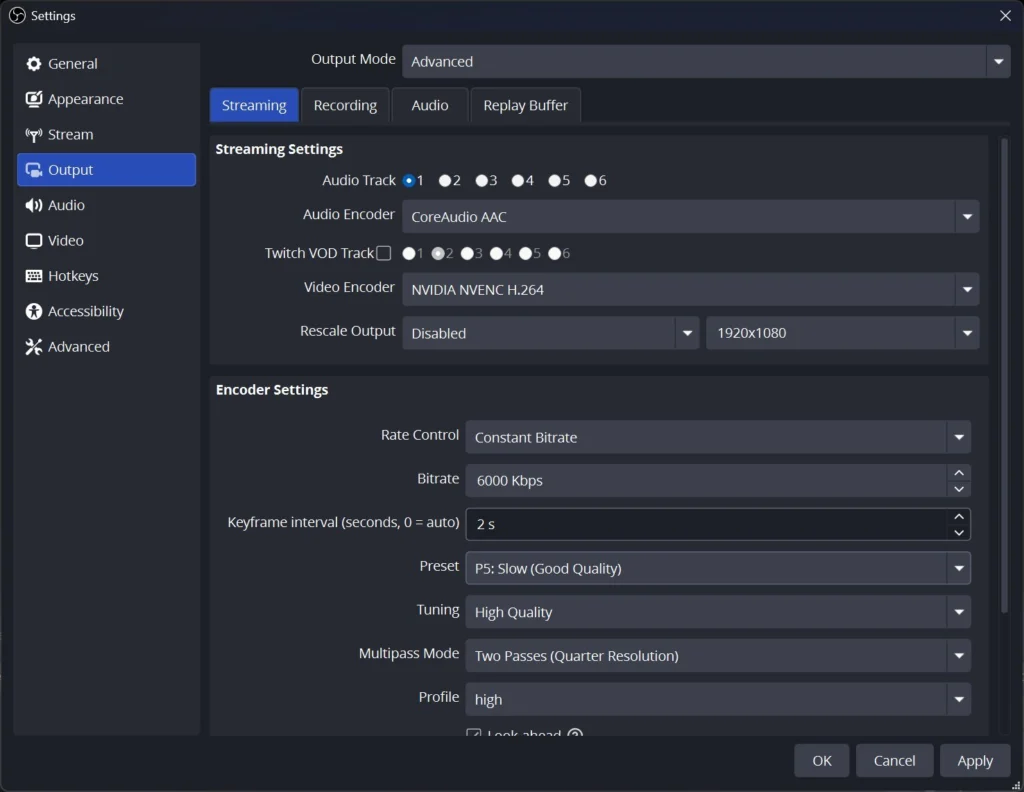
| Setting | Value | Why |
|---|---|---|
| Rate Control | Constant Bitrate (CBR) | Twitch recommends a constant bitrate, since a fluctuating one can cause buffering for viewers. |
| Bitrate | 6000 Kbps | Twitch’s recommendation for 1080p60. |
| Keyframe Interval | 2 s | Twitch’s requirement. At 0 (auto) the encoder decides on its own. |
| Preset | P5: Slow (Good Quality) | A good middle ground. NVIDIA’s OBS guide recommends P6 if your card has room to spare. |
| Tuning | High Quality | |
| Multipass Mode | Two Passes (Quarter Resolution) | Better bitrate distribution for little extra load. |
| Profile | high | |
| Look-ahead | on | Better quality according to NVIDIA. Turn it off if your GPU is heavily loaded. |
| Adaptive Quantization | on | Formerly called Psycho Visual Tuning. |
| B-Frames | 2 | Twitch’s recommendation for NVENC. B-frames are in-between frames calculated from the frames before and after them, which saves bitrate. |
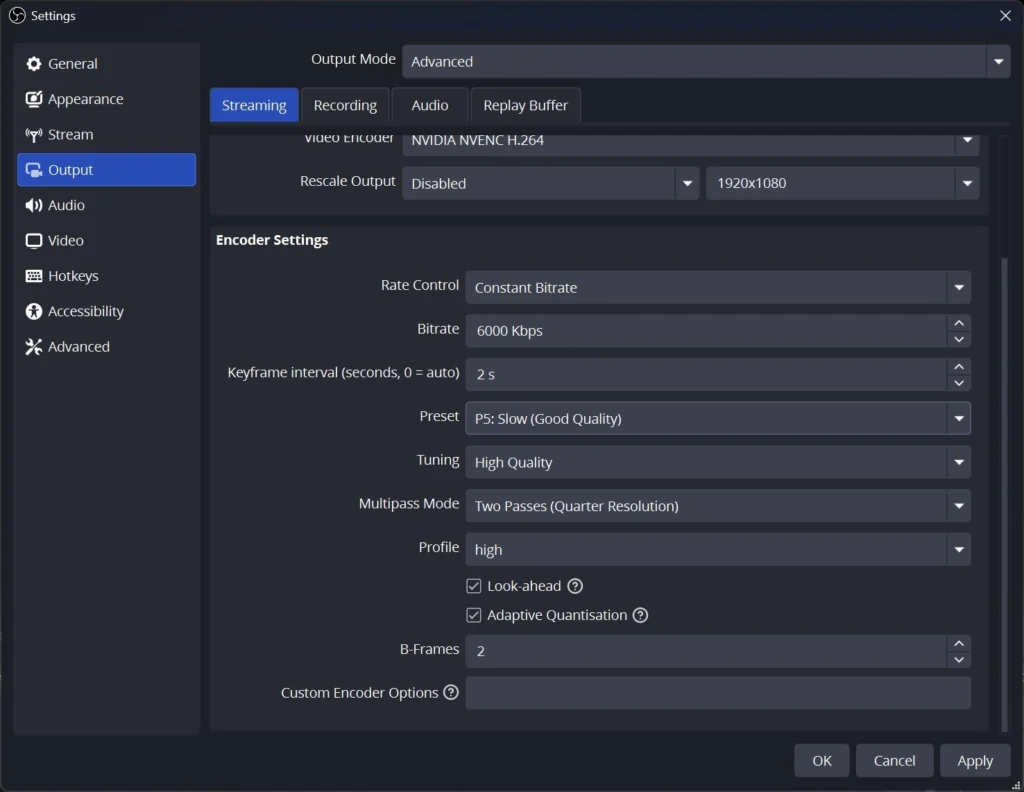
AMD or Intel: the basics stay the same: Constant Bitrate (CBR), 6000 Kbps, keyframe interval 2. As a starting point for quality, pick the “Quality” preset on AMD, and on Intel set Target Usage to “TU4: Balanced (Medium Quality)”. If you get encoding lag, go one step faster. Leave the other fields on their defaults.
For audio, stick with AAC at 160 Kbps. That’s the maximum Twitch lists. You set the audio bitrate in the Audio tab of the output settings.
More than 6000 Kbps? OBS caps the Twitch bitrate at 6000 Kbps unless you check “Ignore streaming service setting recommendations” in the stream settings. The easiest way to get Twitch’s higher values (up to 7.5 Mbps at 1080p) is Enhanced Broadcasting, where Twitch picks the bitrate for you. Twitch itself says a stable stream is better than a sharper one that drops frames.
YouTube: higher bitrates and HEVC or AV1 work there. For 1080p60 with HEVC or AV1, YouTube recommends around 12 Mbps. The details are in YouTube’s encoder recommendations. Set up a separate profile for it.
Step 6: Set video to 1080p60
Under Settings > Video, a new profile sits at an output of 1280×720 at 30 FPS, and that catches almost everyone at the start. Your stream then looks mushy, no matter how good your encoder is.
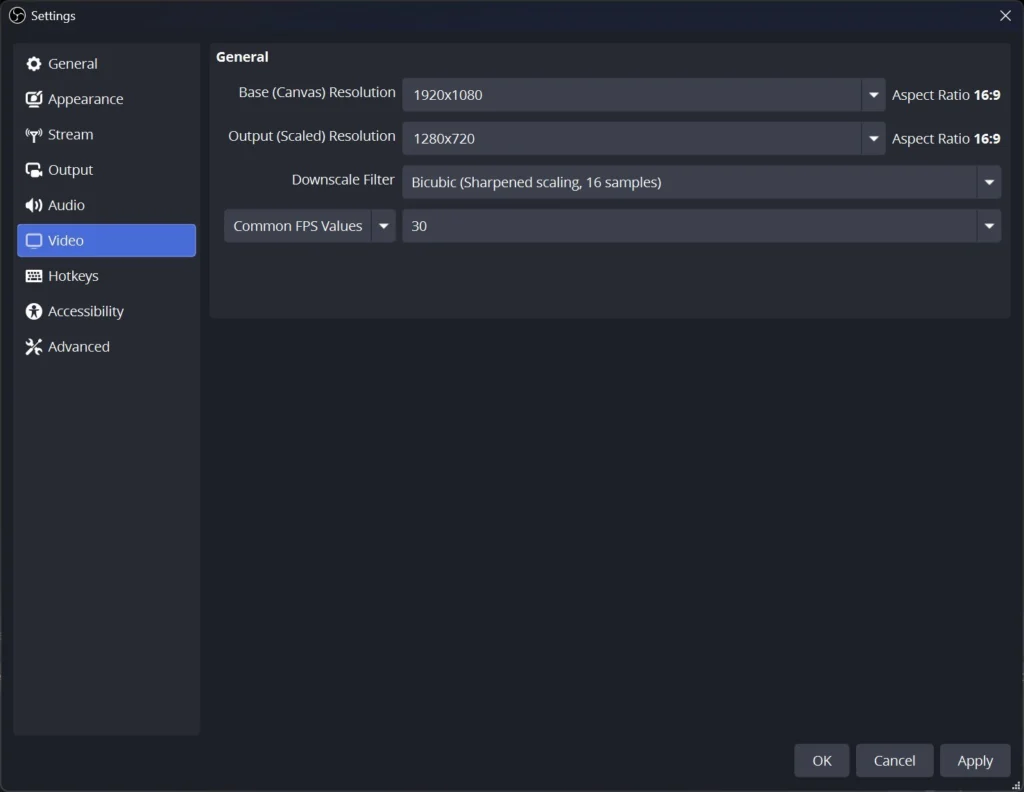
- Base (Canvas) Resolution: 1920×1080. That’s the workspace you build your scene on.
- Output (Scaled) Resolution: 1920×1080. That’s the resolution you stream.
- Common FPS Values: 60.
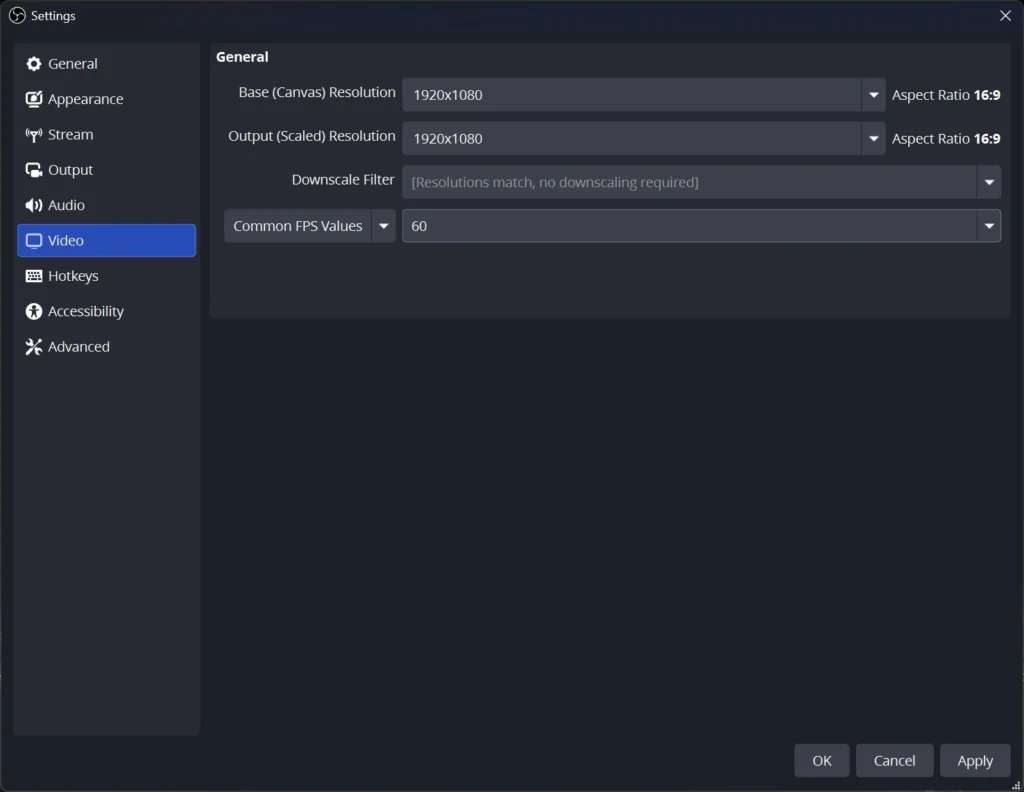
Even on a 1440p or 4K monitor, keep the canvas at 1920×1080. OBS simply scales your sources into the scene. If your upload can’t handle 6000 Kbps, drop to 1280×720 at 60 FPS and 4500 Kbps, which is Twitch’s recommendation for 720p60.
Step 7: Audio settings and global audio devices
Under Settings > Audio, keep Sample Rate at 48 kHz and Channels on Stereo. Below that are the Global Audio Devices. In a fresh setup, Desktop Audio and Mic/Auxiliary Audio are set to “Default”. That means OBS captures your Windows speakers and your Windows mic in every scene automatically, even without you adding a source.
In this guide you add your mic and PC audio as separate sources in step 10. So nothing gets captured twice, switch the global devices off now:
- Set Desktop Audio, Desktop Audio 2 and Mic/Auxiliary Audio through Mic/Auxiliary Audio 4 to Disabled.
- Click Apply. The “Desktop Audio” and “Mic/Aux” faders disappear from the audio mixer. From now on the mixer only shows the sources you add yourself.
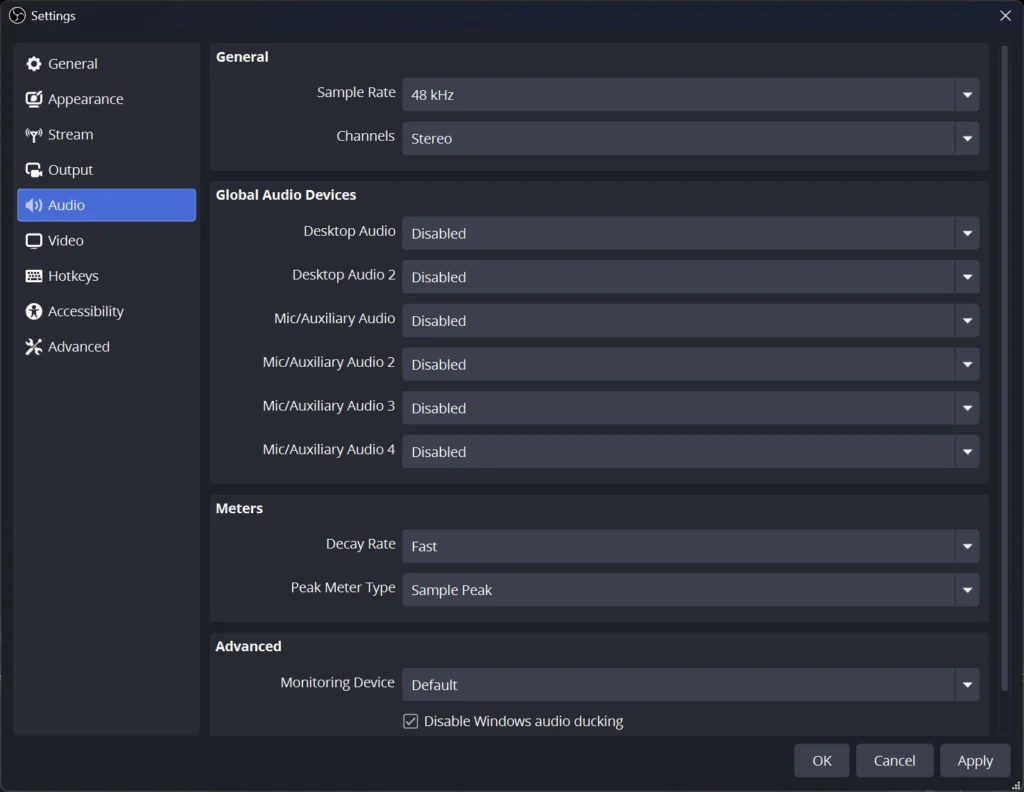
The rule for this whole guide: every sound reaches OBS exactly once, either through the global devices or through your own sources in the scene, never both. If you’d rather keep it really simple, you can leave the global devices on your mic and your speakers instead. Then you don’t add your own mic and PC audio sources in step 10.
Step 8: Advanced, color and network
Under Settings > Advanced, leave the video settings as they are for a normal stream:
- Color Format: NV12 (8-bit, 4:2:0, 2 planes)
- Color Space: Rec. 709
- Color Range: Limited
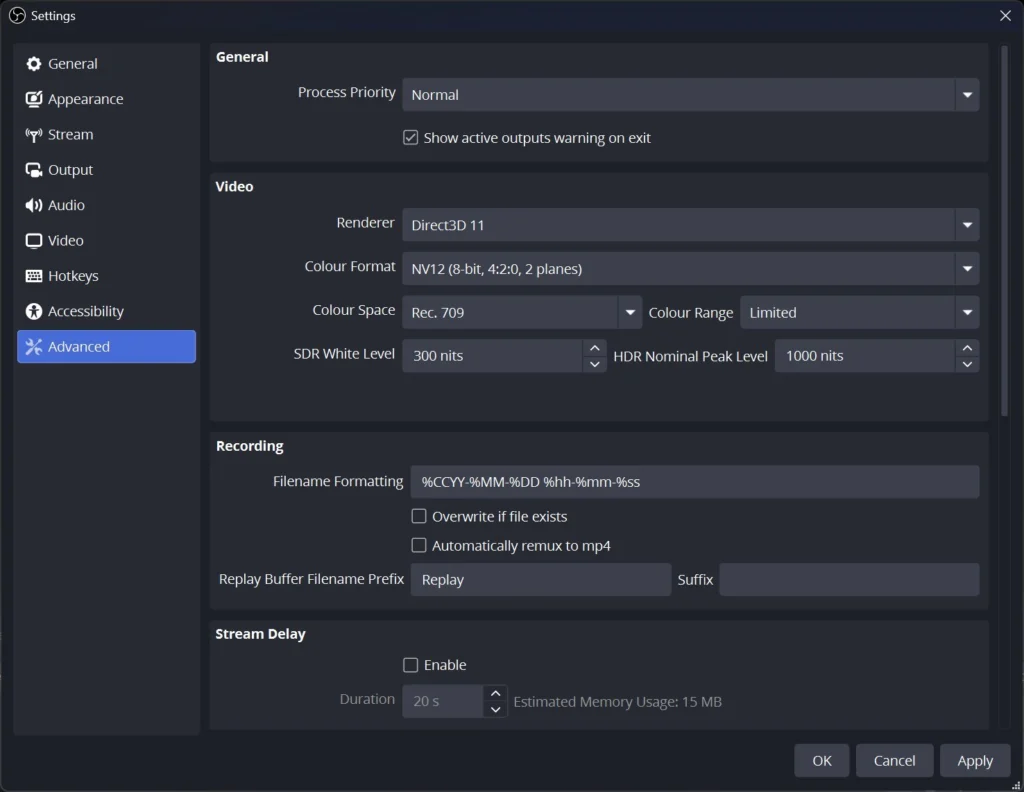
These values match what Twitch and most players expect. If you set Color Range to “Full”, blacks and whites will look off for a lot of viewers. You only need different values for HDR streams on YouTube.
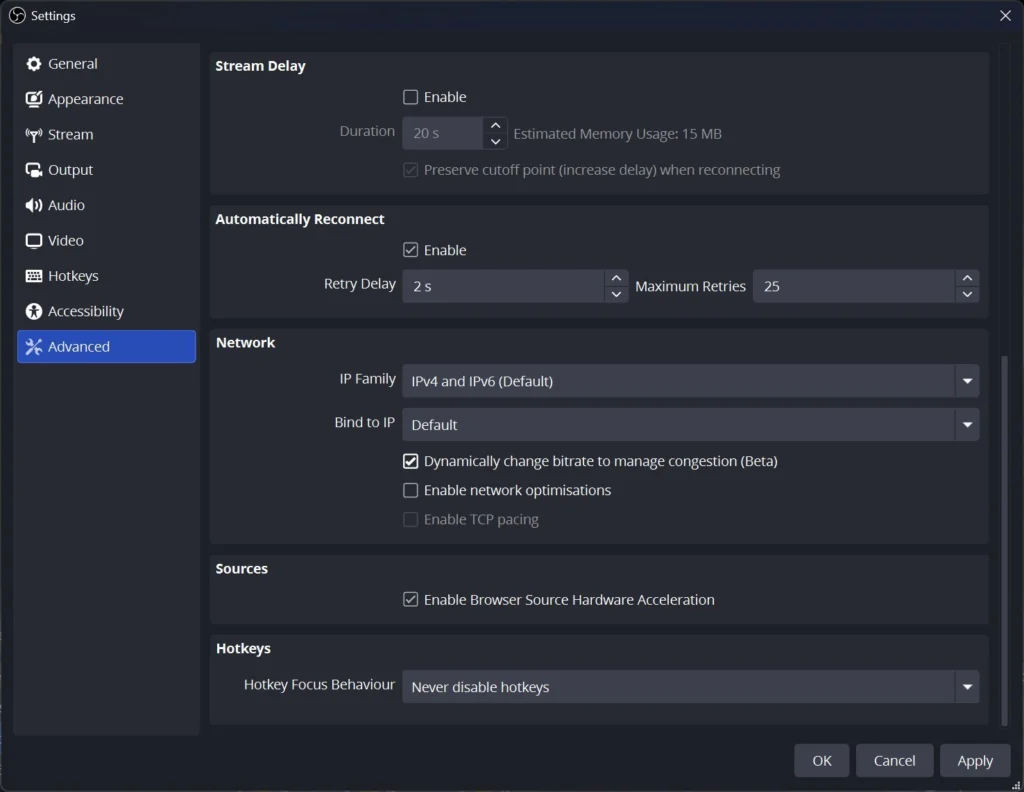
Further down, in the Network section, you’ll find Dynamically change bitrate to manage congestion. With it on, OBS lowers the bitrate when your connection struggles instead of dropping frames. That hides problems without fixing them, and according to OBS it can take a few minutes for the bitrate to recover. My tip: stream over an Ethernet cable instead of Wi-Fi, and you’ll rarely need it. It’s fine to leave it on as a safety net. Above it, keep Automatically Reconnect enabled so OBS tries to resume the stream on its own after a drop.
Step 9: Your first scene and sources
In the Scenes area at the bottom left, a fresh setup already has an empty scene. Right-click to rename it, for example to “Live”. Next to it, in Sources, use the plus button to add your elements.
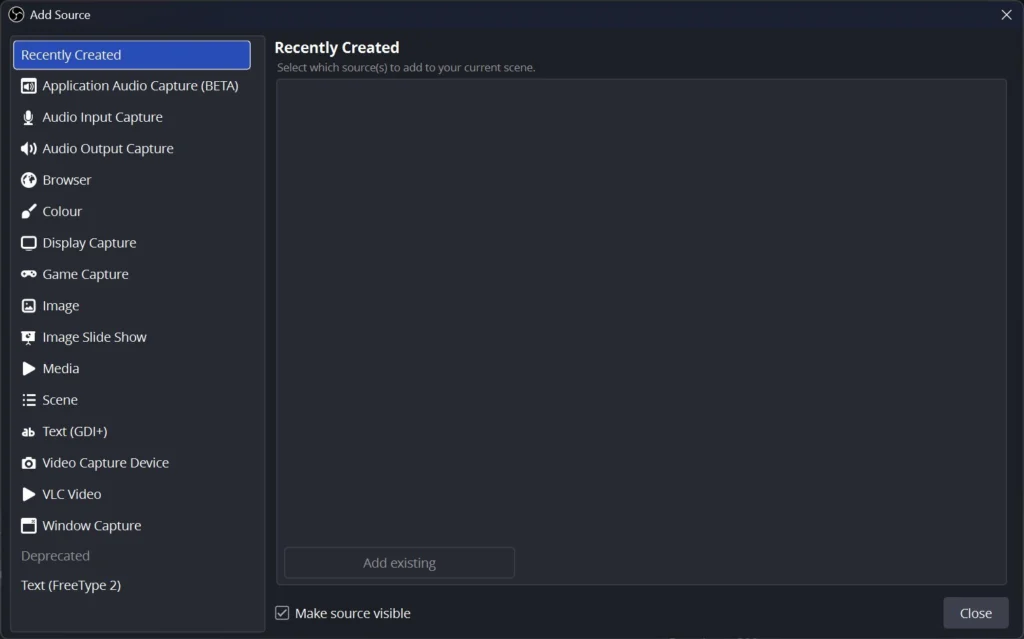
| You want to show | Source |
|---|---|
| A PC game | Game Capture. If that doesn’t work, use Window Capture or Display Capture. |
| Your whole screen | Display Capture |
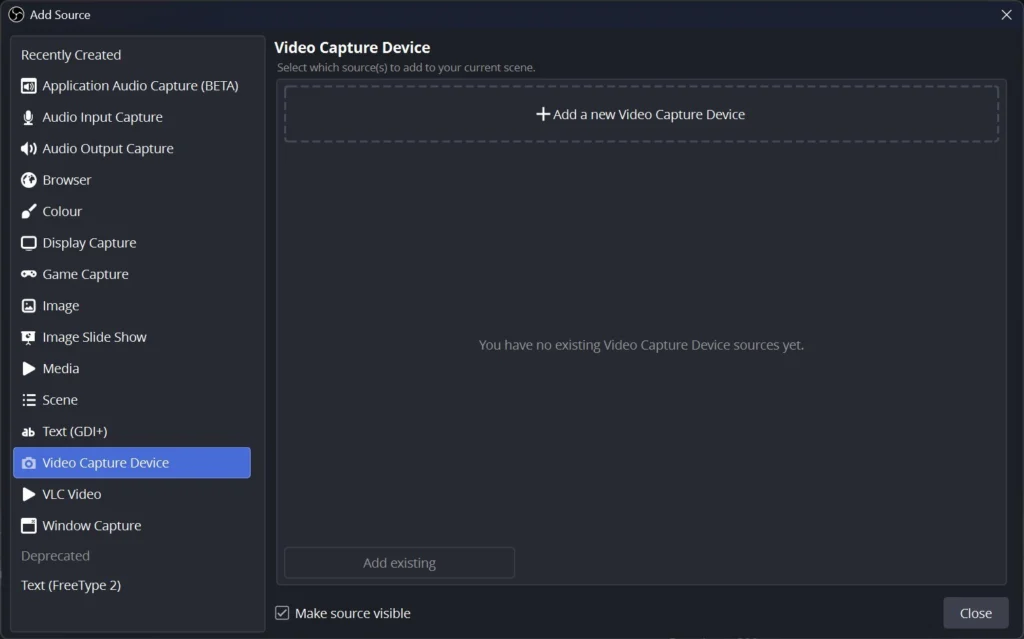
| Webcam or capture card | Video Capture Device |
| Alerts, chat, web overlays | Browser |
| Your mic | Audio Input Capture |
| Your PC’s sound | Audio Output Capture, or Application Audio Capture for single apps |
Example: add a capture card
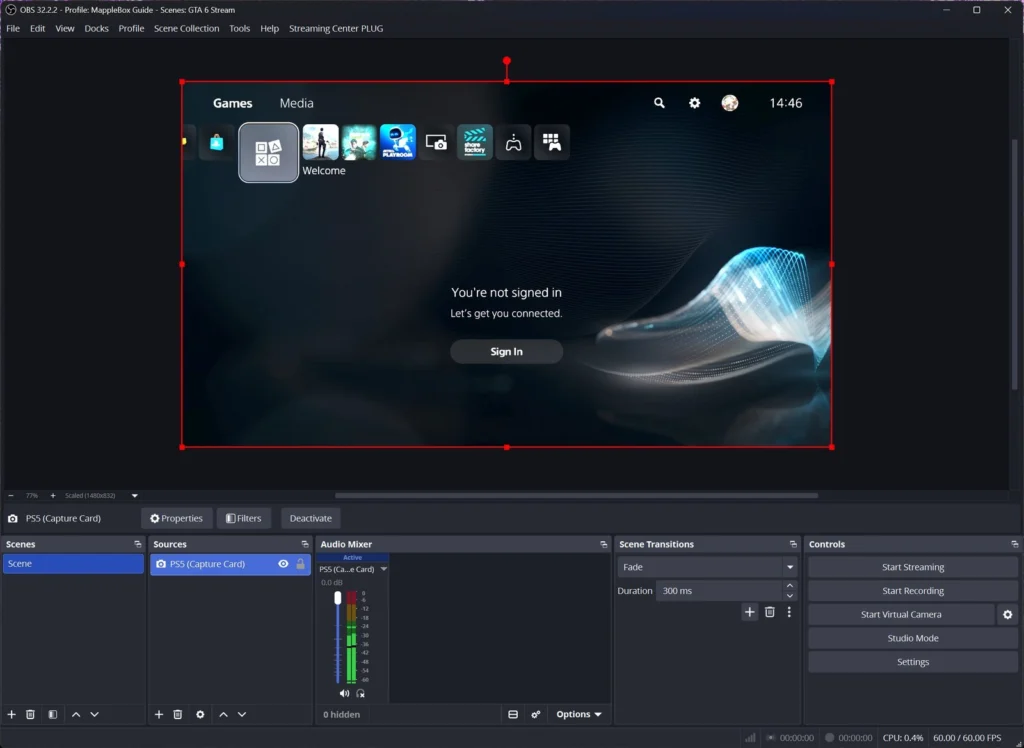
- Click the plus under Sources, pick Video Capture Device and give it a clear name, like “PS5 (Capture Card)”.
- Under Device, pick your card from the list.
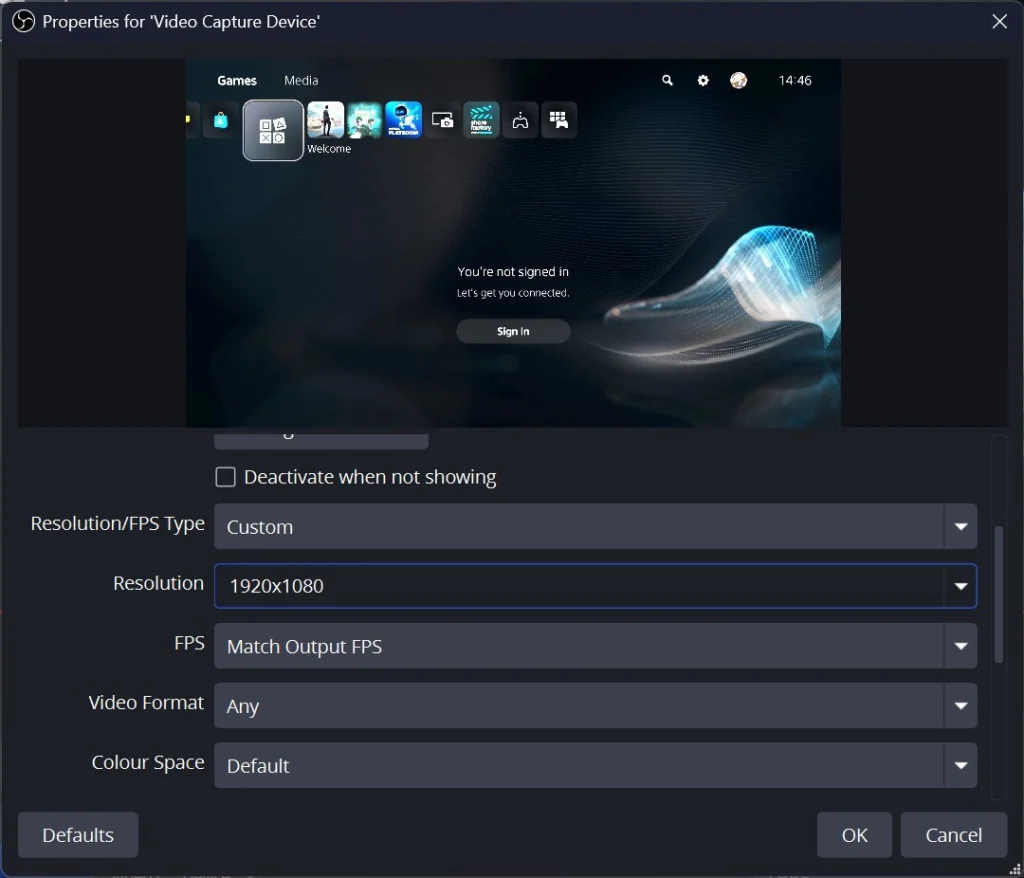
- Set Resolution/FPS Type to Custom, Resolution to 1920×1080, and FPS to “Match Output FPS”.
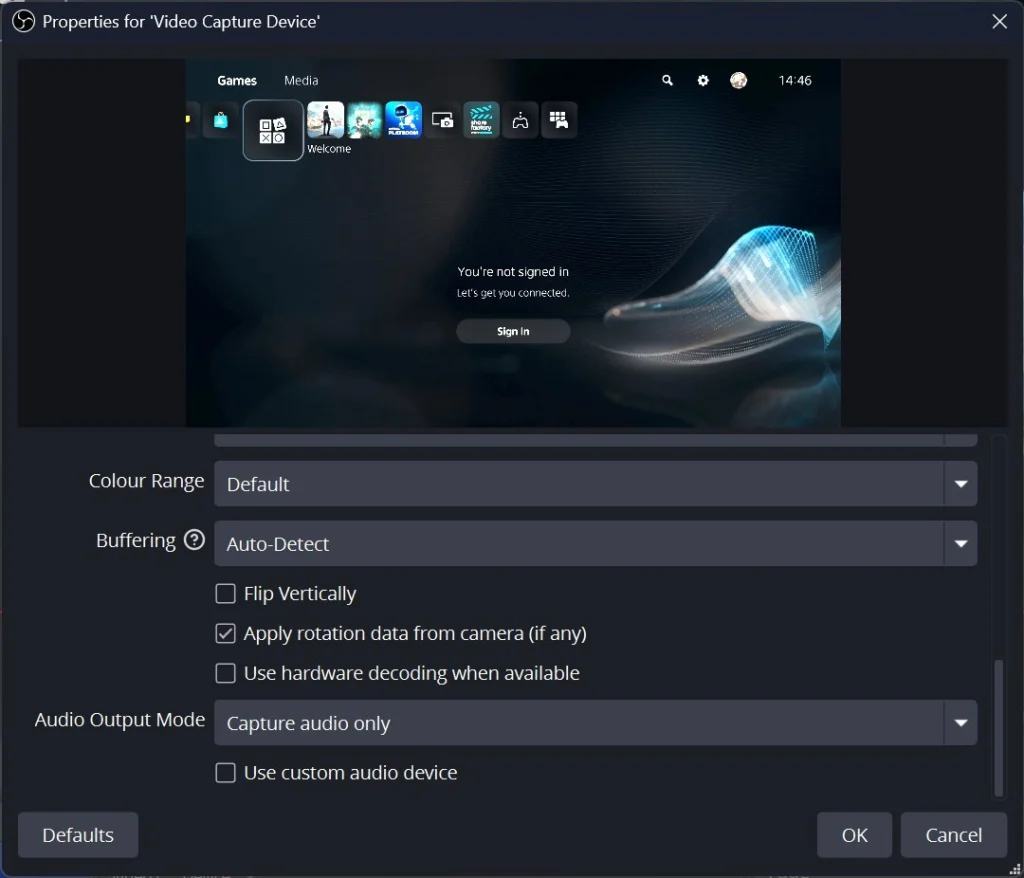
- At the bottom, leave Audio Output Mode on Capture audio only. That’s the default.
- Click OK. Right-click the source > Transform > Fit to screen to fill the canvas.
Example: add a webcam
A webcam is also a Video Capture Device, but with different settings, since it sits small in a corner instead of covering the whole picture:
- Plus under Sources > Video Capture Device, named something like “Webcam”.
- Under Device, pick your webcam.
- Set Resolution/FPS Type to Custom and pick exactly the Resolution and FPS your camera offers in the list. Many webcams only do 1920×1080 at 30fps. In that case pick exactly that, otherwise the picture stays black or stutters.
- Click OK. Drag the red corners to make the webcam smaller and move it into a corner. Skip “Fit to screen” here, or the webcam covers your game.
The order in the sources list is the layer order: whatever is on top sits in front. So your webcam goes above the game in the list.
Break scene and Studio Mode
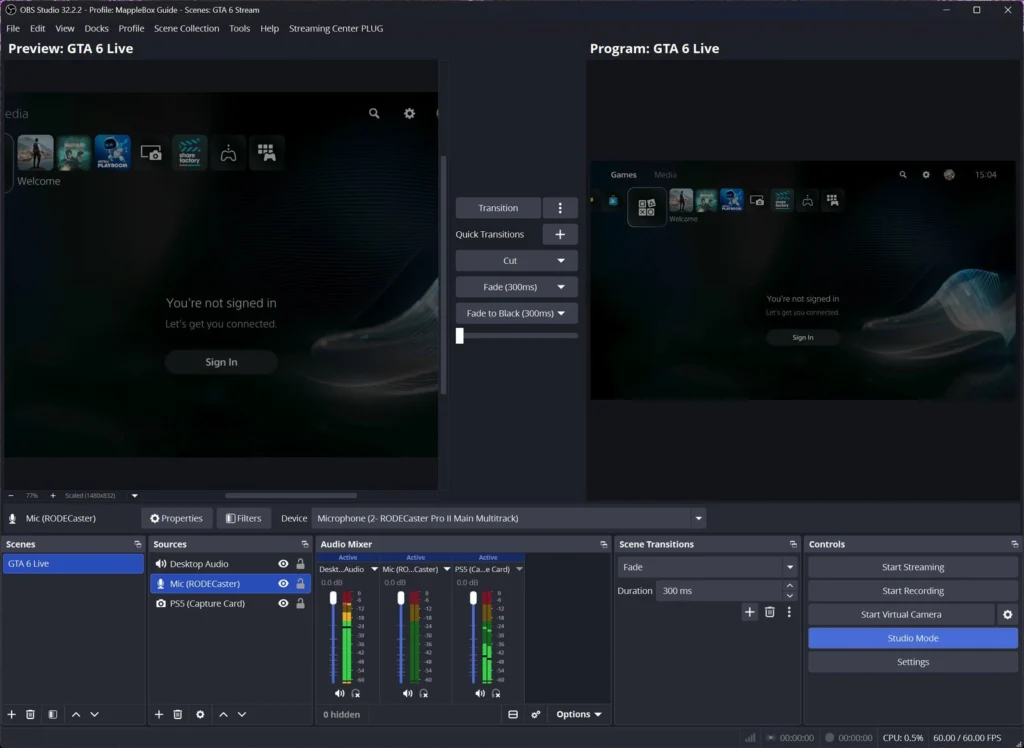
Also add a second scene, like “Be right back” with a still image. Use it whenever you don’t want to show menus, chats or private notifications. If you want to rearrange scenes live without viewers seeing it, turn on Studio Mode. The button sits at the bottom right in the Controls dock. You then edit the preview on the left while the right side shows what’s live. The “Transition” button in the middle sends your preview live.
Step 10: Desktop audio and microphone
Audio is where most mistakes happen. The most common one is a sound that ends up in your stream twice, with an echo or slightly out of sync. So the rule from step 7 applies here too: every sound reaches OBS exactly once. You disabled the global audio devices in step 7, and now you add your mic and PC audio as separate sources.
Add your mic
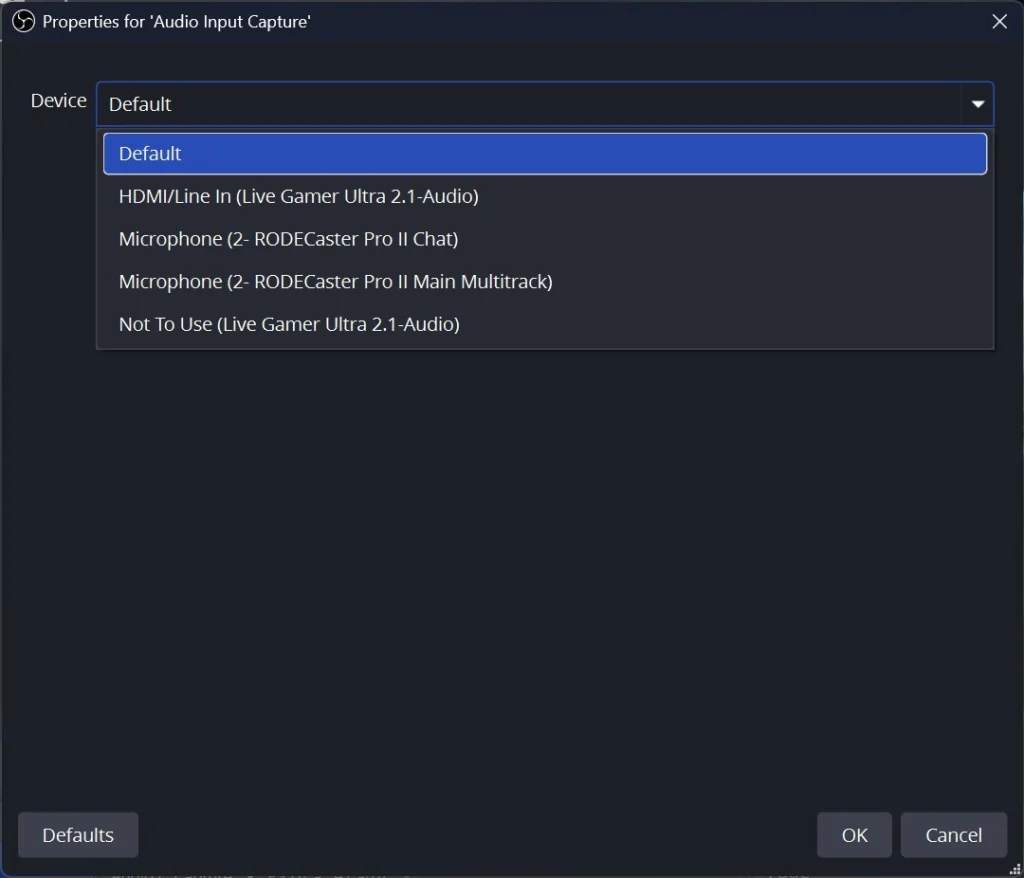
- Plus under Sources > Audio Input Capture, named something like “Mic”.
- Under Device, pick your mic directly from the list. Don’t pick “Default”: if Windows switches its default device, for example when you plug in a headset, OBS suddenly hears the wrong mic.
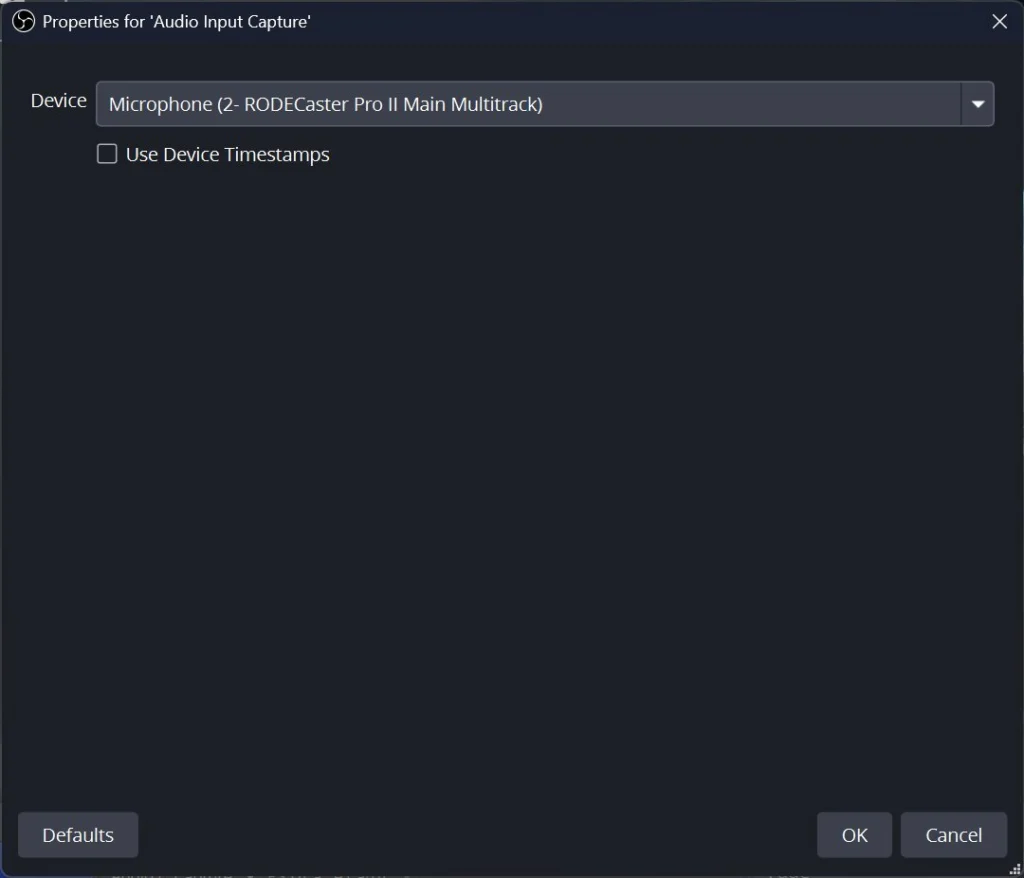
If your mic is connected to an audio interface or mixer, pick the interface. My Shure MV7+ is plugged into a RØDECaster Pro II over XLR, so my device is called “RØDECaster Pro II Main”. What changes with that is covered in the RØDECaster section below.
Add your PC’s sound
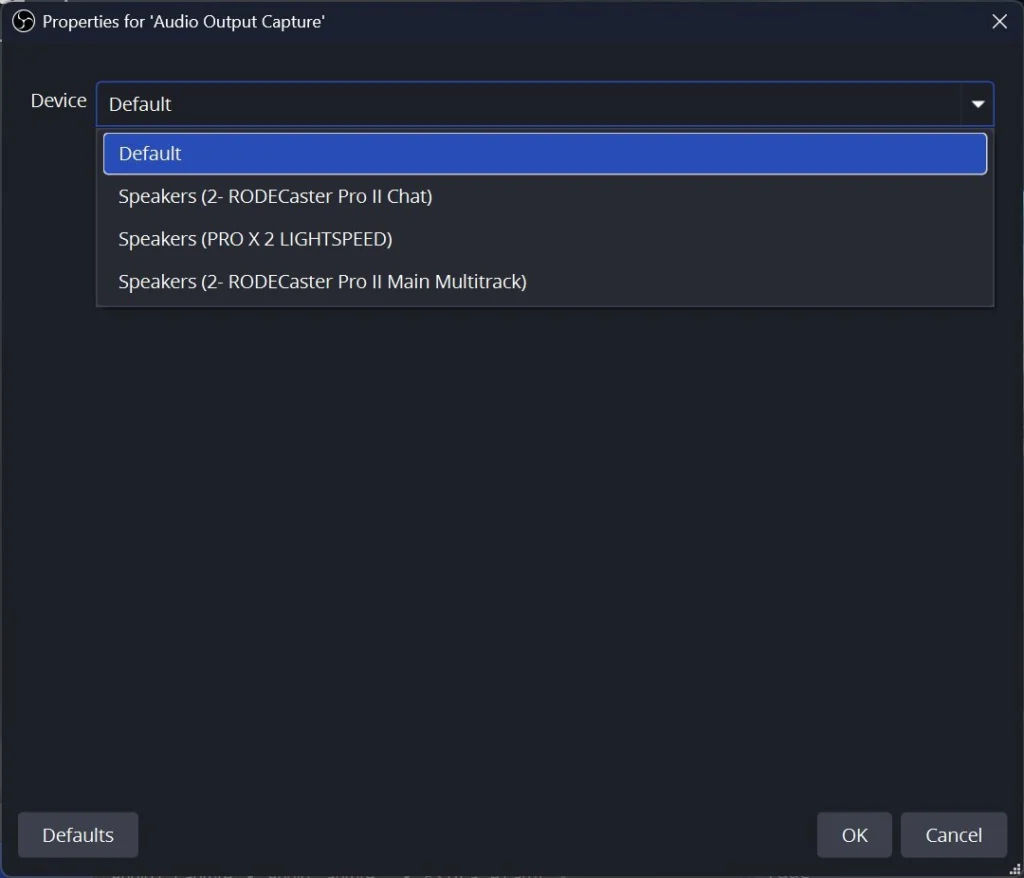
For your PC’s sound, meaning game, Discord, alerts and browser, you have three options. Pick exactly one:
- Audio Output Capture as a source in your scene. For the device, pick the output you actually listen on, like your headset.
- Application Audio Capture for individual programs, for example only the game and only Discord. That keeps Windows sounds and browser tabs out of your stream. It works on Windows 10 version 2004 and newer. OBS says global Desktop Audio has to be Disabled for this too, or you get an echo.
- Global Desktop Audio under Settings > Audio. You disabled it in step 7. If you’d rather go this way, set it back to your output device there and don’t add an Audio Output Capture.
If you use a mixer like the RØDECaster that already puts your PC audio into its mix, don’t add any PC audio source at all. The RØDECaster section below shows what that looks like.
How to avoid doubled audio
- Global Mic/Aux plus an Audio Input Capture on the same mic gives you your mic twice. That’s why the global devices are disabled in step 7.
- Same for PC audio: not global Desktop Audio plus an Audio Output Capture on the same device.
- For a webcam or capture card, keep Audio Output Mode on Capture audio only. With “Output desktop audio (DirectSound)”, OBS also plays the sound through Windows, and a PC audio source captures it a second time.
- If your mixer or audio interface already puts your PC sound into its mix, you don’t need an extra PC audio source.
- Test: mute every source except one and play a YouTube clip in your browser. If the meter moves on more than one source, the sound arrives twice.
Monitoring off
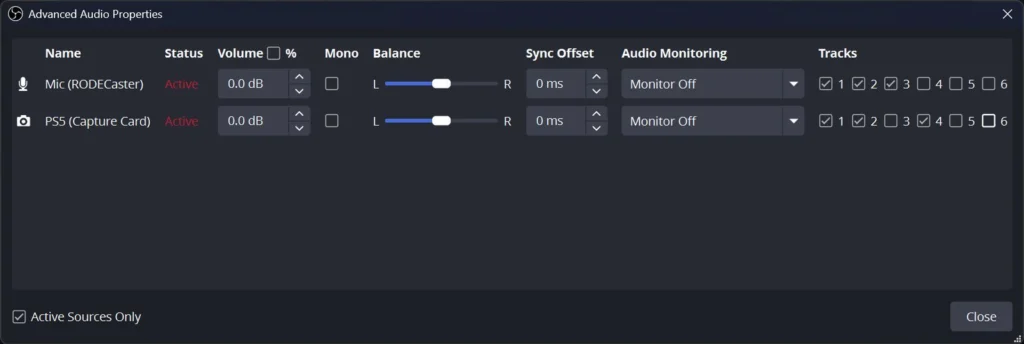
Open Advanced Audio Properties from the gear icon in the audio mixer or from the Edit menu. Keep Audio Monitoring on Monitor Off for every source. Monitoring plays a source through your monitoring device, which you only need if you can’t hear that source any other way. If monitoring runs on a device whose sound OBS also captures, the sound ends up in your stream twice.
Set your levels
The OBS mixer shows green up to -20 dB, yellow from -20 to -9 dB, and red from -9 dB. OBS’s advice: your voice should sit in the upper yellow range and peak into the start of the red. Game audio belongs in the lower yellow range, music and alerts stay in the green.
As numbers to start with: voice peaking around -10 dB, game around -20 dB. That way people hear you over the game. Then adjust by ear, with headphones on and a test recording.
Mic filters
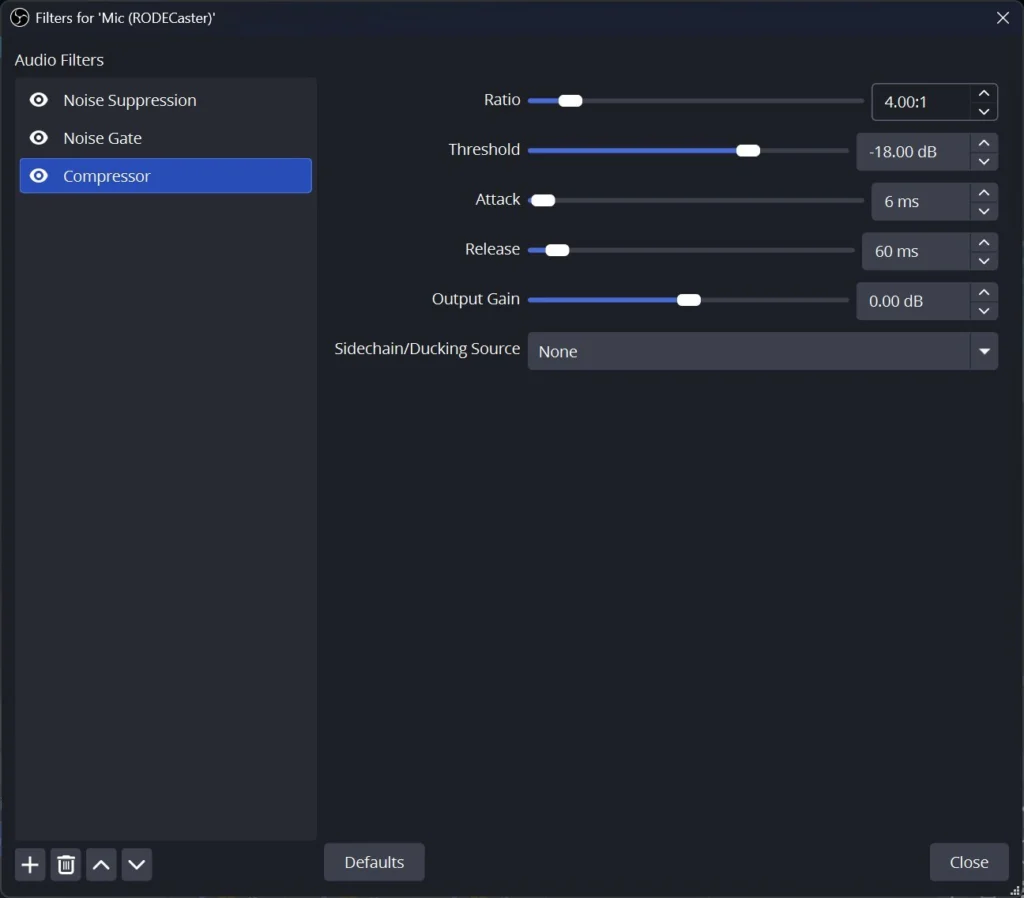
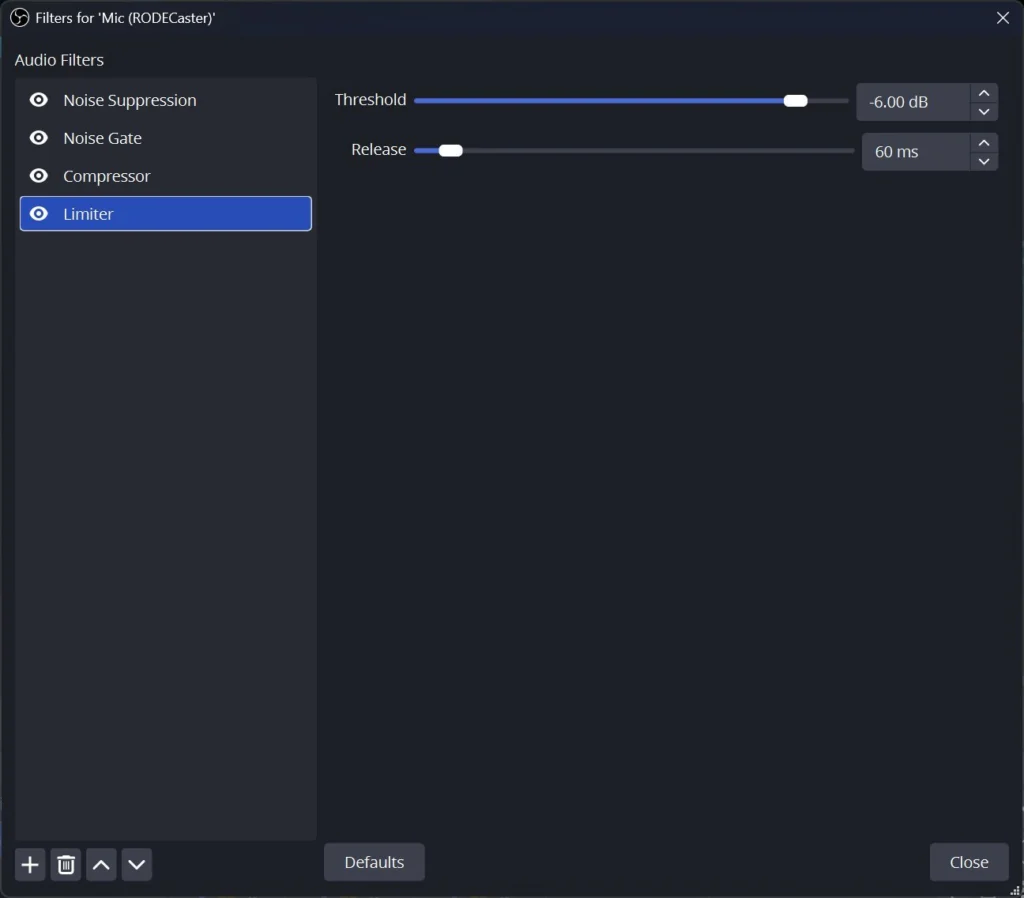
Right-click your mic source > Filters to open the filter window. Use the plus at the bottom left to add this chain under Audio Filters, in this order. New filters always land at the bottom of the list, and the arrows below the list change the order.
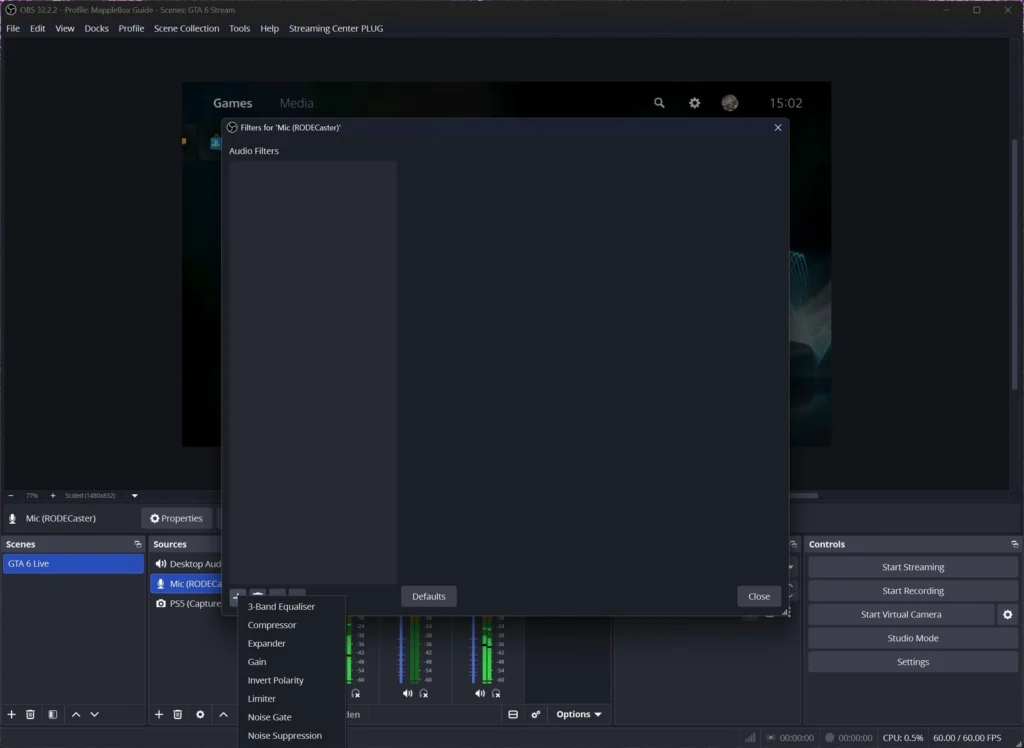
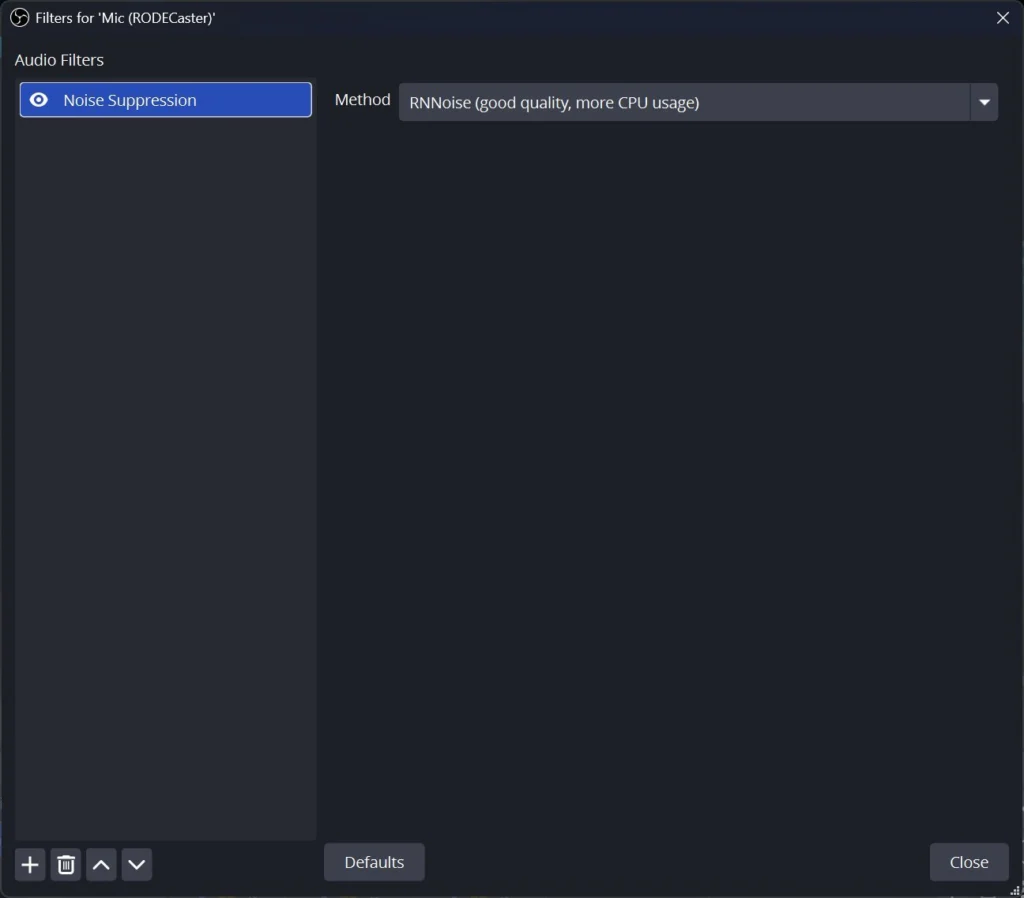
- Noise Suppression: method RNNoise. According to OBS it’s higher quality but uses more CPU. Speex is lighter and adjustable. These filters work well on steady noise like fans, less so in loud rooms.
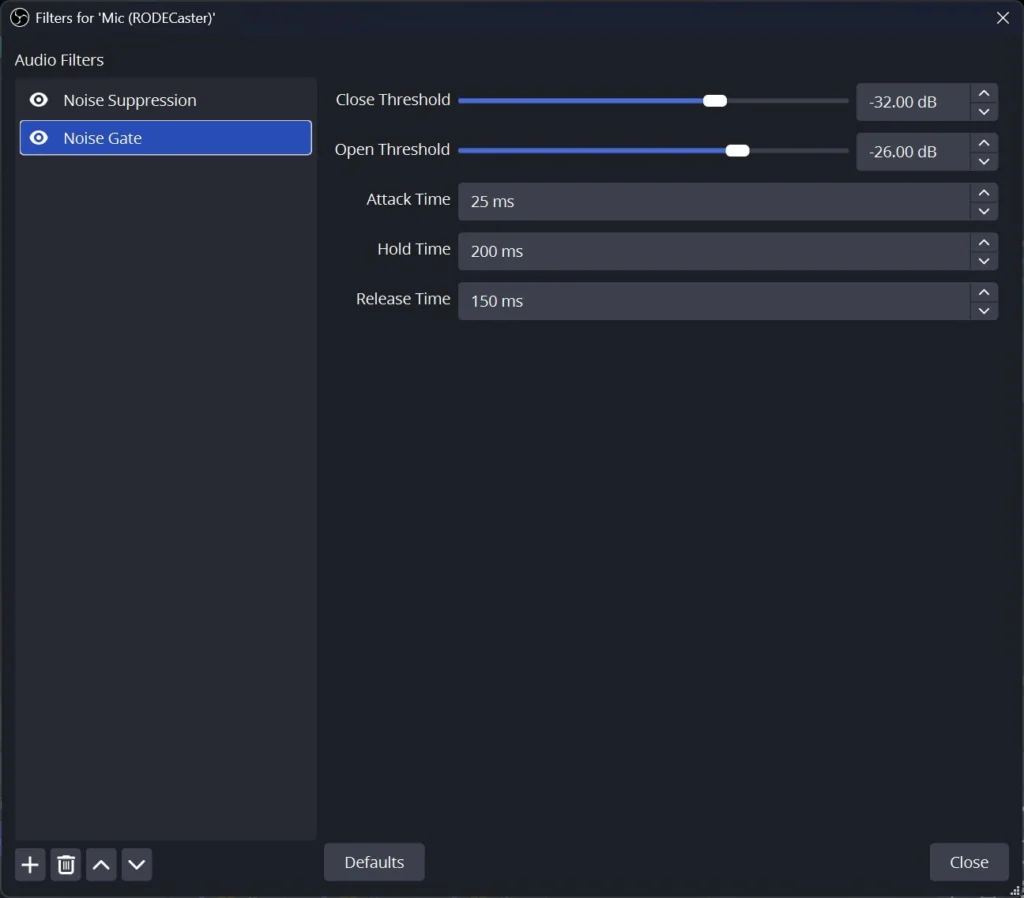
- Noise Gate: cuts everything while you’re not talking. OBS’s advice: set the Close Threshold just above your noise floor and the Open Threshold just below your voice. Defaults are -32 and -26 dB. Alternatively, use an Expander, which turns noise down instead of cutting it off.
- Compressor: evens out loud and quiet parts. The OBS defaults are a 10:1 ratio and a -18 dB threshold, which is pretty hard for speech. Starting values: 3:1 to 4:1 at -18 dB, then adjust by ear.
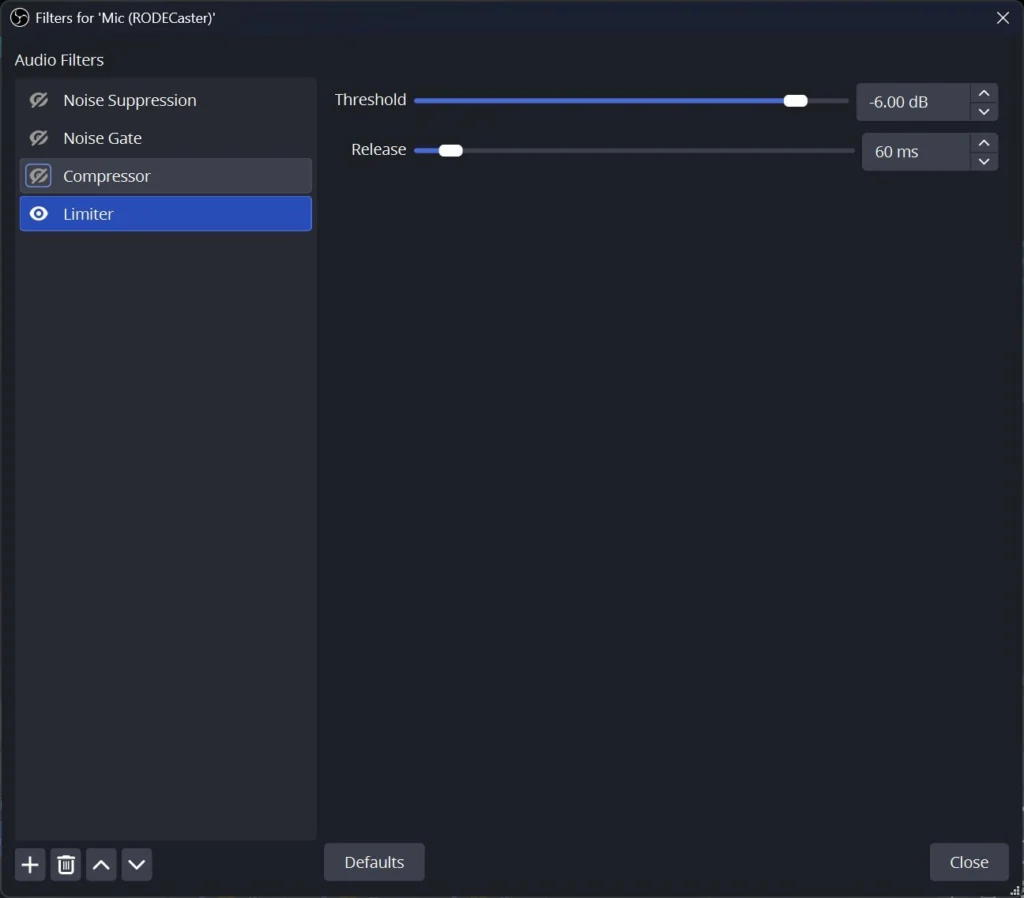
- Limiter: according to OBS, always the last filter. It keeps anything from going over the threshold so nothing clips. The default is -6 dB, -3 dB works as a starting value too.
Stop there: every filter costs a bit of performance, and too much processing quickly sounds like a phone call. Click the eye icon to switch a filter off without deleting it, so you can hear the difference in a test recording.
Tracks for recordings and Twitch VODs
OBS can output up to six separate audio tracks. In Advanced Audio Properties, Tracks decides which track a source lands on. That gets you two things: a VOD without licensed music, and recordings where you can adjust every source separately in your editor. Use this layout:
| Track | Contents | Used for |
|---|---|---|
| 1 | Full mix, all sources | Live audio in the stream and the main track of your recording |
| 2 | Mic and game, no licensed music | Twitch VOD Track |
| 3 | Mic only | Editing |
| 4 | Game or PS5 only | Editing |
| 5 | Desktop audio, Discord or music, if you use them | Editing |
- Advanced Audio Properties: mic on tracks 1, 2 and 3. Game or capture card on tracks 1, 2 and 4. PC audio or Discord on tracks 1, 2 and 5. Licensed music only on tracks 1 and 5, never on track 2.
- Settings > Output, Advanced mode, Streaming tab: Audio Track 1 and check Twitch VOD Track. According to OBS, the VOD track always uses track 2. Your Twitch account needs to be connected in OBS for this (step 4).
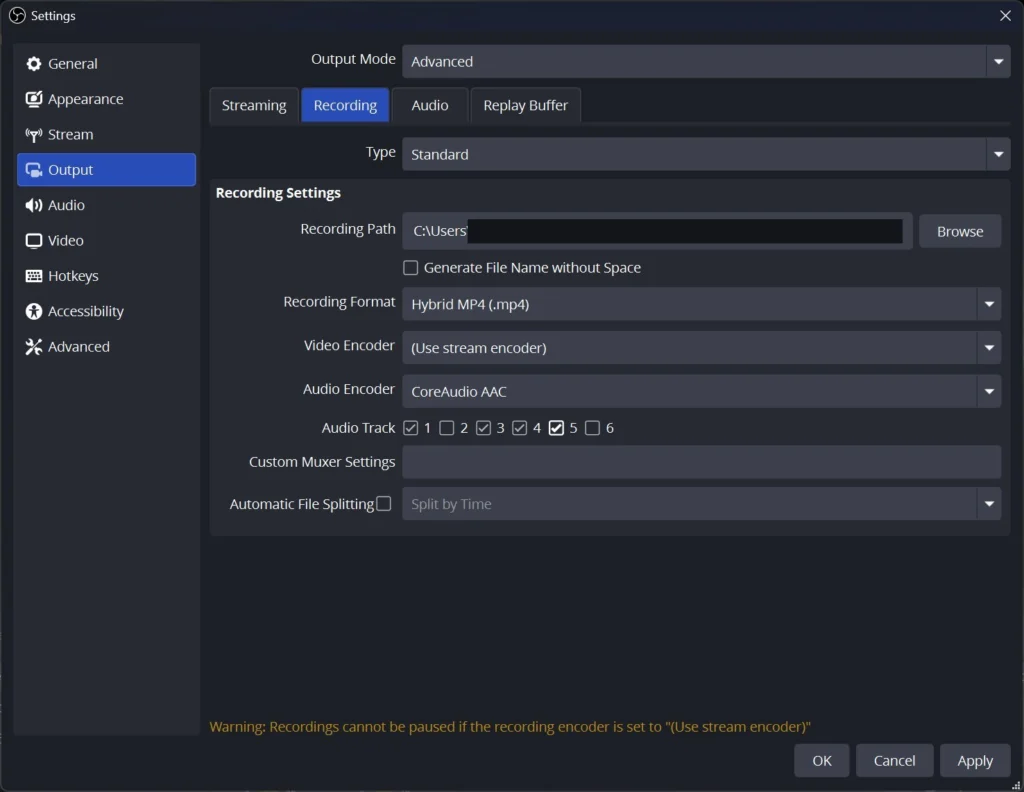
- Recording tab: under Audio Track, check tracks 1, 3, 4 and 5.
Regular video players only play track 1, so you hear the normal mix when you watch the file. In your editor, you also get every source on its own.
Extra: RØDECaster Pro II with OBS
If you use a RØDECaster Pro II as your audio interface, audio works a bit differently. Over the USB 1 port, Windows shows two devices, each as a microphone and as speakers:
- RØDECaster Pro II Main: if you make it your Windows default output, your PC audio lands on the USB 1 Main channel on the console, according to RØDE, and you assign that to a fader. By default, the console sends the full mix back to your PC over the same device: mics, PC audio and everything else on your faders.
- RØDECaster Pro II Chat: a separate device for Discord, Skype and the like. RØDE says to pick it as both microphone and speakers in your app and assign USB 1 Chat to a fader. Mix-minus is on by default for Chat: the person you’re talking to hears everything except themselves, so there’s no echo.
What that means for OBS: if you add “RØDECaster Pro II Main” as your mic source in OBS and Windows outputs to RØDECaster Main, your PC audio is already in the main mix. So don’t add any PC audio source, neither an Audio Output Capture nor global Desktop Audio. Either one doubles your PC audio. If Windows outputs to a different device instead, like a headset, your PC audio isn’t in the RØDECaster mix and you need an Audio Output Capture for that device.
Here’s how to set it up:
- Multitrack off: for software that can’t pick individual channels, RØDE recommends turning multitrack mode off (on the console, Settings > Outputs > Multitrack > USB set to Off). Windows then calls the device just “RØDECaster Pro II Main”. For a simple OBS setup, that’s the safe route.
- Windows default output: RØDECaster Pro II Main. Assign USB 1 Main to a fader on the console, then you control your PC audio right on the fader.
- Discord: input and output on RØDECaster Pro II Chat, USB 1 Chat on its own fader. That puts your party chat in the stream with no echo for the others.
- OBS: one Audio Input Capture on RØDECaster Pro II Main. No Audio Output Capture, global Desktop Audio disabled (step 7).
- Console with a capture card: the game audio comes into OBS directly through the capture card source and doesn’t go through the RØDECaster.
- Processing: the RØDECaster has an APHEX compressor, noise gate, high-pass filter, de-esser and EQ on every channel. If you use those, skip the OBS mic filters and add a Limiter at most, as a safety net. Processing twice quickly sounds squashed.
Your PC shows “Main Multitrack”? Then multitrack mode is on, like on mine. According to RØDE, the main mix sits on the first two channels in multitrack mode, and those are what OBS takes for a regular stereo source. In my test, the mix came through cleanly in OBS from “RØDECaster Pro II Main Multitrack”. If you want to be completely sure, turn multitrack off as in point 1.
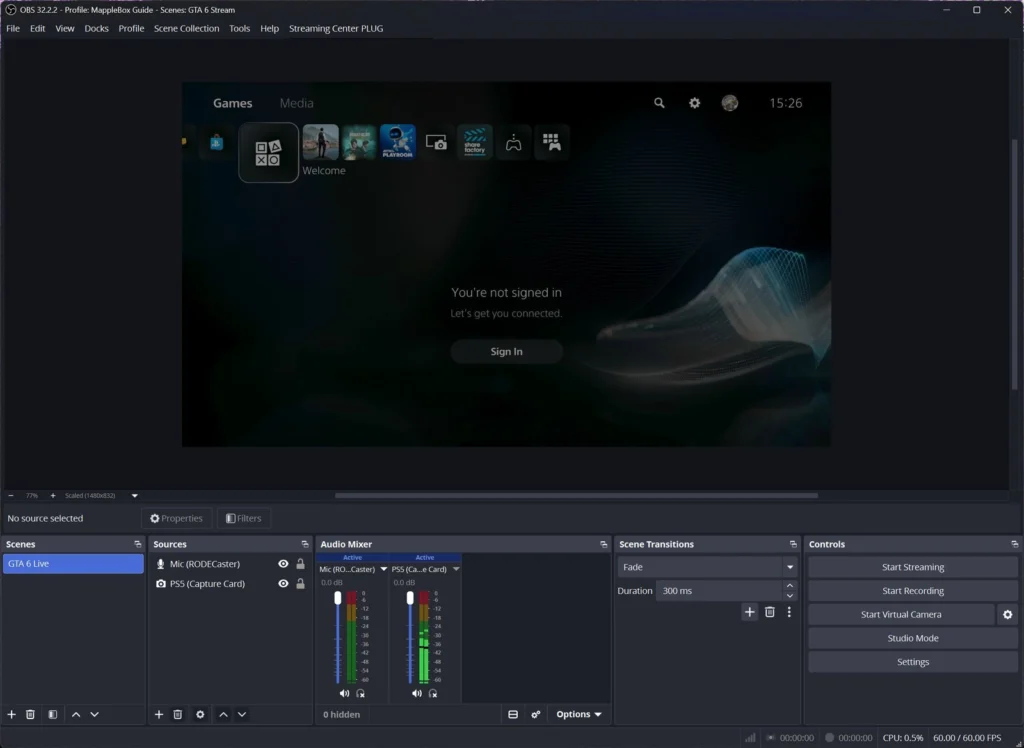
Here’s my setup: a Shure MV7+ on a purple RØDE XLR cable* into the RØDECaster Pro II, and the PS5 Slim through the capture card. In OBS, the scene only has two sources:
Watch your tracks: with the main mix as your mic source, track 3 carries the whole console mix, meaning mic plus PC audio and chat. If licensed music plays through your PC, it’s on track 2 and in your VOD as well. In that case, play it through a different device or leave it out. For truly separate sources in OBS, use the RØDECaster Virtual Devices Driver on Windows: every fader then shows up as its own device, and “System (RØDECaster)” is the stereo sum. RØDE explains the setup in its OBS help article.
Step 11: Test recording and stats
Before you go live, always do a test recording first. The recording settings are under Settings > Output > Recording.
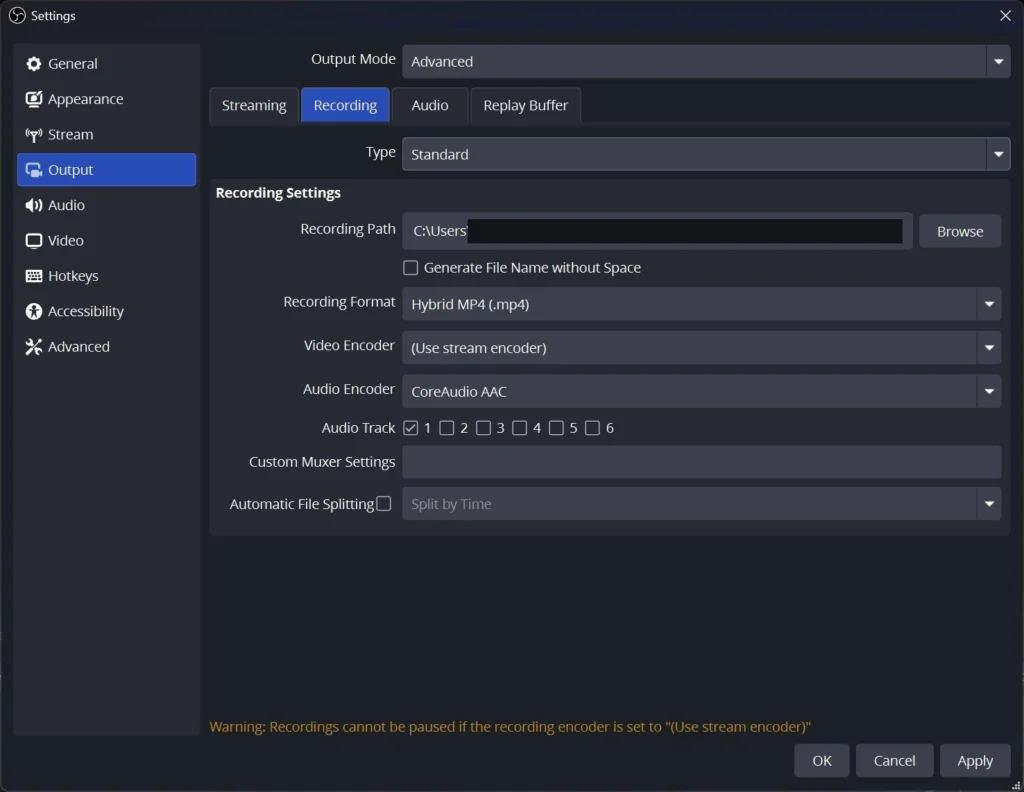
- Recording Format: Hybrid MP4. It was added in OBS 30.2. According to OBS, the file stays recoverable even after a crash or power cut and then plays like a normal MP4. The alternative is MKV, which you convert to MP4 afterwards with File > Remux Recordings. Remuxing only repackages the file without re-encoding, so it’s fast and costs no quality. File > Show Recordings opens your recordings folder.
- Video Encoder: “(Use stream encoder)” saves performance, and the recording then has the same quality as the stream. You can’t pause the recording with it, which OBS also points out at the bottom of the window. For better recordings, pick a separate encoder, see the OBS recording guide.
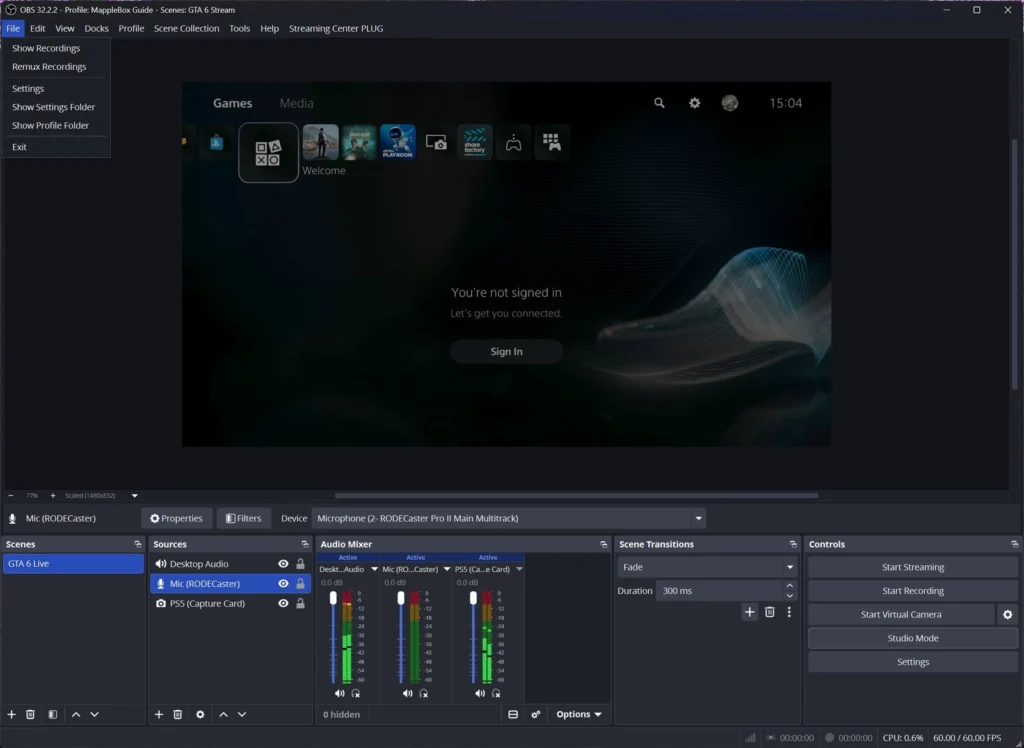
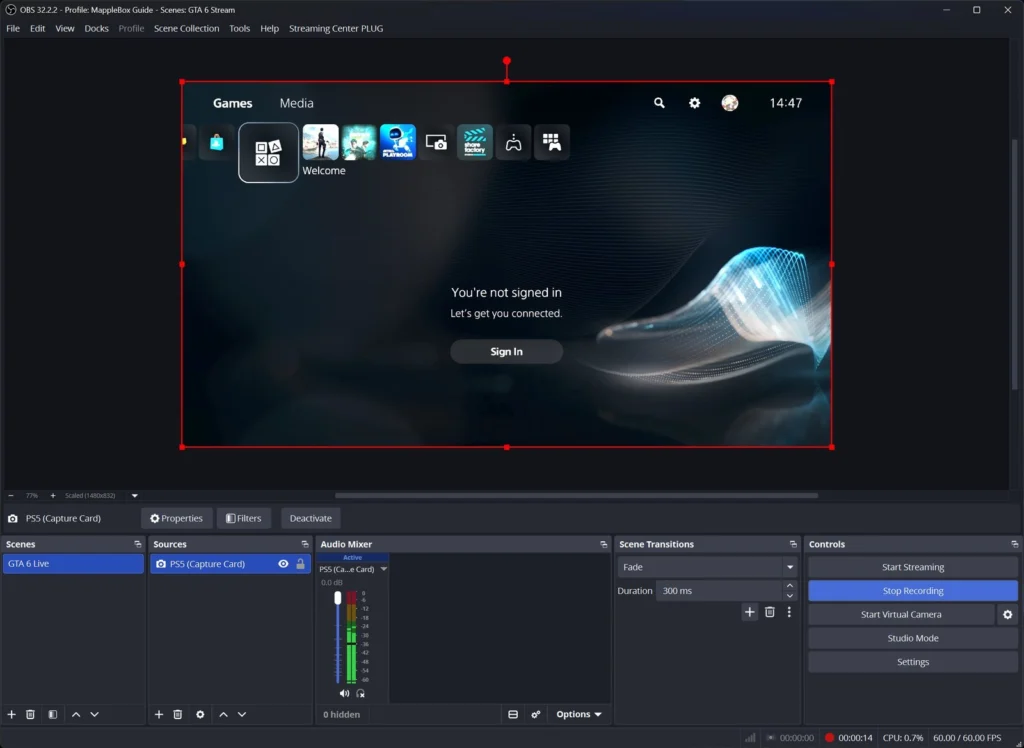
Then click Start Recording, play for a minute while talking, and stop the recording. Watch the file: does the picture look right, can you hear the game and your voice, and are lips and audio in sync?
Reading the Stats window
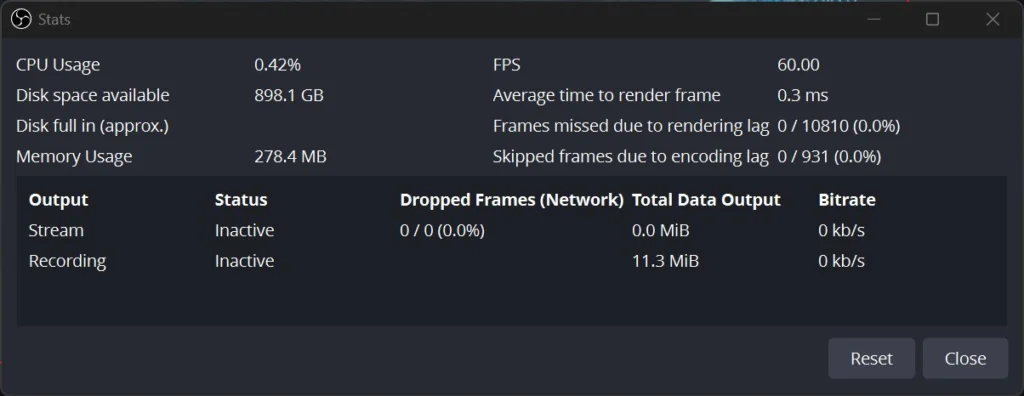
Open View > Stats. Under Settings > General you can also have it open on every startup. Three lines tell you where things go wrong:
| Line | Means | What helps |
|---|---|---|
| Frames missed due to rendering lag | Your GPU is so busy that OBS can’t compose the scene in time. Usually the game is eating everything. | Cap the game’s FPS or turn on V-Sync. OBS says to leave Windows Game Mode (Windows Settings > Gaming > Game Mode) on. With a console and capture card the game doesn’t run on your PC, so this is rarely an issue. |
| Skipped frames due to encoding lag | The encoder can’t keep up. | Pick a faster preset (for example P5 to P4), set Multipass Mode to Single Pass, turn off look-ahead. If that’s not enough, lower the resolution or FPS. |
| Dropped Frames (Network) | Your connection can’t keep up with the bitrate. | Ethernet instead of Wi-Fi, lower the bitrate (start at no more than 75% of your upload), try another server, turn on dynamic bitrate. |
In my test, a 15-second recording at 1920×1080 and 60fps, with H.264 video and 48 kHz stereo AAC audio, ran without a single lost frame.
Step 12: Test stream
The test recording shows whether picture and sound are right, but whether your connection can handle the stream only shows once you actually stream. So do a short test stream before your first real one:
- Click Start Streaming under Controls at the bottom right.
- Open your channel in the Twitch app on your phone, or the Stream Manager in your Creator Dashboard in a browser. The picture arrives there with a few seconds of delay. Check picture, game audio and voice.
- In OBS, look at the Dropped Frames (Network) line under View > Stats. If it stays at 0 or close to it, your connection handles the bitrate.
- After you log in, Twitch Inspector shows the bitrate your stream arrives with at Twitch and whether there were any drops.
- Click Stop Streaming.
My tip: to test without anyone watching, use the Enable Bandwidth Test Mode checkbox, which shows up in the stream settings once your Twitch account is connected. The stream then doesn’t go live on your channel, and you check it in Twitch Inspector only. Uncheck it afterwards, or nobody will see your real stream.
Checklist before every stream
- Right profile and scene collection active? Check the title bar.
- One-minute test recording: picture, voice, game audio, no echo.
- Levels in the mixer: voice peaking into the start of the red, game in the lower yellow.
- No doubled audio: every sound only once, global devices disabled, audio monitoring off.
- Stats open so you see lost frames live.
- Ethernet instead of Wi-Fi, downloads and cloud backups paused.
- Notifications on your PC off, “Be right back” scene ready.
- Stream key off screen, settings window closed, bandwidth test mode off.
- After changes: export profile and scene collection as a backup.
Troubleshooting
- Stream looks mushy: check under Settings > Video that your output is really 1920×1080 at 60 FPS and not the 1280×720 at 30 default.
- Doubled audio or echo: one device is captured twice, for example via a global audio device plus your own source, or a source has monitoring on. Go through the rules in steps 7 and 10.
- Mic meter doesn’t move: wrong device selected, or Windows is blocking access. Check Windows Settings > Privacy & security > Microphone (Windows 10: Settings > Privacy > Microphone) and make sure desktop apps are allowed to use the mic.
- Game Capture stays black: some games can’t be captured because OBS can’t hook into them. Use Window Capture or Display Capture instead. On laptops with two graphics chips, the OBS laptop troubleshooting guide helps.
- Encoding overloaded: see the table in step 11. If you’re on x264, switch to your graphics card’s hardware encoder.
- Rendering lag despite good hardware: OBS lists a quick fix: right-click OBS and choose “Run as administrator”. According to its knowledge base, that lets OBS ask Windows to reserve GPU capacity for it. OBS also recommends turning off Xbox Game Bar recording in Windows.
- Stream drops or stutters for viewers: check the network line in Stats, use Ethernet instead of Wi-Fi, lower the bitrate. Twitch Inspector shows you what actually reaches Twitch.
- Audio and video drift apart: adjust the audio source’s Sync Offset in Advanced Audio Properties.
FAQ
Do I have to use the Auto-Configuration Wizard?
No. It’s a good starting point, but steps 4 to 8 get you to the same result, and you know exactly what’s set.
Simple or Advanced output mode?
For your first stream, Simple with 6000 Kbps and the hardware encoder is enough. You need Advanced for the keyframe interval, tuning, separate audio tracks and the Twitch VOD Track.
Why 6000 Kbps and not more?
6000 Kbps (6 Mbps) is Twitch’s recommendation for 1080p60 and the cap OBS sets for Twitch. Twitch allows more through Enhanced Broadcasting, where Twitch manages the bitrate itself.
Where do I control what viewers hear?
In the audio mixer. Every audio source has a fader there, and Advanced Audio Properties covers monitoring, sync and tracks.
Does this work with a console?
Yes, with a capture card. You add the card as a Video Capture Device. For an example with a PS5 and the AVerMedia Live Gamer ULTRA 2.1, see the GTA 6 guide.
Wrapping up
With your own profile, 1080p60, a hardware encoder at 6000 Kbps and each sound coming from only one source, you’ve got an OBS setup that runs reliably. Do a quick test recording before every stream and glance at the stats, so you catch problems before your viewers do.
* Affiliate link: As an Amazon Associate I earn from qualifying purchases. It costs you nothing extra. More info
Did this guide help you? You can buy me a coffee on Ko-fi. It keeps MappleBox ad-free.